


Other articles by David
-

ElevenLabs with Prenly | AI Text-to-Speech for Newspapers and Magazines
25 Aug 2026
Can you use ElevenLabs with Prenly? Yes. ElevenLabs is one of the text-to-speech providers supported by Prenly as part of Enhanced Text-to-Speech. Once the feature has been configured, audio can be generated automatically for new publications, imported and made available to readers.For newspapers, magazines and other publishers, this means readers can choose to listen to articles instead of only reading them. Enhanced Text-to-Speech uses voices from external text-to-speech providers instead of the standard voices built into browsers, mobile phones and other devices. What is Enhanced Text-to-Speech in Prenly? Enhanced Text-to-Speech converts written articles into audio using voices from external text-to-speech providers. Compared with the standard voices available in browsers and mobile devices, these voices can offer more natural pronunciation, better rhythm and intonation. This creates a better listening experience while also giving readers another way to access the content. Enhanced Text-to-Speech can be used to: make content more accessible, give readers the option to listen to articles instead of reading them, improve audio quality and create a more natural listening experience, improve narration for languages where standard device voices are limited. Does Prenly support ElevenLabs? Yes. ElevenLabs is one of the text-to-speech providers currently supported by Prenly as part of Enhanced Text-to-Speech. To use ElevenLabs with Prenly, you first need an ElevenLabs account and the credentials required for the integration. You then send these details to Prenly, and we configure Enhanced Text-to-Speech for your publication. Prenly currently supports the following text-to-speech providers: ElevenLabs Microsoft Azure Google Cloud Text-to-Speech Amazon Polly Narakeet This allows you to compare different voices and choose the provider that best suits your publication's language and requirements. How does the ElevenLabs integration work with Prenly? Once Enhanced Text-to-Speech has been configured, audio generation becomes part of your existing publishing workflow. You continue uploading new publications to Webarch as usual. The audio is then generated, imported and made available automatically. How the process works, step by step 1. Choose a text-to-speech providerCreate an account with a provider supported by Prenly, such as ElevenLabs. ↓ 2. Obtain the required detailsDepending on the provider, this may include an API key, selected voice, language or region. ↓ 3. Send the details to PrenlySend the required credentials to Prenly so the integration can be configured for your publication. ↓ 4. Publish as usualContinue uploading new publications to Webarch as part of your normal publishing workflow. ↓ 5. Audio is generated automaticallyThe audio is generated, imported and made available automatically for the new publication. What do you need to use ElevenLabs with Prenly? To activate Enhanced Text-to-Speech with ElevenLabs, you first need an ElevenLabs account. Once the account has been created and you have received the required credentials, send them to hello@prenly.com. Prenly will then configure the integration for your publication. The exact details required depend on the text-to-speech provider you choose. They may include: selected voice, Speech Key, API key or JSON key file, region, language, voice gender. Once the integration has been configured, you can continue uploading publications to Webarch as usual. The audio is then generated, imported and made available automatically. Please note: only publications uploaded after Enhanced Text-to-Speech has been activated will receive enhanced audio. Existing publications are not processed automatically. Why use Enhanced Text-to-Speech? Enhanced Text-to-Speech gives readers another way to access your content. Instead of only reading an article, they can also listen to it. By using external text-to-speech providers, publishers can also choose voices with more natural pronunciation, rhythm and intonation than many of the standard voices available in browsers and mobile devices. Make content more accessible Offering articles as audio makes the content available in an additional format and gives readers more ways to access it. Let readers choose between reading and listening With Enhanced Text-to-Speech, the same article can be made available both as text and as narrated content. Create a more natural listening experience Enhanced Text-to-Speech uses voices from external providers instead of the standard voices in browsers and mobile devices. Depending on the provider and voice selected, this can provide better pronunciation, rhythm and intonation. Which text-to-speech providers does Prenly support? Prenly currently supports Enhanced Text-to-Speech with the following providers: ElevenLabs Microsoft Azure Google Cloud Text-to-Speech Amazon Polly Narakeet The quality of the generated audio depends on the provider and voice selected. It can therefore be useful to compare the available voices from the different providers before deciding which solution best suits your publication. ElevenLabs is one of several options ElevenLabs is not the only text-to-speech provider that can be used with Prenly. You can also choose Microsoft Azure, Google Cloud Text-to-Speech, Amazon Polly or Narakeet. This allows you to select a provider based on the voices, languages and settings that best suit your publication. Frequently asked questions about ElevenLabs and Prenly Can you use ElevenLabs with Prenly? Yes. ElevenLabs is one of the text-to-speech providers currently supported by Prenly as part of Enhanced Text-to-Speech. Does Prenly have an ElevenLabs integration? Prenly supports ElevenLabs as a text-to-speech provider within Enhanced Text-to-Speech. Once the configuration is complete, ElevenLabs can be used to generate audio for new publications. Do we need our own ElevenLabs account? Yes. To use ElevenLabs with Prenly, you first need to create an ElevenLabs account and obtain the credentials required for the integration. How do we connect ElevenLabs to Prenly? Once you have created an account and obtained the required details, send them to hello@prenly.com. Prenly will then configure Enhanced Text-to-Speech for your publication. Is the audio generated automatically? Yes. Once the integration has been configured, you continue uploading publications to Webarch as usual. The audio is then generated, imported and made available automatically. Which other text-to-speech providers does Prenly support? Prenly currently supports ElevenLabs, Microsoft Azure, Google Cloud Text-to-Speech, Amazon Polly and Narakeet. Will existing publications automatically receive Enhanced Text-to-Speech? No. Only publications uploaded after the integration has been activated will automatically receive Enhanced Text-to-Speech. Existing publications are not processed automatically. Is the audio quality the same with every provider? No. The quality of the generated audio depends on the text-to-speech provider and voice selected. Learn more about Enhanced Text-to-Speech For technical information about configuration, credentials and the text-to-speech providers supported by Prenly, read our Enhanced Text-to-Speech guide. Want to use ElevenLabs with Prenly? If you would like to activate Enhanced Text-to-Speech for your publication, have questions about the configuration or would like more information about pricing, please contact us at hello@prenly.com.
-

Building Trust in Digital Publishing & Credibility
13 Aug 2026
In today's digital age, where information is abundant and easily accessible, distinguishing fact from fiction has become increasingly challenging. The proliferation of "fake news" has eroded public trust in media, making it imperative for digital publishers to prioritize credibility and accuracy. This article offers a comprehensive guide for publishers to navigate this complex landscape and establish themselves as trusted sources of information.The Impact of Misinformation Before diving into solutions, it's essential to understand the profound impact misinformation can have. Consequences: Eroded Public Trust: When readers encounter false information, their trust in media as a whole diminishes. Misguided Decisions: Misinformation can lead to readers making decisions based on false premises. Damage to Reputation: For publishers, even a single instance of misinformation can tarnish their reputation for years. Pillars of Trustworthy Publishing To combat the tide of misinformation, publishers must adhere to several foundational principles. Accuracy: Fact-Checking: Employ a rigorous fact-checking process for every piece of content. Citing Sources: Always cite reliable and original sources for any claims or data. Transparency: If errors are made, correct them promptly and transparently. Independence: Avoiding Bias: Strive for objectivity and avoid any potential conflicts of interest. Editorial Integrity: Ensure that editorial decisions are not influenced by external pressures, such as advertisers. Fairness: Balanced Reporting: Present multiple sides of a story, giving readers a comprehensive view. Right to Reply: Allow individuals or entities mentioned in a story a chance to respond or offer a counterpoint. Practical Strategies for Building Trust In the battle against misinformation, actionable strategies are the publisher's best defense. Utilize Fact-Checking Organizations: Third-Party Verification: Collaborate with organizations like FactCheck.org or PolitiFact to verify contentious claims. Fact-Checking Tools: Use tools like MediaWise or Snopes to cross-check information. Foster Reader Engagement: Open Channels of Communication: Allow readers to report errors or questionable content. Feedback Loop: Regularly engage with readers, addressing their concerns and feedback. Training and Development: Continuous Learning: Ensure that editorial teams are trained in the latest fact-checking techniques. Workshops: Conduct workshops on understanding biases, verifying sources, and recognizing misinformation. The Role of Technology in Combatting Fake News In the digital age, technology is both a challenge and an ally. AI and Machine Learning: Automated Fact-Checking: AI can scan vast amounts of content quickly to identify potential falsehoods. Pattern Recognition: Machine learning can detect patterns typical of fake news stories or unreliable sources. Blockchain: Immutable Records: Blockchain can be used to create tamper-proof records of published content, ensuring authenticity. Source Verification: Track the origin of a piece of information or image, ensuring it hasn't been altered. Case Studies: Publishers Getting It Right Several publishers have set exemplary standards in ensuring credibility. The New York Times: Their transparent corrections policy and rigorous fact-checking have set industry standards. BBC: Their "Reality Check" team specifically addresses false claims circulating in the public domain. Conclusion Building trust in the age of fake news is neither quick nor easy. It requires a combination of adhering to journalistic principles, employing rigorous fact-checking processes, leveraging technology, and maintaining an open dialogue with readers. Publishers that prioritize these elements not only safeguard their reputation but also play a crucial role in upholding the integrity of the media landscape.
-
Multi-Channel Publishing
23 Jul 2026
With Multi-Channel Publishing (MCP), a single publication can be prepared for delivery to multiple external systems.Once configured, the exports are generated automatically as part of the publication workflow, so no manual export process is required for each issue. What is it used for? Multi-Channel Publishing is used when your publication needs to be delivered to one or more external systems in a specific file format. Common examples include deliveries to libraries or archive systems. Instead of creating these exports manually for every publication, the required files are generated automatically according to the configured setup. How is it implemented? To configure the export, we need the following information: Which output format(s) should be generated (for example, EPUB)? What is the preferred file naming convention (for example, title_yyyymmdd)? Where should the generated files be delivered? Once this information has been provided, we configure the export workflow for you. Read more More information can be found on the webpage. If you are interested in using this feature or have questions regarding it, please contact hello@prenly.com.
-

Activate vouchers for easy access to your apps
7 May 2026
The voucher function allows you to give readers temporary access to your content through redeemable voucher codes. These vouchers can be used for promotions, partnerships, giveaways, or temporary free access to your application. You can either: Create one shared code for all users (Generic Voucher) Generate individual codes for specific users (Unique Vouchers) How to Activate the Voucher Function Click Applications in the left-hand menu. Select the application you would like to add vouchers for. Go to Application settings. Scroll down until you see the Vouchers section. Toggle the function on. In the left-hand menu, go to Settings → Vouchers. Click New. You will now see two different voucher types: Generic VoucherEvery user redeems access using the same voucher code. Unique VoucherIndividual voucher codes are generated for each user. General Setup Steps The following settings are available for both voucher types: Name and DescriptionAdd an internal name and description for the voucher. PackageChoose which package the voucher should give access to. Find out here how to create packages → ApplicationSelect the application where the voucher will be valid. Valid for Days After RedemptionChoose how many days of access the reader should receive after redeeming the voucher. Max Number of RedemptionThis determines how many times in total the voucher can be redeemed. Redemption PeriodChoose the period during which the voucher can be redeemed. If a reader redeems the voucher on the last valid day, they will still receive access for the full number of days configured in Valid for days after redemption. After activation, the voucher can no longer be edited. However, it can still be terminated whenever needed. Setting Up a Generic Voucher CodeChoose the voucher code readers should use, for example: SUMMER26 Once everything is configured: Click Activate. Setting Up Unique Vouchers PrefixOptionally choose a custom prefix for the generated codes.If left empty, the prefix will be generated automatically. CodesChoose how many unique voucher codes should be generated. Once everything is configured: Click Activate and Generate.A download button will then appear.Click the button to download a CSV file containing all generated voucher codes. If you download the CSV file again later, you will also be able to see which codes have already been redeemed and which are still unused. Make Voucher Redemption Visible for Readers Web Application Go to applications and select menu, then choose web. Click add menu section and select Redeem voucher. You can change the menu name if wanted and select an icon. This adds the voucher redemption option to the menu of your web application. Native Apps (iOS & Android) In native apps, readers can redeem vouchers under Settings.
-

Startpage ads
13 Apr 2026
What is it? Home page ads allow you to display ads directly in your home page layout. These ads can be placed between your existing components as a natural part of the page. The content of the ad is defined via a script that controls what is shown to the user. How is it implemented? To create a homepage ad, go to Marketing in the left menu of Prenly Workspace and select Ads. Click on New and select New landing page ad. Name your ad Start by giving the ad a name. This is an internal name used only to help you identify and manage your ads. Where on the home page should the ad appear? Next, choose where to place the ad on the homepage. You can place it at the top, at the bottom or between existing components. If several ads are assigned to the same position, you can control their order by setting a priority. When should the ad be active? Specify when the ad should be displayed by selecting a start date and, if necessary, an end date. The ad will be automatically activated and deactivated based on this time range. Make sure to select the correct time zone. Ad content Next, specify how the ad will be displayed by pasting a script. This script determines the content of the ad. You can find a sample script at the bottom of the page. What are the sizes of your ad? You also need to specify the ratio between the height and width of the ad by entering one or more sizes. If only one size is specified, that ratio will be used on all devices and in all orientations. If multiple sizes are specified, the width will act as a breakpoint to customize the layout accordingly. (Recommended sizes are listed below.) In which applications should the ad be displayed? Finally, select the application where the ad will be displayed.When everything is ready, don't forget to switch the ad from inactive to active to make it visible. Example: Example script < script>(function () {var TAG = '[ta-ad]';console.log(TAG, 'script running');// Capture insertion anchor immediately - document.currentScript is the// reliable way to find "where this script tag lives" in most ad contexts.var anchor = document.currentScript;if (!anchor) {var all = document.getElementsByTagName('script');anchor = all[all.length - 1];}console.log(TAG, 'anchor:', anchor, 'parent:', anchor && anchor.parentNode);// Fontsvar preconnect1 = document.createElement('link');preconnect1.rel = 'preconnect';preconnect1.href = 'https://fonts.googleapis.com';document.head.appendChild(preconnect1);var preconnect2 = document.createElement('link');preconnect2.rel = 'preconnect';preconnect2.href = 'https://fonts.gstatic.com';preconnect2.crossOrigin = '';document.head.appendChild(preconnect2);var fontLink = document.createElement('link');fontLink.rel = 'stylesheet';fontLink.href = 'https://fonts.googleapis.com/css2?family=Merriweather:ital,opsz,wght@0,18..144,300..900;1,18..144,300..900&family=Playfair+Display:ital,wght@0,400..900;1,400..900&display=swap';document.head.appendChild(fontLink);// Styles (scoped under .ta-ad to avoid clobbering the host page)var style = document.createElement('style');style.textContent = ['.ta-ad{position:relative;width:100%;height:100%;min-height:200px;overflow:hidden;cursor:pointer;background:#333;}','.ta-ad .ta-ad-bg{position:absolute;inset:0;width:100%;height:100%;object-fit:cover;opacity:0;transition:opacity 1.5s ease-in-out;z-index:1;}','.ta-ad .ta-ad-bg.active{opacity:1;}','.ta-ad .ta-ad-text{position:absolute;left:10px;bottom:10px;right:auto;top:auto;z-index:2;display:flex;flex-direction:column;align-items:flex-start;gap:5px;margin:0;padding:0;font-family:"Merriweather",serif;font-optical-sizing:auto;font-style:normal;font-variation-settings:"wdth" 100;color:#fff;}','.ta-ad .ta-ad-text h1,.ta-ad .ta-ad-text h2{background:#000000b8;padding:9px 16px;display:inline-flex;margin:0;line-height:1.2;}','.ta-ad .ta-ad-text h1{font-size:4vw;}','.ta-ad .ta-ad-text h2{font-size:2vw;min-width:8.4vw;}'].join('');document.head.appendChild(style);// Markupvar container = document.createElement('div');container.className = 'ta-ad';container.addEventListener('click', function () {window.open('https://www.textalk.se', '_blank');});var img1 = document.createElement('img');img1.className = 'ta-ad-bg active';var img2 = document.createElement('img');img2.className = 'ta-ad-bg';var textWrap = document.createElement('div');textWrap.className = 'ta-ad-text';var h1 = document.createElement('h1');h1.textContent = 'This is a sample ad!var h2 = document.createElement('h2');textWrap.appendChild(h1);textWrap.appendChild(h2);container.appendChild(img1);container.appendChild(img2);container.appendChild(textWrap);// Insert where the script tag lives - unless the script is in // (some ad platforms inject creatives into, where nothing renders). // In that case, or if the anchor is missing, fall back to.function mount() {var parent = anchor && anchor.parentNode;var inHead = parent && parent.nodeName === 'HEAD';if (parent && !inHead) {parent.insertBefore(container, anchor);} else if (document.body) {document.body.appendChild(container);} else {//doesn't exist yet - wait for it.document.addEventListener('DOMContentLoaded', mount);return;}console.log(TAG, 'container inserted into', container.parentNode && container.parentNode.nodeName, 'size:', container.offsetWidth, 'x', container.offsetHeight);}mount();// rotationvar images = [img1, img2];var current = 0;function loadInto(idx) {var url = 'https://picsum.photos/1400/400?random=' + Date.now();console.log(TAG, 'loading image', idx, url);images[idx].onerror = function (e) {console.warn(TAG, 'image failed to load', idx, url, e);};images[idx].src = url;}function nextImage() {var next = (current + 1) % images.length;images[next].onload = function () {console.log(TAG, 'image loaded', next);images[next].classList.add('active');images[current].classList.remove('active');current = next;};loadInto(next);}images[0].onload = function () { console.log(TAG, 'image loaded 0'); };loadInto(0);setInterval(nextImage, 5000);// ClocksetInterval(function () {h2.textContent = new Date().toLocaleTimeString();}, 500);})();< /script>
-

Dark Mode for Publishing Apps | New Feature in Prenly
10 Mar 2026
We are excited to introduce a highly requested new feature in Prenly: Dark Mode.Dark Mode means that the app is displayed with a dark color theme where backgrounds become darker while text and interface elements are adjusted to remain clear and readable. For readers using apps for newspapers, magazines and digital publications, Dark Mode makes it easier and more comfortable to read in low-light environments. For publishers, this creates a modern reading experience that can contribute to: longer reading time better user experience lower battery consumption on the reader’s device Dark Mode is now a standard feature in many apps, and it is now also available in Prenly – the platform for digital publications and publishing apps. Prenly automatically follows the user’s Dark Mode settings Prenly is built for modern publishing apps for newspapers and magazines. When a reader has Dark Mode enabled on their device, Prenly will automatically display the app in dark mode. This applies to: iOS apps Android apps web browsers This means the reader does not need to change any settings in the app itself – the experience automatically adapts to the device’s system settings. Customize Dark Mode in Prenly Workspace As a publisher, you can easily customize how Dark Mode appears in your app directly in Prenly Workspace. By adjusting colors and logo, you can ensure that: your brand identity is preserved the app remains clear in dark mode readability stays optimal.If you do not make any changes, Prenly’s default Dark Mode theme will be used. The launch takes place in two stages 1. Dark Mode in Workspace and web You can now log in to Prenly Workspace and customize colors for Dark Mode. At the same time, Dark Mode is available in the web app so you can test and preview your changes directly. Customize Dark Mode in Workspace -> 2. Dark Mode in iOS and Android apps In the next step, Dark Mode will also be launched in Prenly’s native apps for iOS and Android. When the feature is activated, readers who use Dark Mode on their devices will automatically see your app in dark mode. How to customize Dark Mode in your Prenly app Configuring Dark Mode in Prenly is simple. 1. Log in to Prenly Workspace 2. Go to Applications and select the app you want to manage 3. Under Color Theme, adjust colors for example: top bar menu navigation bar buttons 4. Under Homepage, adjust colors in the Dark column and upload a Dark Mode-optimized logo if you use a logo. Read the detailed guide here -> A modern reading experience for digital publications With Dark Mode, Prenly continues to develop the platform for digital publishing and apps for newspapers and magazines. The feature allows publishers to offer a modern and flexible reading experience that adapts to readers’ preferences. For readers, this means: more comfortable reading in dark environments reduced visual strain a modern app experience We hope you will enjoy Dark Mode in Prenly. If you have any questions, you are always welcome to contact Prenly support and we will be happy to assist you.
-
Annotate links in Adobe software
24 Oct 2025
By following the easy guides below, you will get information on how annotations and links, as well as attachments, work in PDF. Links and attachments in PDF files In Adobe Acrobat 1. Create a link using the Link toolChoose Tools > Edit PDF > Link > Add or Edit. 2. The pointer becomes a crosshair (+), and any existing links in the document, including invisible links, are temporarily visible. Drag a rectangle where you want to create a link. This is the area in which the link is active. 3. In the Create Link dialogue box, choose the options you want for the link appearance. 4. Select one of the following link actions: 5. Go To A Page ViewClick Next to set the page number and view magnification you want in the current document or in another document (such as a file attachment), and then click Set Link. 6. Open A FileSelect the destination file and click Select. If the file is a PDF, specify how the document should open (for example in a new window or within an existing window), and then click OK. Note:If the filename is too long to fit in the text box, the middle of the name is truncated. 7. Open A Web PageProvide the URL of the destination web page. 8. Custom LinkClick Next to open the Link Properties dialog box. In this dialog box, you can set any action, such as reading an article, or executing a menu command, to be associated with the link. You can read the entire guide at Adobe:https://helpx.adobe.com/acrobat/using/links-attachments-pdfs.html In Adobe Indesign Overview of the hyperlinks panel You can create hyperlinks when exporting to Adobe PDF or SWF so that the reader of the document can click a link and go to other pages in the same document, to other documents, or to websites. Hyperlinks that you export to PDF or SWF in InCopy are not active. A source can be a hyperlinked text, a hyperlinked text frame, or a hyperlinked image frame. A target is the URL, file, email address, text, anchor point, or shared target to which the hyperlink leads. A source can only lead to one goal, but an unlimited number of sources can lead to the same goal. Please read the entire guide at Adobe:https://helpx.adobe.com/se/indesign/using/hyperlinks.html
-

Export statistical data
24 Oct 2025
Do you want to export statistical data for your selected e-paper solution from Prenly? There are few steps but this guide will guide you through the process. Preparation The very first thing you will have to do is to sign in to your Google Analytics account. If you have more than one Analytic property then you will need to select the correct property you want to extract data from. If you are not currently in the Reports view, please select "Reports" in the left-most side menu. Google Analytics will automatically minimise this sidebar so you might need to expand the sidebar to select "Reports". Select Reports in the left sidebar menu. Export statistical data per selected report Select which Analytics report you would like to extract the available data. There are several categories and subcategories of reports. Below you can find an illustration of the general report setup. Analytics general report categories overview. 1. Select the "Share this report"-icon located in the top-right corner of the report. Follow-up by selecting "Download file". 2a. Select "Download PDF" to download the currently selected report view as a PDF. 2b. Select "Download CSV" to download the available data for the currently selected report. Select the icon "Share this report". Select "Download file". Select "Download CSV" to download the report data. Select "Download PDF" to download a PDF-version of the report.
-

Rights & Roles
24 Oct 2025
In Prenly Workspace, you as an account owner can also invite your team members with different rights and roles to make it smoother and easier to manage. Here you see the different rights and roles a team member can have. Full PermissionWe always give the main contact who is the owner of your Prenly Workspace Full Permission. It gives them access to all functions in the system as well as the right to administrate and invite new team members. EditorAn editor can create, plan, schedule & publish editions, as well as edit and approve everyone's articles. ReaderA reader can read all publications in a reader application, as long as the application has been configured to grant permissions for administrator accounts. Application manager An application manager can create, view and update applications. MarketerA marketer can create, view and update ads as well as push notifications. Delete a right, role or team member By clicking the trash can to the right of a role, you can easily delete it. And finally, if you want to delete a team member completely, click on the "three-dot menu" at the top right under your name and then on Delete team member.
-
Create account & log in
24 Oct 2025
To activate your account and access the magazine, follow these steps: Mobile appIf you are in the mobile app and past the app's various introductory steps, click on the edition of the magazine you want to read, or on settings followed by "Log in", both of these paths will take you to the login box. Web page If you are on the website, click on "LOG IN" at the right of the line at the top, or on the edition of the magazine you want to read, both of these paths will take you to the login box. Click on the link "Create account".Fill in your e-mail address and your desired password and click on the blue button "Create account". The password can then be changed under "Show profile" -> "Change password" in logged in mode once your account is activated. A green text indicating that an activation email has been sent appears below the account creation button. Go to your email client and check your inbox. If you do not find the letter in the inbox, it may have been filtered out and thus ended up in the mailbox for Spam. Click on the blue button "Confirm account" in the email. The following steps arise if the e-mail address you entered has not been registered in connection with the creation of your subscription. In the next step, select "Link account to subscription". In the box under "Add subscription", fill in your customer number. Press the "Register" button. Now you are done and can read the magazine in your smartphone, on your tablet or in your computer. You can read it like a regular newspaper, or you can click on the articles to read them in larger text or on a different background. You also have the opportunity to have your newspaper read out loud. Feel free to click through to the tools and try the possibilities! Here is also a video guide.
-
Interstitial ads
24 Oct 2025
Interstitial ads are full-page ads that appear between the pages of the e-newspaper. You can create a new ad or manage an existing one at any time in Prenly Workspace. They are dynamically added to the e-newspaper without appearing in the PDF or in the print version of the newspaper. They are created and managed in Prenly Workspace. We also offer a premium service to make managing Interstitial ads easier. In this case, they are created and managed within our service and inserted into Prenly Workspace as HTML ads—one version for portrait orientation and one for landscape. Learn more about this service and sign up at ctabtn.comRequirements HTML. The minimum requirement for Prenly to display your ad is to include an image tag in HTML within the ad content configuration. HTTPS. For security reasons, your ad image source must use HTTPS for the ad to be displayed in your e-newspaper. ClickableAd. If you want your ad image to be clickable for readers, you need to wrap the image tag in a link tag. You can use scripts from external ad servers such as Google Ad Manager to dynamically display in-article ads, but keep in mind that this type of advanced integration requires thorough testing. For this purpose, we have developed a number of features described further down on this page. Here’s how to do it In the left-hand sidebar of Prenly Workspace, select “Marketing” and then “Ads.” 1. Create a new in-feed ad by selecting “New.” 2. Name your ad. Readers won’t see this name; it’s only used so you can find your ad among the others in the ad list in the future. 3. Specify on which page(s) your ad should appear. If you want to select multiple pages, separate them with commas. The ad will appear after the specified page and before the next spread is displayed. 4. Select the date range during which the ad will be displayed. You can choose to specify a start date and keep the ad active indefinitely, or select a specific date range by entering a start and end date. If you choose the latter, the ad will become inactive after the specified end date. Otherwise, you’ll need to visit the ad again to deactivate it. 5. Enter valid HTML in the form of an image tag. Material Specifications Portrait format: 1100 × 1700 pxLandscape format: 1700 × 1100 pxImage format: JPG, PNG, or GIF, max 500 kBVideo format: MP4 (H.264)Delivery: All media must be hosted on HTTPS Upload the material directly to ctabtn ( if you have an account) or provide an external link to the image or video. Both images and videos are supported. If landscape material is not available, the portrait version will be used even in landscape orientation, but we recommend submitting both formats. Choose whether you want a different image for portrait and landscape orientations. You must specify one of these, but only one is required. For example, if you choose to provide content for portrait mode but omit landscape mode, Prenly will use the samecontent to display your ad regardless of whether the reader is viewing in portrait or landscape mode. To create a clickable ad image—meaning readers can click on the image and be taken to the desired ad destination—you also need to include a link tag () that wraps around your image tag. The link destination (the href attribute)mustuse HTTPS for security reasons. What is HTTPS? HTTPS is encrypted communication with web addresses, and the protocol is specified as "https://". Comparehttp://example.com/ andhttps://example.com/. Many web browsers display a padlock icon in the address bar to indicate that it is an HTTPS connection. Why is HTTPS required? For security reasons, Android can only open secure links; therefore, all links that leave the e-newspaper must use HTTPS, even if you only have a web app. This also provides a more secure experience for your readers. To display a dynamic ad—one that, for example, changes its content—you need to use JavaScript. JavaScript is accepted,butthe script must return an `img` tag and, if applicable, a surrounding `link` tag when executed. Prenly willnotvalidate your HTML code. We recommend that you test your code on an HTML page. Sample code for an image: Portrait: < img src="{INSERT-IMAGE-SRC}" alt="Advertisement" width="1100" height="1700" style="display: block; width: 100%; max-width: 100vw; max-height: 100vh; object-fit: contain; margin: 0 auto;" > Landscape: < img src="{INSERT-IMAGE-SRC}" alt="Advertisement" width="1700" height="1100" style="display: block; width: 100%; max-width: 100vw; max-height: 100vh; object-fit: contain; margin: 0 auto;" > You can experiment with different ad sizes to find what works best. We recommend that they match your format. Sample code for video (mp4): H.264-encoded videos are required to work in Safari. Specify image-related content for the ad. Use ctabtn.com to create ads One-time campaign: Create a campaign in ctabtn, copy the code, and insert it as an interstitial ad in Prenly Workspace. This is suitable when a campaign is to run for a limited period. Recurring campaign space (recommended): You create a campaign space in ctabtn and insert its code once in Prenly Workspace. After that, you manage everything in ctabtn: which campaigns will appear in the space, when they start and end, and how they should be distributed when multiple campaigns are active at the same time. You do not need to go back into Prenly Workspace. Here’s how to do it in Prenly Workspace: Create the campaign or campaign space in ctabtn.com and copy the code for portrait and landscape orientations, respectively. Follow steps 1–4 above. Paste the code for portrait orientation into the portrait field and the code for landscape orientation into the landscape field. Activate the ad and save. Always check the result in the app or browser after publishing. If you change the creative, target URL, or display orientation for a single campaign in ctabtn, you must copy the new code and replace it in Prenly Workspace. If you’re using a recurring ad slot, the code never needs to be replaced. When no campaign is active in the ad space, the ad codeautomaticallycallswindow.PrenlyAd.collapseAd(). The Prenly app then hides the entire ad space so that the reader never sees an empty space. Therefore, keep the recurring ad active in Prenly at all times. Title ControlA campaign can be limited to one or more titles. If the field is left blank, the campaign will appear in all titles where the ad space is present. Statistics are also reported by title, so you can see where the campaign performs best. Consent and PrivacyThe ad code reads the reader’s consent via window.PrenlyUserConsent(CMP). The ad is displayed regardless of consent—even if the reader has not consented to ad tracking, the ad will still be displayed, but the statistics are collected anonymously and in aggregate. No TC strings, cookies, or identifiers are stored for individual readers. Statistics and ReportsFor each campaign, the number of impressions, number of clicks, and click-through rate are measured—both in total, by month, and by title. Each campaign is reported separately, even when multiple campaigns share the same ad space. You can also send reports directly from ctabtn to any email addresses—either on a one-time basis or automatically every week or month. The report shows the campaign name, where it was displayed, the number of impressions, and the number of clicks. Common Mistakes That Can Occur on ctabtn.com The material has been updated in ctabtn, but the old code remains in Prenly Workspace. Only portrait-oriented content has been added, which results in a poor display in landscape mode. The image is larger than 500 kB, which causes the ad to load slowly. Content hosted on HTTP instead of HTTPS is not displayed in the app. Using JavaScript from an ad server If you use JavaScript from an ad server, you can take advantage of some additional features that were developed for the web browser in May 2025 and are included in the iOS app starting with version 14.1.1 and in the Android app starting with version 12.10.0. As of May 2025, these new features are being used by a publisher who uses Google Ad Manager, and it is up to you to ensure that your integration works properly. The new extensions allow the ad script to capture the user’s consent settings in the PrenlyUserConsent object. And with the PrenlyAd object, you can instruct the app to hide an unbooked ad and capture data about the base URL and ad title. See the technical description at the bottom of this page. 6. Select the application(s) that will display the ad. 7. Select which titles within each selected application should display the ad. 8. Select "Save" to save your settings. If you cannot save after the last setting, you have missed a setting. Look for a red dot on the right-hand side and continue configuring the settings from that section. 9. Activate your ad using the toggle at the top. If the ad is inactive, you will activate it; if the ad isactive, you will deactivate it. An active ad will be sent to your e-newspaper and, based on your settings, will be displayed to your readers in newspaper reading mode. An inactive ad will not be displayed to readers when they swipe past the selected newspaper page. Example of an active ad. 10. Remove ad. To delete a selected ad, tap the three-dot menu in the top-right corner and then select “Delete Ad.” The ad will be deleted from Prenly Workspace and deactivated in your e-newspaper if the ad wasactive prior todeletion. Integration with external ad systems It’s possible to dynamically load in-article ads from external ad systems via JavaScript. This requires a good understanding of your ad system and its capabilities, as well as knowledge of JavaScript, and may not work for everyone. PrenlyAd The PrenlyAd object contains the "collapseAd" function, which you can use in your script to instruct the app to hide an ad slot when the ad system cannot deliver an ad. Instead of displaying an empty ad slot, the entire ad area is hidden. You can retrieve the "baseUrl" and "titleSlug" from the ad’s position in the e-newspaper to create a virtual URL in your script that you can use to target your ad from the ad system so that it appears under a specified title in the app. Example of how to create a virtual URL that can be used for targeting. url = window.PrenlyAd.baseUrl + "/p/" + window.PrenlyAd.titleSlug; window.PrenlyAd= { collapseAd: function // function that should be called to notify the native app that the ad is collapsed titleSlug: string // title slug that identifies the title associated with the interstitial ad baseUrl: string // base URL of the app} PrenlyUserConsent You can use the PrenlyUserContent object to retrieve the user’s consent settings and, based on those, determine whether to load dynamic ads from a third party (if the user has consented to ads) or internal static ads (when consent is not given). The object contains parameters to pass along the user’s selections from the CMP dialog and the TC string, if available. In cases where the iOS app has an ATT (App Tracking Transparency) prompt—which is sometimes required by Apple—the "att_granted" parameter is included. window.PrenlyUserConsent= { cmp: string, // CMP module name cmp_vendor_grants: dictionary, // dictionary containing vendor grants info if available cmp_purpose_grants: dictionary, // dictionary containing purpose grants if the CMP provider supports it prenly_purpose_grants: dictionary, // only available if the app uses Prenly CMP as the provider tc_string: string, // TC string if the CMP provider supports it att_granted: boolean // only if the app has ATT configured } Support Questions about in-app ads and ctabtn:hello@prenly.com
-

Change URL - CNAME
24 Oct 2025
In this guide, we'll walk you through how to create a CNAME record for your domain, so that your Prenly e-magazine can be accessed through its own URL, such as epaper.example.com. By setting up a CNAME, you point a subdomain (like epaper) to your Prenly homepage. This allows your visitors to use a clear and branded URL instead of a standard address. The guide shows you step-by-step how to ask your web host to do it for you, and how to set it up in your DNS yourself. CNAME with help from your hosting provider To make a CNAME pointing of your chosen subdomain to Prenly, you first contact your web host. Then you tell the web host that you want to make a CNAME pointing from your chosen subdomain (e.g. epaper.example.com) to Prenly, e.g. name.prenly.com (you replace name with your subdomain) Once a CNAME pointing has been made by the web host, contact Prenly's customer service:Email: hello@prenly.comChat: in Prenly AdminPhone: +46-31-388 47 40with information about which subdomain you have chosen and which your main domain is. Based on the above example, it is enough to tell us that you have made a CNAME on "epaper.example.com" and want to get this into your web app. Prenly will notify you when your web app has been moved to your new web address. Activating a CNAME pointing usually takes up to 24 hours and there are usually no costs involved. Please note that it must be a CNAME pointing. A regular REDIRECT will not work. What is a subdomain? A subdomain, also called a subdomain, is an extension to the main domain. The most frequent subdomain today is "www". In the web address (URL) "www.example.com", the "www" part is the subdomain; "example.com" is the main domain. For many web hosts, it is a main domain that customers need to buy. A subdomain usually doesn't cost anything extra, depending on which web host you have as a customer. Many of Prenly's customers have chosen to use the subdomain "epaper" for Prenly. Create a CNAME record yourself If you want to do this yourself through your web host, you usually follow these steps - but it may vary a bit depending on which web host you use. Step-by-step: Create CNAME record Log in to your web host's control panel (often called cPanel, DNS Editor, or similar). Navigate to DNS settings or DNS zone editor for your domain. Locate a function to add a new record.Fill in the details like this- Type: CNAME- Name/Host/Subdomain: ex etidning (if you use etidning.example.com)(sometimes you write etidning.example.com, sometimes just etidning depending on the platform) - Value / Target / Pointing to: name.prenly.com. (this value is the first URL you get from us, you can always ask for it from support if you don't remember)Note that the dot at the end is not always necessary, but some DNS systems require it - TTL: Leave it at default (e.g. 3600) Click on Save / Add record / Update. It can take up to 24 hours for the change to take effect globally (due to DNS caching), but it is often much faster. You can test that it works via e.g.: - https://dnschecker.org- Or through the terminal with: nslookup etidning.example.com
-

Rename components
24 Oct 2025
You can easily give your components individual names in Prenly Workspace. Under the Applications menu, select which application to edit. Then in the Home menu, click on the three-dot menu on the right of the component you want to rename. Click Rename and then enter the new name for the component and click Update and finally click the save button at the top right. The video below shows how to rename the components.
-

Create deep links to open the app
24 Oct 2025
To drive traffic to your iOS and Android apps, you can send out links that automatically open the app when the user clicks on them on a mobile device.These types of links are often colloquially referred to as deep links, but technically they are called "Universal links" in iOS and "App Links" in Android.Most Prenly apps automatically support deep linking, but if your app doesn't support it, it may need to be updated.You can check if deep linking works by copying some urls from the web reader, pasting into an email, sending the email to yourself, and opening the email on an iOS or Android device. Long press on a link to show that it can be opened in either the app or Safari.The links that work are of the type:- Link to home page: Example https://etidning.dn.se/ - Link to a page in an issue: Example https://esvd.svd.se/p/svenska-dagbladet/2023-06-09/r/4/6-7/1001/1016121- Link to article page: Example https://eavis.lokalavisen.dk/p/folkebladet/07-06-2023/a/auning-aktivitetspark-vokser-spaden-gar-snart-i-jorden-til-naeste-etape/2645/1012971/40483101- Link to title page and title summary (only available in some applications): Example https://emagasin.arcy.se/titleshttps://emagasin.arcy.se/title/amelia/3051- Link to the archive: Example https://eavis.lokalavisen.dk/search- Dynamic link to the latest issue in a title: Example https://eavis.lokalavisen.dk/p/adresseavisen/latest/2637Please note that this link must be created using the title-slug and title-id - which you will find in the regular url that the dynamic link opens, when typed, it points tohttps://eavis.lokalavisen.dk/p/adresseavisen/07-06-2023/r/1/1/2637/1012975where title-slug is "addresseavisen" and title-id is "2637".If the deep linking works properly, you can also in iOS - if you long press on a link in Mail - open a menu where you can choose whether you want to open the link in the Prenly application or in Safari. The iOS smart banner appears at the top of the mobile web page in Safari.Please note that not all Prenly applications are yet configured to support deep links. Please contact our helpdesk (hello@prenly.com) if your app does not work with deep links.Also note that deep links only open the app when you open a link from another application or webpage outside your own domain. If you manually enter a link in Safari or use a bookmark in Safari, the link will open in Safari. In Chrome for Android, the smart banner appears at the bottom of the webpage.If the app is not installed on your device, or the app cannot be opened for some reason, a "smart banner" should appear at the top of mobile Safari.There you can easily open the app or go to the AppStore to download it.The Android smart banner appears at the bottom of the webpage in mobile Chrome.If you click to close a smart banner, you can get it back by clearing your browser's cache.
-
Create a startpage for your application
24 Oct 2025
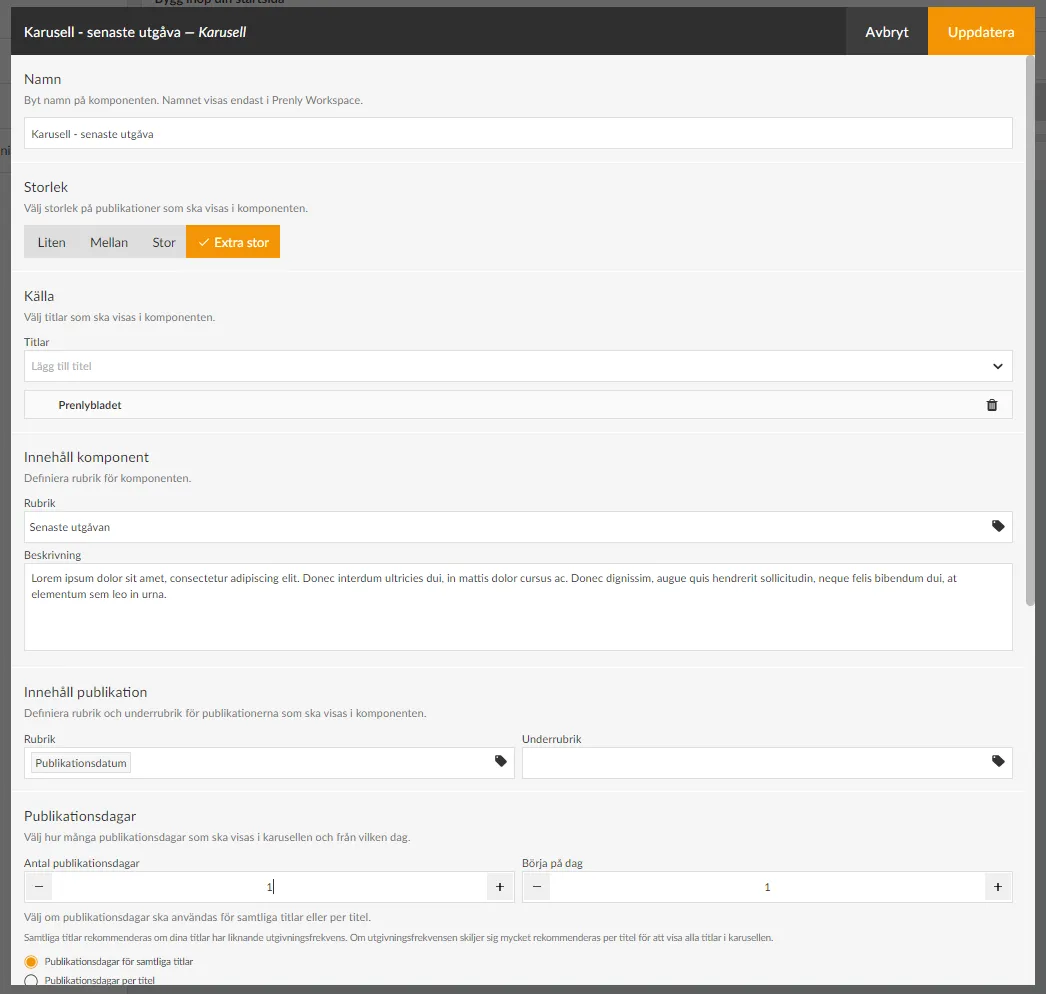
The start page is where everything in your app comes together. From here, you can guide them to your latest publication, older issues, articles, the latest podcast episode, or the content of your custom tabs in the mobile apps. All this is done by adding the right components, such as banners, flashbacks, podcasts, text, etc. To be able to manage the start page, you need to have the Application Manager role or higher. Below we go through how to create a start page and how the different components work. How to set up a start page 1. log in Log in via https://content.textalk.se with the user information you received from Textalk support. If you have forgotten your password, you can reset it via the Forgotten Password service. If you have forgotten your username, contact support via hello@prenly.com. 2. Select applications In the menu you should now see the option Applications (if you have the right authorization). Select the application you want to build/manage a start page for. A tip is to first look under Application settings so that your title is entered in the application. Read more here. Under the Home tab, build your page with optional components: All optional components Carousel Present the latest issue together with all parts and annexes, show the last 7 issues, highlight interesting annexes. Available in four different sizes. Editors Choice Highlight one or more publications of your choice from the archive in a carousel. Available in four different sizes. Banner Make your own design and upload as an image. Can link to external URL, publication, login, application or be completely without link. Flashback Take your readers back in history and rediscover old issues and articles. What really happened 1, 5 and 10 years ago? Articles Highlight articles directly on the start page to encourage reading. There is also the option to enable article audio playback directly on the start page. Podcast Highlight the latest podcast episodes. News item Display the latest issue of a newspaper, supplement or magazine, select a special issue to highlight to your readers. Hero Highlight an issue of a newspaper or magazine that is particularly important, such as the latest issue or that special publication everyone should see. Text Welcome your readers, tell them about your app, your vision or just take the opportunity to wish your readers a great day. Rights container If you have many titles in your application, you can choose to show only what a reader subscribes to. Fill the container with, for example, carousels to present the reader's newspapers. Web content Make content in your custom tab more visible by showcasing it directly on the start page. This requires the use of JS Bridge and a custom tab set up. 3. add a carousel We start by adding a Carousel to display the latest publication. - Name the carousel so you can keep track of what it contains later (e.g. "Latest publication".) - Choose between four different sizes to display. Test what works best for your title. In this case we choose an Extra large. - Under Source, select the titles to be included in the component. - Under Content component, put a Heading that your readers will see (e.g."Latest edition"). You can also write a descriptive text if you want. - Under Publication content, you define how your title will be presented in the carousel and the publication date. For the title, click on the tag icon and select, for example, Publication date. It is also possible to have a subheading that could, for example, be the name of the title if you have several different titles displayed in the same carousel. - Under Publication days , first select the number of days of the title to be displayed in the carousel. Keep in mind that the number of titles displayed in full depends on the size you selected (see above) and the unit in which the start page is displayed. In our case, we set 1 publication day to show only the latest publication. - Under Start on day, you can choose to skip, for example, the latest publication and start on day 2, which will be useful in our next carousel. We leave this on 1 in this case. If you have several titles displayed in the carousel, there is also a setting to show the number of publication days per title. We recommend that you select the Publication days option for all titles if your titles have a similar publication frequency. If the publication frequency differs a lot, it is recommended per title to show all titles in the carousel. - Under Text on archive link you can change the text Archive which is set as default. For example, if you want to write "See the whole archive" instead. - Under Download you can set whether the publications in the component should be able to be downloaded offline from the start page, then a download icon will appear. - The Appearance section allows you to change background colors, text colors, etc. in the component. We will leave them as default for now. - The last selection is Time limit. Here you can control whether the component is displayed for a specific period of time. You can choose either start time, end time or both. If a component has no required content, such as Title, the checkbox will be grayed out and cannot be activated until it is filled in, to prevent empty components from appearing on your start page. Use the drag-and-drop menu to put the components in the order you want them to appear on your start page. 4. Save component When you are done with the configuration, select Update in the top right corner. The component is now prepared for publication but is not yet visible to the reader. The checkboxes allow you to activate or deactivate components. Only active components will be visible. 5. Create another carousel to show more issues We add a new carousel to show the last 2-15 issues. Follow the steps above for more detailed instructions: - Select size Medium. - Add the title. - Set the title to e.g. "Read our older publications". - Set the number of publication days to 15 and start on day 2 (i.e. skip the latest publication which is already above). - Update. 6. other settings Make sure to also add your logo and brand colors so that your app feels familiar and clearly connected to your brand. Select the Background and top bar section. Here you can set the color of the top bar, the text color, and whether you want a different background color on the start page. More color settings can be found in the menu on the left under "color theme". You can upload a logo by clicking on Browse and selecting a suitable image. Here we can also choose to hide the top bar for the mobile version of the app (Android and iOS) but we leave it visible in this case. 7. Publish your start page. Now we have a basic configuration of the start page ready and we are ready to publish it. After each component there is a checkbox to activate the component. We drag it to the right so that it turns green and then click the Save and Publish button in the top right corner to finalize the setup. Congratulations, you have now created your start page! 8. Delete or modify a component If you want to remove a component from the start page, you can either deactivate it (if it will be used again later) by changing the checkbox to gray or click on the three dots next to the component to select Delete. If you want to change something, just click on the component to open its settings. Remember to save and publish each change! Note: If a checkbox is gray, it means that the component lacks the required content and it cannot be activated until it is complete. A black checkbox means that the component is inactive, but can be activated. A green checkbox means that it is activated but not published until you click Save and publish - you do this when everything is ready. 9. add more components Now you can start exploring our other components that, along with the carousels, will enhance the reader experience. For example, you can use a banner for ad slots, podcast feed and highlight articles from the latest issue. Try it out!
-

Retract publication
24 Oct 2025
If you want to delete the latest version of a publication and show the previous one for your readers it's easily done via Prenly Workspace. Here we show you how to do it. 1. Go to your Titles, choose the relevant title and click the publication you want to change. Navigate to the title and publication you wish to change. 2. Click the publishing date (or the little arrow next to it) to show all versions of the publication. Click the publication date to show the publication's version history. 3. Click the small trash can to delete the desired version of the publication. Delete the unwanted version by clicking the trash can. 4. Confirm that you want to delete the chosen version by clicking "Delete". Confirm the deletion by clicking "Delete". 5. Done! The version is now retracted and instead the previous one is published. The green box in the lower right corner confirms that the removal was successful.
-

Re-publish
24 Oct 2025
Re-publish the publication in order to let the readers receive the changes. Follow these simple steps to re-publish your publication: 1. Select "Publish...". Select "Publish..." to initiate a new publication version. 2. Select "Publish now" to publish the changes without reviewing the publish settings. If you want to review the settings, see the next step. Select "Publish now" to publish a new version with the standard publish settings. 3. Select a publish setting section to review the current settings. Select "What should the publication contain?" to select which articles to keep in the new publication version. Select which articles among the approved-for-publish articles you want to keep in the new publication version. Select "Next" to approve the current settings for the section. 4. The graphical interface will update when the publication has been re-published. Re-publish a scheduled issue If an issue is already scheduled for publication and you want to make changes, you need to reschedule it. You can see that an issue is scheduled by the yellow indicator in the top-right corner (see image). Make your edits, then select "Publish...". In the "When should it be published?" section, choose the new date and time, then click Next. Select which articles the publication should contain, then click Next. You don't need to enter a description. Simply click Done. Then select "Schedule for publishing". Done
-

Delete publications
24 Oct 2025
If you need to delete an unwanted publication, it is very easy to do it yourself via Prenly Workspace. Here we show how to do it. 1. Go to your Titles and select the relevant title. Navigate to the title that contains the publication you wish to delete. 2. Select the three-dot menu and then select "Delete". Click on the three-dot menu and then "Delete". 3. Confirm that you want to delete the publication by clicking "Delete". Confirm the deletion by clicking on "Delete". 4. The publication has now been removed! The green box in the lower right corner confirms that the removal was successful.
-

Three Decades of Digital Leaps: How Helsingborgs Dagblad Extends Its Reach with Prenly
22 Oct 2025
More than thirty years have passed since Helsingborgs Dagblad became pioneers by publishing their entire newspaper online—a journey that started with Textalk’s technology.Back then, Textalk built the tools not only to convert the printed newspaper into digital articles, but also to publish these articles in HTML format. That way, the entire newspaper was truly available online.Today, HD continues to break new ground with Prenly, making it easy to create fully digital special editions and integrate podcasts directly into the e-paper. The Challenge In 1995, the challenge was to get a daily newspaper online at all. Over time it became about offering readers more than just the printed edition—providing extra digital supplements and audio content in a smooth and efficient way. The Solution Prenly was set up so that HD could easily create digital special editions during major events, bundling them seamlessly with the e-paper without any need for print. In addition, Prenly automatically fetches HD’s podcasts from their specified podcast feeds. HD can decide whether all readers can listen to the podcast or if a specific subscription package is needed for certain channels. This also opens up new revenue opportunities for premium content. How It Works HD produces their regular e-paper. When needed, they create a digital special edition in Prenly. The special edition is automatically bundled with the e-paper. Podcasts are automatically pulled from HD’s existing feeds and integrated into the reading experience. Readers can listen to the podcasts directly in the e-paper, either openly or as part of a premium subscription. Why It Matters For Helsingborgs Dagblad, this means they can adapt their content quickly, provide more value to their readers, and create new revenue streams through premium offerings. Contact us to discover how Prenly can elevate your digital publishing to the next level!Read Helsingborgs Dagblad here
-

Over 40 Years of Accessibility: Göteborgs-Posten’s Digital Evolution with Prenly
22 Oct 2025
It all began in 1979 when Göteborgs-Posten launched the world’s first digital newspaper for the visually impaired, developed by Textalk’s founder Henrik Rubinstein.Textalk was there from the start and continues to work with Göteborgs-Posten to this day. Over the decades, they’ve grown from that pioneering accessibility project into a fully modern digital platform with Prenly. Challenge In 1979, Göteborgs-Posten needed to make their news accessible for visually impaired readers. As time went on, their needs expanded. By the mid-1990s, they were publishing classified ads online, building a media archive, and eventually needed a comprehensive digital platform for all their content. Solution Textalk built the original technology for the accessible newspaper and has been a part of their digital transformation ever since. Today, with Prenly, Göteborgs-Posten and the entire Stampen group distribute fully digital newspapers, thematic supplements, podcasts, and newsletters—all in one place. How it works Göteborgs-Posten produces their content and uploads it to Prenly. Prenly optimizes editions for tablets and mobile devices. Late updates or digital-only supplements are easily added. Everything integrates smoothly with their workflows. Readers enjoy a seamless experience, from main newspapers to podcasts and newsletters. Why it matters This has been crucial for Göteborgs-Posten. They’ve maintained accessibility for visually impaired readers while expanding into a fully digital offering. With Prenly, they’ve modernized their workflow, reduced costs, and delivered a better experience for their audience.Contact us to learn how Prenly can modernize your newspaper’s digital presence!Read Göteborgs-Posten e-paper here