



Other articles by Maria
-

Prenly Games webinar in English | September 22 | Prenly
15 Sep 2026
Following the response to our Swedish Prenly Games launch webinar, we’re hosting a new live session – this time in English.
-
Google | Create a Google Account
4 Aug 2026
A Google Account is required to access services such as the Google Play Console. Be aware: Create a Google Account, not a Google Workspace account. A Google Workspace account requires a paid subscription. Tip: We recommend using a shared or general email address (for example apps@company.com) that multiple people in your organization can access. This ensures you retain access in case of vacations, illness, or personnel changes. Option 1: Create a Google Account during Play Console registration If you are setting up a Google Play Console account, you can create your Google Account as part of the registration process: click here to get started. Option 2: Create a Google Account directly You can also create your Google Account first by visiting this link. Then follow these steps: Step 1: Click Create account. Step 2: Select For my personal use. Selecting For work results in creating a Google Workspace account. Step 3: Enter the account holder’s first name and, optionally, last name.Note: Google may later require identity verification using a valid government-issued ID. The account should therefore represent a real individual. Enter your date of birth. Adding your gender is optional. Choose one of the following: Use your existing email address by selecting Use your existing email, or Create a new Gmail address by following the prompts. Step 4: Verify your email address (if using an existing email). Google will send a verification code that must be entered to continue. Step 5:Create a secure password.Enable two-factor authentication (2FA) to improve the security of the account. This is strongly recommended and required for many Google services. Next steps Once your Google Account has been created, you can use it to sign in to Google services such as the Google Play Console. For more information, refer to Google’s official documentation:https://support.google.com/accounts/answer/27441
-

5 Ways to Give Content Access and Attract Subscribers
5 Jun 2026
Not every reader is ready to subscribe immediately. Try to strategically offer access to selected content to attract new audiences. Here are five effective ways to provide access to content while supporting audience growth and subscription conversion - find the ones that fit best for you: 1. Make a specific publication public for everyone Even if your content is normally protected by a paywall, you can choose to make a single edition freely available to all readers. This can be particularly effective for special editions, seasonal publications, breaking news coverage, or content that showcases the value of your publication to new audiences. To maximize visibility, feature the public edition prominently on your homepage using the Editor’s Pick component. This ensures visitors immediately see the publication you want to promote. By making selected content publicly accessible, you also increase the chances of being discovered through search engines and content recommendations. Learn how to make a publication public → 2. Share a specific publication via link Sometimes you might want to promote a particular edition by opening it for a specific audience. With a shareable publication link, you can grant access to a specific edition and distribute it through: Social media campaigns Email newsletters Partner collaborations Events and conferences Print advertisements QR code campaigns Anyone with the link can access the publication, even without a subscription. This approach is especially useful when measuring campaign performance, since you can track engagement from individual marketing activities and better understand which channels drive the most interest. Learn how to create a marketing link → 3. Make older publications public automatically Your archive can be one of your most valuable marketing assets. Instead of keeping every publication behind a paywall indefinitely, you can automatically make older editions publicly available after a defined period, such as 30, 60, or 90 days. This approach allows readers to experience the quality of your publication while keeping your newest content exclusive to subscribers. Many publishers use archive access as a way to balance subscription revenue with content discoverability. Why archive access improves discoverability Publicly available content can help your publication: Appear in Google search results Be discovered through AI-powered search experiences Build authority around specific topics Generate long-term organic traffic Reach readers who are researching a topic months or years later By combining premium content with accessible archive content, publishers can improve both visibility and subscriber growth. Learn how to configure archive access → 4. Offer free access to your entire application for a limited time Sometimes the best way to convert readers is to let them experience everything your app has to offer. With Free Days Access, readers can download your app and enjoy full access for a predefined number of days. Once the trial period ends, an active subscription is required to continue accessing content. This is an effective way to increase app downloads and reduce barriers for first-time users. For publishers focused on audience development, free trial campaigns can be an effective part of a long-term subscriber acquisition strategy. Learn how to set up Free Days Access → 5. Give temporary access using voucher codes Voucher codes are a flexible and measurable way to grant access to a specific title for a limited period. Option 1: Generic Voucher codes Running a marketing campaign? Create a simple voucher code such as SUMMER26 and promote it through: Social media Print campaigns Newsletters Partner organizations Your website Anyone who enters the code receives access according to the rules you define. Option 2: Unique Voucher Codes If you need more control, you can generate unique voucher codes and distribute one code per recipient. This allows you to: Track redemptions individually Limit access to specific users Measure campaign effectiveness Control distribution more precisely Voucher campaigns can be particularly useful for partnerships, membership organizations, event attendees and targeted acquisition campaigns. Learn how to create and manage vouchers → Measure the results of your campaigns Whichever access strategy you choose, measuring the results is essential. Basic metrics such as link clicks, voucher redemptions, or app downloads provide valuable insights. However, a statistics integration can help you understand the complete reader journey. With analytics in place, you can also see: How readers interact with your publications Which publications generate the most interest How long readers stay engaged Which pages receive the most attention Whether readers return after their first visit Which acquisition channels perform best How many readers eventually become subscribers These insights help you identify which campaigns are driving engagement, improving discoverability and generating subscription growth. Find out more about statistics option in Prenly →
-
User vs Session in Google Analytics
31 Mar 2026
A visitor (user) who uses the e-paper 100 times on the same device should be counted as one user, but 100 sessions. A user is thus a unique visitor per device. A user can be a returning visitor and thus a recurrent user (as long as the user can be traced back over several dates). A session is a traceable use (i.e. a traceable viewing of a "screen" in the app (in the web app "screen" is called "page")) of the e-paper within a fixed activity, where a new session is started due to inactivity (usually 30 minutes per default), where there is no upper limit on how long an active session can last. It is thus an activity that the user performs during a specific date. Whatever a user does in the app is always collected as part of a session, regardless of whether the user is reading in article or replica reading mode or just looking at other parts of the app (e.g. the home page or the archive).
-

Configure Analytics – Custom Definitions
30 Mar 2026
The statistics provided via Prenly are event-based. To see what events are available, see https://wiki.prenly.com/en/user-analytics/eventsEach event contains additional data in the form of event parameters. An event can be seen as something that happened, but if you want more information, you need to look at the event parameters. For example, if you are interested in the exposure of articles in article reading mode, you can look at the event data. On the other hand, if you are interested in seeing which articles have been exposed, you need to look at the event parameters associated with the event to get the answer. Google Analytics will by default list the available events. If you want to see the event parameter data, you will need to configure your Analytics, where it will take Google Analytics up to 48 hours to make the change take effect. By configuring Analytics to show the event parameters associated with an event, you can filter the data and view aggregated graphs per event parameter. To configure Google Analytics to expose event parameters, you must configure custom definitions and custom metrics. Configuring custom definitions Step 1. Select the Google Analytics property to configure. Step 2. In the menu on the left, select Admin (the cog). Step 3. Select Custom definitions in the property column. Step 4. Select Create custom dimensions to create a new custom dimension. Step 5. Dimension name: Enter the name you want. This will be displayed in the report data Scope: Must be set to "Event" Description: Optional: Optional. You can add a description for the event parameter. Event parameter: The parameter must be identical to the dimension of the event parameter, e.g. "article_slug". Once the above has been set, save the settings by selecting "Save". You can find the dimension of the event parameter by selecting an event on https://wiki.prenly.com/en/user-analytics/events, e.g. select the event article_open(https://wiki.prenly.com/en/user-analytics/events/article_open) and look in the column "dimension". You can also find the description for the event parameter by viewing the "description" column. Repeat steps four and five for each event parameter you want to configure. Below you can see an example of a setup for your Analytics. Once you have configured your Analytics, it will take Google up to 48 hours for the change to take effect. Please note that some event parameters ("time_spent" and "played_duration") need to be defined as "Custom metric" rather than "Custom dimensions". This is important to ensure that their values are aggregated. Additional bonus An added bonus after configuring your Analytics to expose the event parameters is that you can create a custom report via Looker Studio. By creating a custom report through Looker Studio, you have more control over what data you want to expose and can customize where and how you want to display the data.
-
ID token
30 Mar 2026
An ID token can be used to extract the unique user ID after the user has successfully authorised. You can also opt-in to bypass the use of a resource server by using a custom claim in the ID token payload.Specifications To use an ID token, you must verify that: The ID token follows the JWT specification (RFC 7519). The ID token follows the OpenID Connect Core specification. The ID token contains the required claims (see OpenID specification for details). The ID token validation complies with the specification. Issuer and Discovery Prenly requires knowledge of the issuer ("iss" in the ID token payload), where the issuer must be a valid URI. You may also require to meet the Discovery specification. In particular: OpenID Providers supporting Discovery MUST make a JSON document available at the path formed by concatenating the string /.well-known/openid-configuration to the Issuer. – section Obtaining OpenID Provider Configuration Information This path is formed by concatenating the issuer: {issuer}/.well-known/openid-configuration Notes: The issuer must not include a trailing slash. The issuer must be a valid, functional URL. Validation The ID token must be verifiable before its payload can be trusted. Prenly requires access to the JSON Web Key Set (JWKS), typically referenced as: JKU JWKS URI This is commonly available via: {issuer}/.well-known/jwks (or specified in the OpenID configuration) Additional requirements: If multiple signing keys are used, the "kid" header claim must be included in the ID token. If only one key is used, Prenly assumes that key is valid for verification. You can test and verify ID tokens using tools such as: https://jwt.io Testing via JWT.io Go to https://jwt.io Paste your ID token into the Encoded field Review decoded sections: Header Payload Signature If verification fails: Paste your JWK (JSON) into the field: "Public Key in SPKI, PKCS #1, X.509 Certificate, or JWK string format" Payload In addition to required claims, Prenly primarily uses: "sub" Optional supported claims: "email" "given_name" "family_name" "name" for a full list of claims see the specification for required and optional claims. If name and email are available: They will be displayed in the UI after login Otherwise: A placeholder will be shown Custom Claims (Subscriptions) Prenly supports custom claims in the ID token: Must be a string array Each value represents a subscription product code Used to grant access to protected content Scopes Required scope: openid Recommended scope: offline_access (for details see specification for offline access) Benefits: Allows longer-lived authentication sessions Important behavior: Prenly uses the access token to determine authentication status Session duration depends on: Token expiry Prenly cache duration (minimum: 20 minutes)
-
Unified App for Publishers: Why Media Houses Are Moving Beyond Separate News & E-Paper Apps
27 Jan 2026
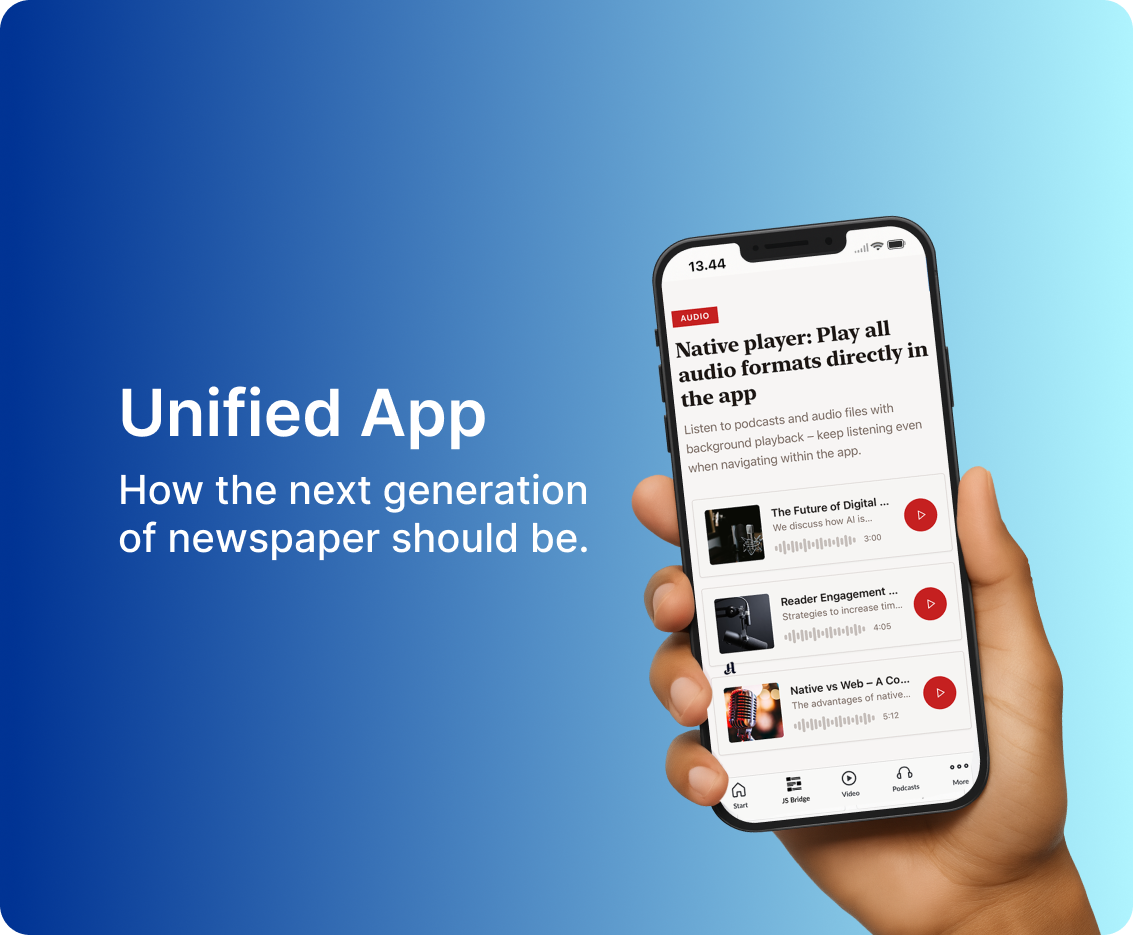
When digital publishing continues to evolve, many publishers are asking the same question: Do we really need so many separate digital products?For many years, it has been common to split the digital reading experience across multiple platforms – one app for e-paper editions, another for live web news, and separate tools for podcasts, newsletters, or archives. Each product made sense on its own. Together, they often created fragmentation.Heading into 2026, more publishers are rethinking this setup. Not because consolidation is suddenly trendy, but because complexity has become expensive – both for organizations and for readers.Instead, a unified app is emerging as a long-term foundation: a shared workspace where different content types, workflows, and business models can coexist and evolve over time. This is exactly where Prenly comes in – as a unifying platform for the entire digital publishing operation. Publishing has outgrown channel-based thinking Most publishers don’t struggle with content creation. The real challenge lies in distribution, maintenance, and coherence. When content lives in separate systems: editorial workflows become fragmented readers must learn multiple experiences development and maintenance costs increase it becomes harder to build habits and loyalty The result is often a collection of products rather than a single, recognisable digital experience. A unified app doesn’t mean “one format fits all.” It means one place where different formats work together. What publishers really mean by a “unified app” A unified app is not just a container for content. It is a digital product where: e-paper editions and web news coexist articles, audio, podcasts, and special content live side by side access rules, subscriptions, and permissions are consistent readers move seamlessly between formats without friction For publishers this has meant shifting focus from “where content lives” to “how it is experienced by readers.” The app becomes the primary relationship surface – not just another channel. Why readers benefit from a unified solution From a reader’s perspective, fragmentation creates unnecessary friction. Multiple apps mean: multiple logins different navigation patterns inconsistent reading experiences In a unified app, readers can: start with breaking news and continue into a full edition switch between article view and classic PDF layout listen to content via text-to-speech or podcasts save content and return later – all in one place This consistency is a key driver of habit formation, engagement, and long-term retention. Publishers have seen that when friction disappears, engagement increases naturally. Why publishers benefit even more For editorial and product teams, unification is not just a UX improvement – it’s a workflow improvement. A unified app allows publishers to: manage content, layout, and promotion from a single tool avoid duplicating work across multiple platforms introduce new content types without launching new products evolve the experience over time without heavy development cycles Instead of maintaining parallel systems, teams can focus on: editorial quality audience value long-term strategy This is especially important for media organizations managing multiple titles or initiatives under the same brand. One app doesn’t mean one title A common misconception is that a unified app limits flexibility. In practice, the opposite is true. Many publishers today operate: multiple titles regional and national editions collaborations or partnerships niche or temporary publications In a unified app, these can coexist through: a shared newsstand flexible access rules editorial control over what is highlighted – and when Media houses use this approach to offer a cohesive experience for readers, while still supporting different editorial identities. Where Prenly fits into a unified app strategy Prenly is built on the idea that publishing is a workflow – not a collection of isolated channels. With Prenly: e-paper editions and web content live in the same app publishers control structure, content, and design via the App Manager updates are reflected instantly across iOS, Android, and web access, subscriptions, and analytics are handled consistently This allows publishers to continuously evolve their app without rebuilding the product every time their strategy changes. For publishers and media houses, this means having a unified app that adapts as their publishing model evolves – not one that needs to be replaced. A more sustainable way forward The strongest signal going into 2026 is not about new features or formats. It’s about how publishing teams want to work. A unified app: reduces operational complexity strengthens the reader relationship supports long-term digital strategy Instead of asking “Which app should this live in?”, publishers can ask the more important question: “How should this be experienced?” That shift is what makes a unified app not just a technical decision – but a strategic one. Interested in seeing how this works in practice? If you want to explore how e-paper, web news, and other content types can live in one unified app, we’d be happy to show you how. Contact us or book a free demo to see how publishers use Prenly to create a unified app experience – fully tailored to their workflows and goals. Prenly Workspace Prenly Workspace is the tool for publishers, editorial teams, and media organizations. Here you create articles, add text and media, organize content into sections and categories, and publish everything easily when you’re ready. Explore Prenly Workspace ->
-
Apple | Change account holder
24 Oct 2025
Here's a simple step-by-step guide on how to change "Account Holder" on Apple's Developer Account. As the current account holder 1. Sign in to https://developer.apple.com/account as the current account holder. 2. Select the icon Membership details or swipe down manually to the section for Membership details. 3. Select Update your information. 4. Select the Transfer Account Holder role and select Choose a candidate. 5. From the drop-down select the new account holder. Note. If you cannot find the new account holder in the list you must first invite the new account holder as an admin user on your developer account. 6. Read through the Account Holder Transferor Agreement and select Agree to agree to Apple's terms. As the new account holder You must have two-factor authentication activated on your AppleID to complete these steps. If you are asked to verify your identity, please see https://developer.apple.com/support/app-account#verify to start the process to let Apple verify your AppleID. Note that this might take some time for Apple to complete. 1. Wait for the current account holder to complete the steps above. 2. Sign in to https://developer.apple.com/account with your AppleID. 3. Above the section Program resources you should see a notification bar regarding pending agreements. 4. Review the agreement Account Holder Transferee Agreement and agree to the agreement by toggling the checkbox at the bottom and selecting Agree.
-

Google | Activate Speech synthesis
24 Oct 2025
Prenly supports speech synthesis of articles in the simplified article reading mode. This can be used to have the Android app read the article content out loud. You can at any time in the article reading mode choose to activate or deactivate the speech synthesis functionality. 1. Select an article in the article reading mode. If your publication opens to a replica, select an article from the replica to open in the simplified article reading mode. Open the article mode. 2. Activate the speech synthesis functionality by selecting "Aa" in the top-right corner. The article reading mode's settings will appear. Select the panel "Theme & Speech" and then toggle the switch for Speech synthesis. The toggle will change to colour to indicate that the speech synthesis function shall activate. Activate the speech synthesis functionality within the Aa-menu and the panel "Theme & Speech". Article reading mode with deactivated speech synthesis functionality. 3. Deactivate the speech synthesis functionality by selecting "Aa" in the top-right corner. Select the panel "Theme & Speech" and then toggle the switch for Speech synthesis. The toggle will become colourless to indicate that the speech synthesis functionality shall deactivate. Deactivate the speech synthesis functionality within the Aa-menu and the panel "Theme & Speech". You will find three icons at the bottom of the article when the speech synthesis functionality is activated. Select the play icon, located in the middle of the three, to have the article read out loud via the speech synthesis. While the reading is active the same icon will transform into a pause icon, enabling you to pause the reading. Switch article by either swiping or selecting the previous- and next icons. If the speech synthesis is currently reading it will instead read the new selected article. Article reading mode with activated speech synthesis functionality. Select the video below to see how to activate or deactivate the speech synthesis functionality.
-

FTP Client
24 Oct 2025
To access the FTP account, a downloaded FTP client is required. One suggestion is to download the free program FileZilla. Once the client/program has been downloaded, open it and fill in your details in the boxes as shown. Then click Quickconnect to connect to the server. The files to be uploaded to FTP are then dragged into the lower right box.
-
PDF Settings
24 Oct 2025
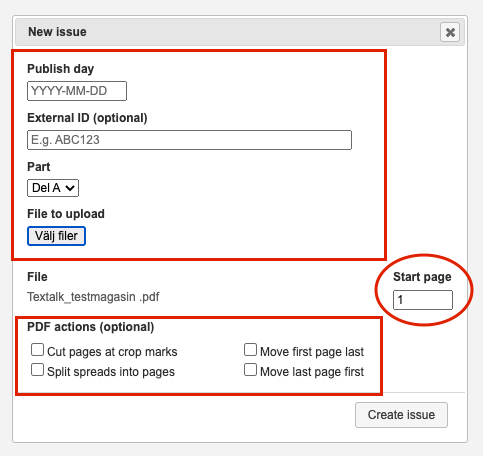
When a new edition is uploaded to Webarch, there are also various settings that you can make with the PDF when uploading. Here we will show you what those settings mean and do. 1. Publish day This means which day you want the issue to be "published" in your e-magazine. The format must always be YYYY-MM-DD, for example, 2022-01-01. 2. External ID (Optional)External ID is completely optional to fill in. This box is only used internally (unless otherwise is said from Helpdesk) and is not something that will be visible to readers of the magazine. An example of what you can write here is the e-papers publish number, the internal name of the issue, or other information you as a customer want. For example, Maybe the magazine is called "Test" and then you choose to enter "NR 1" in the box for External ID, so that you yourself know. 3. Part Most newspapers have only 1 "Part A". You can easily see this in your newspaper at the top of the menu. See the picture below. When you upload a PDF, do not change this box, just leave it as is. 4. File to uploadHere you select the file (issue/magazine) to be uploaded to the system. 5. FileHere you see which file you have chosen to upload, check that it is the correct version, file name and file format. 6. Start Page Indicates which page the PDF starts on. You should not change anything here, just leave it as it is. The PDF should always start on page 1. 7. PDF actions (Optional) 7.1 Cut pages at crop marks Only mark this box if the issue contains cut marks, otherwise, you leave it blank. 7.2 Split spreads into pages If the edition is structured as a spread instead of pages, click in this box otherwise leave it blank. 7.3 Move first page last Marke the box if you want to move the front page to the end of the issue, otherwise leave this box empty. 7.4 Move last page first Marke the box if you want to move the last page to the beginning of the issue, otherwise leave this box empty. 8. Create issueAnd finally, when you have made the desired settings, click on the "Create issue" button to upload the issue to the system. This is where our operators will take ower, and complete the export.
-
Tags and Permissions
24 Oct 2025
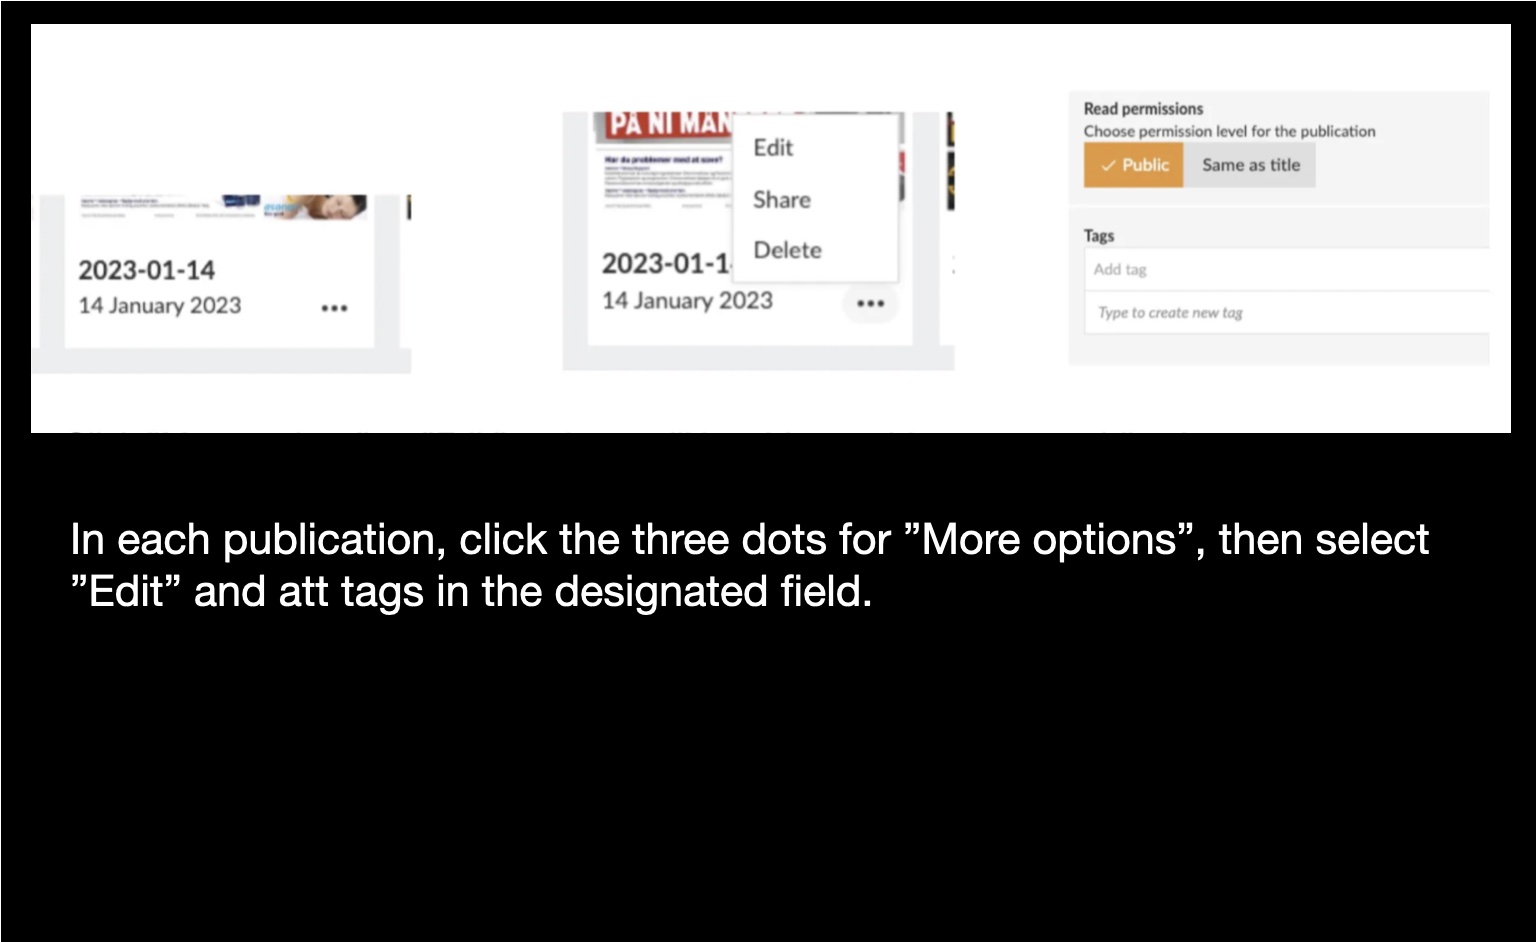
One option when allowing access to your content, is to grant access to the entire title. Or you can set up for flexible subscription packages with the tag-based permission system. That means that you now can offer various subscription models with flexible access, like:• Access only to Sunday’s publications• Access only to Monday-Friday publications• Access only to the last 7 days, not the full archive This flexibility gives you opportunities to offer a range of subscription packages with various price tags within the same title. This filtering is accomplished by adding tags to each publication and creating corresponding subscription services. It can easily be done either manually in Prenly Workspace or by sending data to our Connect api. Let’s say you add the tag “Sunday” to all of your Sunday publications. That will enable you to create a subscription package which gives your subscribers access to the publications tagged “Sunday” but nothing more. How to add tags? You can add a tag manually to any publication by opening the settings for each publication in Prenly Workspace and add a tag there. Click the three dots in the bottom right corner of a publication to open a small menu where you select “Edit”. In the publication settings you can add tags. If a tag has already been created you can choose it from a list. You can also add tags automatically by using our api and send a batch of tag updates. You can do this for previously published publications, and you can set up a daily api call to add tags to any new publications. See the documentation of the api. https://apidoc.prenly.com/connect-api/ How to create packages? Navigate to “Package management” found in Prenly Workspace Settings. You have to create a Package and a Service to support the publication tags.In Workspace you go to Settings -> Package Management Click “Services” -> “New” Add a name to the service, select title and add the same tag that you have added to the publications. Then create a new Package and connect it to the Service you just created. The Package has a slug that you can add to subscribers in your subscription system. Summary If you give a subscriber access to a subscription called “sundays_only” in your subscription system. You should set up a subscription package in Prenly Workspace with a slug called “sundays_only”And you should set the access of that subscription package to access a title with publications tagged “Sunday”And finally add tag “Sunday” to all publications that should be accessed. Note The tag-based permissions will work out of the box with many integrations set up with the Prenly Remote API. For some integrations there have to be additional configurations done deeper into the Prenly access system. Please contact our helpdesk if you need assistance.
-
LOGIN | OAuth2
24 Oct 2025
Prenly supports OAuth2 with or without OpenID Connect extension (OIDC) as long as the authorisation server follows the OAuth2 specification RFC 6749. You will likely need an authorisation server that supports OIDC. Prenly only supports the authorisation grant Authorization Code. The client Prenly will use in the OAuth2 flow is the e-paper's application authority (a technical implementation that decides how authentication and authorisation are handled by the e-paper application within Prenly's backend). Prenly will need to know a few things to be able to act as the client for the authorisation flow: • Optional*. The chosen issuer. This is mandatory if you want to use the OpenID Connect extension ID token claim. • Mandatory. The client ID you want the Prenly authority to use. • Mandatory. The client secret you want the Prenly authority to use when exchanging the provided authorisation grant for an access token when authenticating the Prenly authority (the client). • Optional. Scope. You may choose to make Prenly use a space-separated list of scopes defining the issued token's permission. The scope(s) will be used with the authorisation endpoint. • Optional. State. Prenly supports generating of state in the authorisation request. You may choose to either let Prenly generate a state or make the authority skip it. • Mandatory. Authorisation endpoint. The Prenly authority will navigate the user agent to this endpoint to initiate the authorisation flow with the authorisation server by logging in the user to obtain the authorisation code grant. • Mandatory. Token endpoint. The Prenly authority will try to exchange the user's authorisation code for an access token or, if your authorisation server supports it (which is strongly recommended), exchange the user's refresh token for a new access token. Authentication method. On default, Prenly uses the OIDC's client authentication method client_secret_basic when authenticating with the authorisation server's token endpoint. Prenly also has support for the client authentication method client_secret_post. Please notify Prenly if you require the latter, otherwise the default authentication method will be used. • Recommended. An external URL to log out the user. The Prenly authority will use the current user's selected user agent to log out the user remotely at the authorisation server. Prenly is capable of using placeholders in the URL when creating the authorisation request to log out the user by providing the following: ◦ The Client ID; ◦ The logout return URI; ◦ The logout error URI; Please note that state cannot be used. An example of a return URI query parameter is "post_logout_redirect_uri". Currently, only the HTTP method GET is supported for the logout URL. User ID The Prenly authority will need to know how to extract the unique user ID after the user has been successfully authorised by the authorisation server. This unique user ID, if you are using the Prenly Remote authority API, is the `uid` request parameter when requesting the user summary information. You may choose one of the following methods: • From a property in the JSON token endpoint response. If you choose this you must inform us of your chosen property name containing the user ID. • From the OpenID Connect "sub" claim in the signed ID token (as returned by the "id_token" token response property. To be able to extract the user ID you must also provide: ◦ Required. The external URL to public keys to validate the ID tokens. This URL must contain a JSON Web Key Set according to JWT standards (see RFC 7515), which can be referred to as either JKU or JWKS. ◦ Optional. The property name in the user data response that contains a customer number. ◦ Required. Prenly needs to know the issuer which must match the "iss" claim in the ID token when verifying the ID token. For more details see ID token. • From the "sub" property response from a UserInfo endpoint. To use this method you must also provide: ◦ Required. The UserInfo endpoint URL. The endpoint is used to fetch basic information about the user by using the user's access token to authorise the request. ◦ Optional. The property name in the user data response that contains a customer number. Resource server You may choose a resource server that Prenly supports or you are free to contact us at hello@prenly.com to make a request to Prenly to support your specific resource server as an integration task, which Prenly might support based on a paid development task. Out of the box, Prenly supports Prenly Remote authority API from version 1.4 or higher as a resource server. See our general information about Prenly Remote authority API for the concept of this API. To implement Prenly Remote authority API as a resource server please see the API specification for the endpoint /oauth2/getUser. The "resource" Prenly is requesting from the resource server is a list of subscription products associated with the user. The products, in the form of a product code, indicate the user's subscription status where each code is configured to grant read access to publications within your e-paper application. To grant the correct read access depending on the subscription product you must also inform Prenly which publications the product code authorises read access to. Any unknown product will be ignored. You might not need a dedicated resource server... Prenly can bypass a traditional resource server altogether if your UserInfo endpoint is capable of exposing the subscription status of the resource owner – the user. If your UserInfo endpoint is capable, all you will have to provide is the claim (property name) in the UserInfo endpoint response JSON data. The claim value must be a JSON list (array) of strings. Each list item represents a subscription product code. Provide information When you have all the required information please contact Prenly's customer service at hello@prenly.com with the information. The team will then set up the chosen e-paper application's Prenly authority to use OAuth2 for you.
-
PDF upload
24 Oct 2025
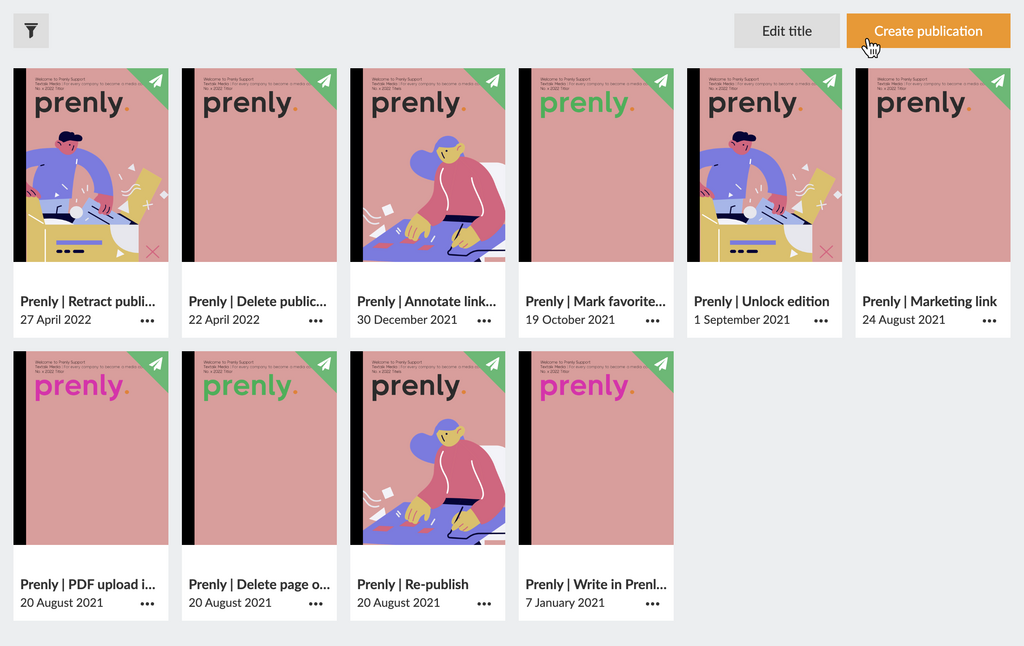
A PDF for only replica reading mode can be uploaded directly in Prenly Workspace. Regardless of what you want to write, you first need to select a publication to host your PDF. Select the publication of the Prenly title of your choice by touching the publication card either on the cover image or name field. If the publication does not exist, select the button "Create publication" to create a new publication on the selected Prenly title. Select "Create publication" to create a new publication. Enter a delivery date and name. Select whether the publication should be public or "Same as title" to use the title's general read permissions settings. Configure your new publication by entering a delivery date and a name prior to creating it by selecting the button "Create". Once you are happy with the configuration, select "Create" to create your new publication. Prenly will, by default, use your chosen delivery date as the publication name when Prenly automatically creates a new publication; but you are free to select whatever name you would like. Now follow these simple steps to upload your PDF: 1. Select the target publication. 2. Select the tab "Pages". Select pages to upload your PDF to the publication. 3. Select Upload PDF. Select "Upload PDF" to upload your PDF to the publication. 4. To upload the PDF you need to select which part of the publication it represent. Choose between existing parts currently available, by selecting "Existing part" or creating a new part, by selecting "Create new part" and enter your desired part name. Select "Existing part" to upload the PDF to an existing part. Select "Create new part" to upload the PDF to a new part. If you chose "Existing part", select an existing part in the drop-down menu. In the drop-down menu, select the part you would like to use. 5. Select "Browse" in the section "Select PDF" to open a file-selector on your local device. Select the PDF you want to upload. Prenly will render a preview of the PDF prior to it being uploaded. To initiate the actual upload, select "Upload". Preview the PDF by swiping downwards. The upload process can take a couple of minutes to complete. The graphical interface will reload once the process has been completed. While Prenly is processing your PDF you can either wait for the process to complete, or continue with other tasks within Prenly Workspace. The graphical interfaces will reload when the PDF has been uploaded. 6. You can see the result of uploading your PDF when the upload process has been completed. See the upload result. Share the result with the readers by publish a new version of the publication. If you like the result then select "Publish..." if you want your readers to also see the result. You can also select the video below to see "how to upload a PDF" as a video guide. Remember to first create a publication to host the PDF as described above.
-

How Corren makes sure readers never miss the latest news
29 Sep 2025
Through a smart digital shortcut, Corren was able to instantly turn a problem into an improved reading experience.When the newspaper doesn’t land in the mailbox as it should, frustration can quickly arise. For Corren, with its strong role as the news source of Östergötland, it was crucial to find a solution that always guarantees reader access – regardless of distribution. Through a smart digital shortcut, they were able to instantly turn a problem into an improved reading experience. Challenge:For Corren, the physical distribution of the newspaper was a recurring challenge. When the paper failed to arrive in certain areas, customers would immediately call customer service. The phones were ringing off the hook, and frustration grew – both among readers and staff. Instead of focusing on service and value-creating work, large parts of the support team's time were spent handling the same question: "Where is my newspaper?" Solution:Together with Prenly, a completely new solution was created – simple, smart, and effective.By integrating Prenly’s API directly into the phone system, Corren was able to automate the process. When a reader called from an area where delivery had failed, they were met with the message: "Didn’t receive your newspaper today? Press 1."With the press of a button, a unique digital link to that day’s newspaper was automatically generated. The link was sent directly via SMS or email – with no need for the reader to log in or search for their details. Result:The result was a win–win for everyone: Readers got immediate access to their newspaper in digital form and didn’t have to wait. Customer service was relieved of countless repetitive calls and could focus on more meaningful matters. Corren strengthened its brand by showing that they could adapt quickly and put the reader experience first. Read Corren here