


iOS & Android
-
APPLE & GOOGLE | Handle extra document requests for developer accounts
21 Oct 2026
If your association, foundation or other organisation is asked for extra documents during account creation, use the matching case below. Only some cases may apply to you.
-
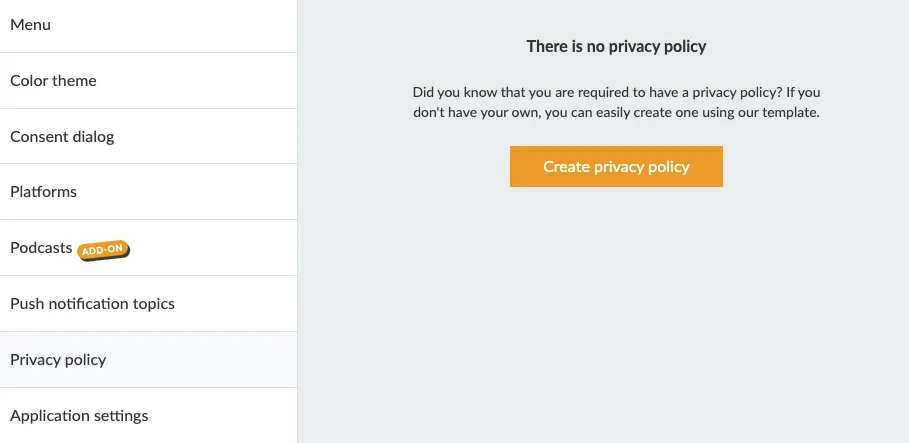
Generate a Privacy Policy
27 Nov 2025
If you do not have an existing Privacy Policy, you can create and host your Privacy Policy page directly in Prenly. In Prenly Workspace in the left-hand menu, click Applications and select your application where you want to add the Privacy Policy. In the application menu, click Privacy Policy. Here you can get started on creating your privacy policy. Next you can either paste in existing content, or, if you do not have an existing Privacy Policy, you can use our tool to generate a new Privacy Policy: https://privacy.prenly.co/ In the top-right corner, select the language selector to switch to your preferred language. This is important to remember: You are always the Data Controller who has the responsibility to ensure that the policy is correct for your company. Please note that the page currently doesn't store things, so reloading the web page will empty the form.
-

Apple | Renew membership
24 Oct 2025
An active membership grants you access to all resources. An expired Apple Developer Program membership will have the published apps automatically deactivated from App Store by Apple, so your readers can no longer find and download the app. Apple will remind you 30 days prior to your annual membership to Apple Developer Program expiring on the e-mail address associated with the account holder. To renew the membership you will need access to the account holder's AppleID (an e-mail address, password, and two-factor authentication) and your payment information. The most common payment method is by credit card. Step 1. Sign in to your Apple Developer account as the account holder by visiting https://developer.apple.com/account/. You may also visit https://developer.apple.com/ and select Account in the menu. Sign in to Apple Developer. Step 2. At the top of the Apple Developer overview, you will see a message regarding your membership status if it has expired. See the section Your Apple Developer Program membership has expired. In it, you will be guided by Apple as the account holder on how to renew your membership. Follow the instructions provided by Apple in this section. Find current membership expiration date You will find your current membership expiration date in the section Membership details. You can "jump" to the section by selecting the section shortcut "Membership details" at the top of the overview page. Select "Membership details" to jump to the section "Membership details". In the section Membership details, you will find details about your membership such as the Team ID, type of membership, who the current account holder is, and the membership expiration date by the label Renewal date. Your membership will expire past this date unless you renew your membership before the date, or opt-in for automatic membership renewal. Your membership expiration date is on the row labelled by "Renewal date". Automatic membership renewal You (the account holder) may opt-in for automatic membership renewal by toggling the Auto-renew option in the Membership details section. If you have opt-int for the automatic membership renewal then Apple will charge your default payment method on your membership expiration date.
-

Apple | Activate Speech synthesis
24 Oct 2025
Prenly supports speech synthesis of articles in the simplified article reading mode. This can be used to have the iOS app read the article content out loud. You can at any time in the article reading mode choose to activate or deactivate the speech synthesis functionality. 1. Select an article in the article reading mode. If your publication opens to a replica, select an article from the replica to open in the simplified article reading mode. Open the article mode. 2. Activate the speech synthesis functionality by selecting "Aa" in the top-right corner. The article reading mode's settings will appear. Select the panel "Theme & Speech" and then toggle the switch for Speech synthesis. The toggle will change to colour to indicate that the speech synthesis function shall activate. Activate the speech synthesis functionality within the Aa-menu and the panel "Theme & Speech". Article reading mode with deactivated speech synthesis functionality. 3. Deactivate the speech synthesis functionality by selecting "Aa" in the top-right corner. Select the panel "Theme & Speech" and then toggle the switch for Speech synthesis. The toggle will become colourless to indicate that the speech synthesis functionality shall deactivate. Deactivate the speech synthesis functionality within the Aa-menu and the panel "Theme & Speech". You will find three icons at the bottom of the article when the speech synthesis functionality is activated. Select the play icon, located in the middle of the three, to have the article read out loud via the speech synthesis. While the reading is active the same icon will transform into a pause icon, enabling you to pause the reading. Switch article by either swiping or selecting the previous- and next icons. If the speech synthesis is currently reading it will instead read the new selected article. Article reading mode with activated speech synthesis functionality. Select the video below to see how to activate or deactivate the speech synthesis functionality.
-

Apple | Request Access to AppStore Connect API
24 Oct 2025
To provide your customers with the best possible reading experience, we want to continuously improve and update your mobile apps. In order for us to do so, please follow the instructions below. Step 1. Log in to your Apple developer account as an account holder by visiting https://developer.apple.com/account/ Select "Users and Access " in the "Program Resources" section. Log in to Developer account and select "Users and Access". Log in to your Developer account and select "Users and Access". Step 2. Select "Integrations" and then click "Request Access " to activate the App Store Connect API. Select "Request Access" to get access to the App Store Connect API." Select "Request Access" to get access to the App Store Connect API. Step 3. Read through the request, check the confirmation box, and then select "Submit". "Submit" Read through the request, check the confirmation box, and then select "Submit" You have now activated the App Store Connect API and we will now take care of the rest. We thank you very much!
-
Apple | Updated agreements
24 Oct 2025
Apple regularly updates their agreements to use its App Store platform. Apple usually updates the agreements several times a year. Each time Apple updates the agreements it will be up to the account holder to review the updated agreement and eventually approve it, as the agreement updates will block Prenly to administrate your iOS app. Reviewing and approving the updated agreement(s) is quick and easy. All you will need is a computer and access to the account holder's AppleID (an e-mail address, password, and two-factor authentication), i.e. the information you use to log in to your Apple Developer account. Step 1. Sign in to your Apple Developer account as the account holder by visiting https://developer.apple.com/account/. You may also visit https://developer.apple.com/ and select Account in the menu. Sign in to Apple Developer. Step 2. At the top of the Apple Developer overview you will see active statuses regarding your membership: • Updated agreements• Apple Developer Program membership active expired/renewal See the section The program license agreement has been updated.In it, you will be able as the account holder to find a link to your agreement page. Click the link to be taken to the agreement page at the Business section. Follow the instructions provided by Apple in this section. Alternatively, you can swipe down to the section Program resources and select the link labeled Business. Step 3. It is time to review and eventually approve the updated agreement. Depending on your app's requirements you might see two agreements, one for the mandatory Free Apps but also one for Paid Apps. Both agreements need to be up-to-date. See the agreement's status in the tabular column Status. If it's Active without further information on new agreements, you are done – else review the new agreement. To view the agreement select View, review the agreement and approve it. Tabular view of an updated "Free Apps" agreement ready to be reviewed and approved.
-
Google | Create a Play Console Payments Profile - to manage and track your app sales
24 Oct 2025
1. Sign in to Play Console. 2. Go to the Payments settings page (Setup > Payments profile). 3. Click Create payments profile. Make sure to have your business information available. 4. Under "Payments profile," click the down arrow and select Create payments profile. 5. Name and address: - Enter the legal name of your business as you want it to appear on your payments profile. This information will be shown to your customers and also on your receipts. - Provide your legal business address as it appears on official documents. It’s important that Google has a valid physical address on file for your business. PO box address is not allowed. 6. Primary contact: Enter the name of an authorized representative for your company who Google can contact if they have questions about your payments profile. Provide an email address and a phone number (optional). 7. Enter the following public business information, or choose to match your public merchant profile and payments profile information:- Enter your business website.- Select the category of products that you sell.- Your customer support email.- The business/product name that'll appear on your customers' credit card statements. Note: To help customers remember what they purchased and keep chargebacks to a minimum for you, use an appropriate credit card statement name. 8. When you're finished, click Submit.Note: You cannot change your business location country but you can change your public merchant and payments profiles later. After you create a payments profile it is automatically linked to your Play Console. Note: If you have set up a payments profile or merchant center account previously, it is already linked to your Play Console. Reference: https://support.google.com/googleplay/android-developer/answer/7161426?hl=en Add your bank account https://support.google.com/paymentscenter/answer/7161440?hl=en
-

Google | Validate Account
24 Oct 2025
Before you start: Ask your IT team or website agency whether your website is already verified in Google Search Console. If it is, skip the DNS steps below and go to Verify in Google Play Console. The verified website owner can approve your request. If you use the same Google Account in Play Console and Search Console, approval is automatic. In Google Play Console you will see this banner: Picture showing banner in Google Developer account. Click on “View details” and you will see the following view: Picture showing instructions to very the organization's website. Click on “Go to Search Console”.In Google Search Console under Domain fill in your company domain (e.g. prenly.com). Picture showing the Google Search Console. You will see something like this: Picture showing instructions for domain ownership via DNS record. Google wants you to prove that you own the mentioned domain by adding a special code to your domain’s settings (this is called a DNS TXT record). Here’s how to do it: Log in to Your Domain Registrar • Go to the website where you purchased or manage your domain (e.g., GoDaddy, Namecheap, Cloudflare, or a similar service).• Log in using your account credentials. Go to Your DNS Settings • Once logged in, find the DNS settings or Zone Editor for your domain.• It’s often located in a section called Manage Domains or DNS Management.• Look for something like “Edit DNS Records” or “Zone File Settings”. Add the TXT Record • Record Type: Select TXT (as shown in the screenshot, this is the record type Google is asking for).• Host/Name: Some registrars require you to enter @ (this represents the root domain). Others might ask you to leave it blank or enter your full domain name.• Value/Text: Copy the complete, unique TXT value shown in your own Google Search Console and paste it into the Value or Text field. Do not copy the example code from this guide or its screenshots. Save the Record • Once you’ve entered the details, click Save or Update.• The TXT record is now added to your domain’s DNS settings. Verify in Google Search Console • Go back to Google Search Console.• Click the Verify button at the bottom of the screen.• Wait for Google Search Console to confirm that ownership has been verified. Graphs and data alone do not confirm successful verification. Verify in Google Play Console • In Google Play in the banner showing “Finish setting up your developer account” click on “view details” • Click on “verify website”• If this leads you to your account details, scroll down to your organisation's website and click “Send verification request” • If another person is the verified website owner in Search Console, ask them to approve the request. If you use the same Google Account, approval is automatic.• Check for confirmation in your email or Play Console Inbox that the website association is complete. Other account-setup tasks may still remain. Important Notes• DNS changes may take some time (up to 48 hours) to update across the internet. If verification doesn’t work immediately, wait a few hours and try again.• If you don’t know where your domain is registered or managed, contact the person or team responsible for setting up your website.•
-
Privacy Policy
24 Oct 2025
According to Swedish data protection legislation and the GDPR (General Data Protection Regulation), you, as the data controller, are required to provide a valid privacy policy. If you also have an Android or iOS app, you are required to provide a valid privacy policy in accordance with Google's and Apple's guidelines. If you do not have your privacy policy, you can refer to Generate a Privacy Policy. It's important to keep in mind that your privacy policy must clearly outline how you, as the data controller, collect, use, and potentially share user data. You are not allowed to process user data that is not specified in your privacy policy. User Data Personal and sensitive user data includes any information that can be directly or indirectly linked to a specific (natural) person. Personal identity number Contact information, such as email address and phone number Payment information or other financial details Authentication details (i.e. login credentials) Authorization details (i.e. subscription information) Health-related information, including sexual orientation In other words, any information that can identify a specific user from among all available users when using the service/product. Google's requirements Your privacy policy must... ...describe what data the app can access or collect about the user. ...explain how the data [1] is used and/or shared. ...not be combined with other disclosures that are unrelated to the collection of personal and/or sensitive user data. ...the term "Privacy Policy" must appear somewhere in the text. Google will translate the information into English, and if their translation tool cannot find the phrase "Privacy Policy," the policy will be rejected. ...be directly accessible via a URL (web address) without a paywall, and the page must not be editable. A linked PDF is not allowed. ...cannot be partial. The full policy must be accessible via the URL and cannot link to external resources such as "read more". Sources https://support.google.com/googleplay/android-developer/answer/10144311?hl=en&sjid=13395122270323995155-EU Frequently Asked Questions Do I need a privacy policy? Yes, if you have an e-paper, you are required to have a privacy policy. Can I place my privacy policy behind a login? No. The privacy policy must be publicly accessible in full via a website. It may not be provided as a downloadable document, such as a PDF or MS Word file. Can I include my privacy policy in my e-magazine? Yes, that's possible. You can include it as an article in an open digital publication via Prenly Workspace, and the article can serve as a webpage for your privacy policy.
-

Apple | Digital Services Act
24 Oct 2025
Apple has decided to act on the European Union (EU) Digital Services Act (DSA) legislation. All Apple developer account holders must specify their trader status according to the Digital Services Act. If the account holder does not provide nor verify information regarding their developer account then a) the iOS app cannot be updated; b) in-app payments may be delayed; c) Apple might decide to remove the iOS app from being available in certain countries or regions. Am I a trader? The account holder will be asked by Apple if they have a "trader provider account" or a "non-trader provider account", or, more simply: Are you a trader? The definition of a "trader" is loosely defined, but in short it is any business acting for purpose relating to the trade or profession. In short, anyone who can gain financial gain by the iOS app or the content within. For a Prenly app, the term "trader" is summarised as anyone whose content is not fully publicly available is considered a trader. If all your publications (regardless of which Prenly title they belong to) are freely available then you may not be a trader. If at least one publication requires login/subscription then you are a trader. If you are not a trader, the account holder may select the option to inform Apple that the account is a non-trader provider account. However, since the term for a trader is loosely defined and Apple might have their own interpretation, it is recommended for any iOS account holder to specify the account as a trader-provider account to reduce complications moving forward. This manual will assume that the account holder wants to specify the developer account as a trader-provider account. Comply with Apple's requirement regarding the Digital Services Act You will be asked to provide a phone number and e-mail address to comply with the requirements according to this manual and to provide and verify information regarding your developer account for Apple and the Digital Services Act. Apple will publish this information publicly on the App Store in certain countries or regions. Step 1 - Login to your Apple Developer Account as the account holderLink that leads directly to the correct page https://appstoreconnect.apple.com/business/ Step 2 - Click Complete Compliance Requirements for *your account name* Select the link starting with "Complete Compliance Requirements". Step 3 - Click Complete Compliance Requirements (new page) Select the link "Complete Compliance Requirements". Step 4 - Select "This is a trader provider account" and then click Next Select the option "This is a trader provider account". Step 5 - Enter your phone number and email address Enter your organisation's public contact information. Step 6 - You will now be asked to verify your phone number and email address Check your e-mail inbox for the e-mail from Apple and SMS from Apple. Step 7 - Read through the information, and then click Confirm Verify the information and select "Confirm" to complete.
-

Apple/Google | Get started reading in the app!
24 Oct 2025
Getting started reading the e-newspaper is easy! Start by downloading the app from the App Store or Google Play Store. The first thing you'll see are some simple instructions on how to read the app. 1. Navigate the page view - Scroll through the newspaper by dragging the pages to the right or left. Single-tap the overview icon in the bottom left corner to access the overview. 2. Page view overview - Get a quick overview of all the pages of the newspaper by scrolling up and down the overview. Single tap on any page to open it. 3. Read in customized reading mode - Open an article in reading mode by tapping on the article in the newspaper. 4. Text settings - Adjust the size, shape and background color of the text and turn the speech synthesis on and off by clicking on the text icon in the top right corner. 5. Article list - Get an overview of all the articles in the magazine via the article list, which can be accessed via the list icon in the top left corner. 6. Available offline - Press the magazine download button to save offline. Saved material can be found under My Content. 7. Search the archive - Search the archive to find what you are looking for and use the download button to save offline. Saved material can be found under My Content. 8. log in to the app - Now it's time to start reading! Click on settings in the bottom right corner and then "Log in". 9. Log in with your Digital Account - Here you log in with your digital account, username and password. Then it is ready!
-
Apple | Change account holder
24 Oct 2025
Here's a simple step-by-step guide on how to change "Account Holder" on Apple's Developer Account. As the current account holder 1. Sign in to https://developer.apple.com/account as the current account holder. 2. Select the icon Membership details or swipe down manually to the section for Membership details. 3. Select Update your information. 4. Select the Transfer Account Holder role and select Choose a candidate. 5. From the drop-down select the new account holder. Note. If you cannot find the new account holder in the list you must first invite the new account holder as an admin user on your developer account. 6. Read through the Account Holder Transferor Agreement and select Agree to agree to Apple's terms. As the new account holder You must have two-factor authentication activated on your AppleID to complete these steps. If you are asked to verify your identity, please see https://developer.apple.com/support/app-account#verify to start the process to let Apple verify your AppleID. Note that this might take some time for Apple to complete. 1. Wait for the current account holder to complete the steps above. 2. Sign in to https://developer.apple.com/account with your AppleID. 3. Above the section Program resources you should see a notification bar regarding pending agreements. 4. Review the agreement Account Holder Transferee Agreement and agree to the agreement by toggling the checkbox at the bottom and selecting Agree.
-
Google | Change Account Owner
24 Oct 2025
Currently, Google does not permit changing the account owner for the Play developer account. The developer account will always be associated with the Google account used when the Play developer account was created. In some circumstances, you can change the e-mail address associated with the Google account. For details, see Google's manual Change the email address for your account. Alternatively, you can create a new Play developer account with a different Google account and then make an app transfer of the selected app. Transfer app to a different developer account If you have apps that you want to transfer to a different Google Play developer account, you can submit a transfer request. For details, see Google's manual Transfer apps to a different developer account.
-
Apple | Create Developer Account
24 Oct 2025
In order to publish an iOS app on the App Store, you need a company developer account, which requires a DUNS number and an Apple Account. If you do not have this already, it is created via Apple. Before you start: Who should create the account? Someone in your organisation who is authorised to accept agreements on its behalf—for example, an owner, director, or an employee given that authority. They do not need technical knowledge. Apple calls this person the Account Holder. Apple’s requirements Helping someone set up the account? Arrange for the future Account Holder to complete the application with you. They need to sign in themselves and be available for any identity checks, so you can proceed without interruptions. Have the Account Holder’s photo ID available: Apple may request a government-issued photo ID to confirm their identity. Have the Account Holder’s phone or Apple device nearby: Apple may send a security code by text message or display it on an Apple device they are already signed into. They’ll need to enter this code to continue. Start here: Step 1 - Apple Account (Previously referred to as Apple ID) The Apple Account can be created here: Apple Account Make sure to: Enter the Account Holder’s legal first and last name—not the company name. You will enter the organisation’s name separately during Developer Program enrollment. Use a general email address that several people in your company have access to. In case of illness, vacation, change of position. Enable two-factor authentication: Apple requires this to enroll your organisation in the Developer Program. Step 2 - D-U-N-S number If you have already received the D-U-N-S number, go directly to step 3. In order to create a developer account with Apple, you need a D-U-N-S number. The D-U-N-S can be described as an international organization number. Don't have a number? Go to this link to check/create one. Don't know your number? You can also use this page, to have your existing D-U-N-S number sent to you. Step 3 - Developer account Click on the link and follow the instructions to create an account. Make sure to: choose Company/Organization as the entity type. Use your organisation’s registered company name—not your publication’s brand name. Provide a working, publicly accessible company website—not a placeholder page. Provide a work email address on your organisation’s domain, such as name@yourcompany.com. After submitting your application: Check your email, including spam, for Apple’s verification requests. If Apple asks for additional documents, follow our guide. Once Apple approves the application, follow the emailed instructions to accept the membership agreement and complete payment. Wait for Apple’s membership confirmation before continuing to Step 4. Submitting the application alone does not complete enrollment. FYI: Nonprofit organisations may qualify for a fee waiverRecognised nonprofit organisations may qualify to have Apple’s annual US$99 membership fee waived if they do not sell digital goods or services through their apps and have no active Paid Applications Agreement. Request the waiver during enrollment, before paying—Apple does not refund fees already paid. See Apple’s fee-waiver requirements. Stuck or unsure what Apple is asking for? Contact Prenly support and include a screenshot of the message or step you’re stuck on, so we can help you move forward. Step 4 - Invite Prenly to the developer account, after Apple has approved the application made in Step 3. Invite Prenly: Log in Under "Program resources" and "App Store Connect" select "Users and Access". In the menu, click on the plus sign to add a new user. Add Prenly's developer account as "Admin". The name can be set to whatever you want but the email address must be ios-app-manager@textalkmedia.se Make sure the options under Developer/Additional Resources are checked. Save by clicking on Invite. Enable us to provide you with updates: Under "Users and Access" click on "Integration" and select "Request Access". Read through the request, check the confirmation box and click "Send". Step 5 - Verify Trader details All accounts must verify their trader information in order to publish apps. Read more and follow the instructions here.
-

Google | Activate Speech synthesis
24 Oct 2025
Prenly supports speech synthesis of articles in the simplified article reading mode. This can be used to have the Android app read the article content out loud. You can at any time in the article reading mode choose to activate or deactivate the speech synthesis functionality. 1. Select an article in the article reading mode. If your publication opens to a replica, select an article from the replica to open in the simplified article reading mode. Open the article mode. 2. Activate the speech synthesis functionality by selecting "Aa" in the top-right corner. The article reading mode's settings will appear. Select the panel "Theme & Speech" and then toggle the switch for Speech synthesis. The toggle will change to colour to indicate that the speech synthesis function shall activate. Activate the speech synthesis functionality within the Aa-menu and the panel "Theme & Speech". Article reading mode with deactivated speech synthesis functionality. 3. Deactivate the speech synthesis functionality by selecting "Aa" in the top-right corner. Select the panel "Theme & Speech" and then toggle the switch for Speech synthesis. The toggle will become colourless to indicate that the speech synthesis functionality shall deactivate. Deactivate the speech synthesis functionality within the Aa-menu and the panel "Theme & Speech". You will find three icons at the bottom of the article when the speech synthesis functionality is activated. Select the play icon, located in the middle of the three, to have the article read out loud via the speech synthesis. While the reading is active the same icon will transform into a pause icon, enabling you to pause the reading. Switch article by either swiping or selecting the previous- and next icons. If the speech synthesis is currently reading it will instead read the new selected article. Article reading mode with activated speech synthesis functionality. Select the video below to see how to activate or deactivate the speech synthesis functionality.
-
Google | Create an Android Developer Account
24 Oct 2025
To publish an Android app on Google Play, you need a Google Play Console developer account. Before creating the account, you will need a Google Account and a D-U-N-S number. Before you start Who should create the account? Choose someone in your organisation who will be responsible for the Google Play Console account. The Google Account used during registration becomes the account owner. Have photo ID available: This must belong to someone authorised to represent your organisation—not necessarily the person creating the account. This can be an owner, director or employee given that authority. If someone else will provide the ID, arrange for them to help with verification. Have access to your email and phone: Google sends verification codes that you will need to enter during setup. Step 1 - Google Account The Google Account used during registration becomes the owner of your Play Console developer account. Before continuing, make sure you are signed into the Google Account your organisation intends to use. If you do not yet have a Google Account, follow this guide before continuing. Step 2 - DUNS number If you have already received the D-U-N-S number, go directly to step 3. In order to create a developer account with Google, you need a D-U-N-S number. The D-U-N-S can be described as an international organization number. If you do not know your organisation's DUNS number, visit dunsnumberlookup.dnb.com to have it sent to you. Step 3 - Play Console developer account Make sure you are on the correct account, or select Switch accounts to select the correct account owner. Start the process of creating your new developer account here. Sign in with the correct Google Account. If necessary, select Switch accounts. Accept Google's distribution agreement. Google will charge a one-time fee of $25. Google will accept multiple payment options, select the one most suitable for you and pay the registration fee. Select Organisation as the account type. Choosing Personal means additional steps will be needed to convert the account later. Which payments profile should you choose? A Google payments profile stores the legal name and address Google uses to verify your organisation—even if your app is free. Create a business payments profile using your organisation’s registered name and address. If Google offers an existing profile, select it only if it belongs to the same organisation and its details are correct. Otherwise, create a new profile. Do not use an employee’s personal payments profile. Make sure the company name and address match your organisation’s Dun & Bradstreet record. Tip: The developer name is shown publicly on Google Play and can be your organisation’s name or your publication’s brand name. This is separate from the legal company name used for verification. Step 4 - Invite Prenly Log in to your Play Console account Click on "Users and permissions" in the left-hand menu Select "Invite new users" Enter dev@prenly.com as the user email and leave the Expiry date empty. In the Permissions section, select Account permissions, select Admin Select Invite user to invite Prenly Tip: If the "Invite user" button is grey, it means you have missed a step. Step 5 - Complete the account verification Complete the verification tasks shown in Play Console, including your organisation’s D-U-N-S number, identity, website and contact details. Prepare the right documents Google may ask for an official company-registration document as well as the authorised representative’s photo ID. Check Google’s accepted documents for your country before uploading. Make sure the documents match the details provided for verification. For photo ID, use a clear colour photo of a valid document—not a photocopy. If Google requests additional documents, follow our guide: Handle extra document requests for developer accounts. Verify your website Entering your website address does not complete verification. Google uses Google Search Console, its website-management service, to confirm your organisation’s access to the website. Ask your IT team or website agency who manages the website in Search Console. That person may need to approve the verification request you send from Play Console. If the same Google Account owns the website in Search Console, the request is approved automatically. Follow our guide to verify your organisation’s website. Verify your email address and phone number Complete the email and phone verification tasks shown in Play Console. Use contact details you can access to receive verification codes. For organisation accounts, Google requires identity and website verification to be completed before contact-phone verification can proceed. Your developer account will not be fully activated until all required verification steps have been completed. Stuck or unsure what Google is asking for? Contact Prenly support and include a screenshot of the message or step you’re stuck on, so we can help you move forward. Recommendation Once you have created your Play Console developer account, we recommend saving or printing the payment confirmation email from Google. The email contains important information that may be required if you ever need to transfer your app to another Play Console account, including: The transaction ID The payment method used The purchase date The account owner’s email address
-

Apple | Create deployment key
24 Oct 2025
This guide will guide you through easy-to-follow instructions to create a deployment key for the iOS-application within Prenly. You need to sign in as the account holder to follow these steps. Step 1. Sign in to your Apple developer account as the account holder by visiting https://developer.apple.com/account/ Select Users and Access in the section Program resources. Log in to Developer account and select "Users and Access". Step 2. Select Integrations. Select "Integrations". Step 3. Select Request Access to enable the App Store Connect API. Select "Request Access". Step 4. Read through the request, check the confirmation box and then select Submit. Accept the agreement and request API access. Step 5. Notify Prenly that you are done by sending an e-mail to hello@prenly.com.
-

App icons
24 Oct 2025
What do we need to get started? To update your app icons, we need new image files in 1024 × 1024 px (SVG). The app icon must not contain an alpha channel/transparency, while the splash icon may have transparency. For Android, we also need a separate, simplified notification icon with an alpha channel.