


Manage Applications and Configure Settings Easily
-
JS Bridge in Prenly – Embed Interactive Web Content
18 Sep 2026
This guide explains how to embed your own interactive web content (like puzzles, forms, or custom dashboards) onto your app's start page and have it communicate with the native Prenly app using our JavaScript (JS) Bridge. Note that Helpdesk team needs to activate JS bridge before it’s possible to use.
-
Set up IP Access for Location-Based Reading
27 Jul 2026
An IP-based subscription allows readers to access your content without logging in, as long as they are connected to a predefined IP address or IP range. Instead of verifying a user account, Prenly checks the reader’s network location and automatically grants access. What is it used for? IP-based subscriptions are useful when multiple people should be able to access your content from the same location without creating individual user accounts. Common use cases include: Libraries Schools and universities Offices and newsrooms Hotels and other public spaces Because access is based on the network rather than individual accounts, there is no limit to the number of readers who can access the content at the same time from an approved IP address. How is it implemented? To activate an IP-based subscription, simply send us the IP address or IP range that should be granted access. Once we receive the information, we will: Configure the IP address in Prenly. Connect the appropriate subscription package(s). Activate access for the specified network. After the setup is complete, readers connected to the approved network can access the included content without signing in. Be aware: Access is only available while the reader is connected to an approved network. If they leave the network, access is removed until they reconnect. There is no limit to the number of simultaneous users connected from an approved IP address or IP range. If you would like to activate IP-based subscriptions, have questions about the setup, or would like pricing information, please contact hello@prenly.com.
-
Possibilities within menu settings for the app (custom tabs)
30 Mar 2026
Read more about some of the possibilities in custom tabs to find out which option is best for you. The possibilities are compared below: Regular website/landing page Single page application (SPA) Read more about some of the opportunities within custom tabs to find out which option suits you best. Possibilities compared below: Ordinary web site / landing page Single Page Application (SPA) Summary Ordinary web site / landing page: Navigation: Full-page reload on every click Performance: Slightly slower due to frequent reloading Technical expertise: None needed – easy to implement User Experience: May feel less seamless compared to an app-like interface Best for: Static pages, simple integrations Drawbacks: Less smooth, might need adjustments for a better mobile experience Single Page Application (SPA): Navigation: Smooth transitions, no page reloads Performance: Faster after initial load, optimized experience Technical expertise: Requires developer knowledge of JavaScript User Experience: Smooth, app-like interactions Best for: Dynamic content, news updates, interactive features Drawbacks: Requires JavaScript support, can be complex to develop ... Detailed explanation Ordinary web site / landing page What is it? On traditional websites, navigation triggers a full page reload for each click, refreshing the browser to display new content. This happens because the browser requests a new HTML document (a ‘document request’) to display an updated view. What are the benefits? This is the easiest way to include the customer’s website in their apps. The URL to the page already exists and the customer can simply add it in a new external link in the app. What are the drawbacks? Every click reloads the entire page, which can feel slow and interrupt the flow compared to the smooth experience of a SPA. If the landing page isn’t mobile-friendly, it might come across as cluttered, hard to navigate, or out of sync with the app’s look and feel. Traditional websites lack the dynamic, app-like interactions/feel that SPAs offer, making them less ideal for news articles or content that updates frequently. In which case do we recommend clients use it? Low technical expertise: This option is ideal for customers without technical knowledge or a developer on hand. Simple content integration: If the goal is to display static or additional information (e.g., contact details, event pages) rather than interactive features or frequent updates, a traditional website is sufficient. Quick implementation: When a fast and straightforward solution is needed, adding an existing webpage to the app can save time and effort. Single Page Application (SPA) What is it? SPA (Single Page Application) allows seamless navigation by dynamically fetching and displaying new content without reloading the page (i.e. by the web browser making a document-type network request). Unlike traditional websites, which use navigation events to load new pages, SPAs use transition events to update content within the same page. A SPA commonly uses a dedicated GUI (Graphical User Interface) with buttons or menus to navigate between “pages”. Each rendered page is rendered by the client (web browser) instead of rendered by the server for a traditional page. Content is fetched from the server, CMS, to be rendered “on the fly” by the web browser ensuring new articles appear without manual updates affording a more app-like user experience. In short, an SPA is dynamically rendered by the web browser. What are the benefits? SPAs update content on the same screen without switching to a new page, offering a smooth, intuitive experience similar to mobile apps. After the initial load, SPAs can feel faster since they fetch only new data instead of reloading the entire page, making them ideal for frequently updated content like news. Developers have full control over rendering, turning raw data into user-friendly visuals efficiently, reducing processing, and ensuring responsive performance. What are the drawbacks? SPAs rely on JavaScript, which can cause compatibility issues with outdated browsers when the SPA relies on a specific Web API, for example social sharing, requiring developers to add fallback code and in turn increases complexity. Rendering occurs in the user’s web browser on their device, where the web browser commonly processes raw data (e.g., JSON) and downloads large files upfront, making the initial load slower than traditional websites. This process also consumes more battery and processing power, affecting mobile devices or older hardware. However, after setup, SPAs tend to respond faster as no additional page loads are needed. In which case do we recommend clients use it? When the goal is to create a seamless, responsive design similar to a mobile app. Ideal for content with the latest news or live updates where content refreshes dynamically. Suitable for clients with a developer who can handle JavaScript-heavy projects and how to optimize for different devices and browsers. ... FAQ How long would you estimate it takes to build a SPA? The time required depends on the developer’s experience and the complexity of the SPA. In general, building a basic SPA can take around 1–3 development days, with design, development, and testing. Can we display ads? Yes, you have full control over the content displayed in your custom tab. The only restriction is mentioning Apple or Google, as this could result in the app being rejected during the review process. What is the recommended number of menus in a SPA for the best user experience? When adding a menu bar within the SPA to allow readers to switch between different pages, consider how many menus are really needed. Since the SPA is embedded in an app that already has multiple tabs, an overly detailed menu can feel cluttered. To keep it user-friendly, we recommend keeping the menu minimal and focused. Do external links from our articles automatically open in a web browser, or does it depend on our own hyperlink settings? The link behavior is depending on the target attribute. If you do not specify a target attribute, or set it as (_self) the app will treat it as the default target behaviour, which means that the link will be opened within the current view. Can we force certain pages to open in a web browser instead of in the app, for example by using target="_blank"? Yes, this is possible. By setting the target attribute to _blank, the app will attempt to open the link in a new browser tab or WebView. However, in SPAs, this is not commonly used, as it breaks the seamless “in-app” experience that SPAs are designed to provide. Do I need to implement a refresh function for article pages in the mobile app when users scroll down? We recommend adding a refresh or reload function to ensure the page updates properly as users scroll down.
-
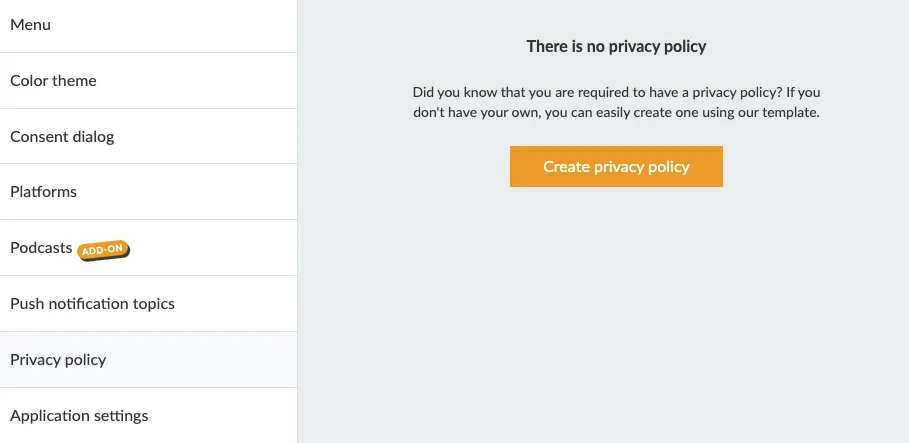
Generate a Privacy Policy
27 Nov 2025
If you do not have an existing Privacy Policy, you can create and host your Privacy Policy page directly in Prenly. In Prenly Workspace in the left-hand menu, click Applications and select your application where you want to add the Privacy Policy. In the application menu, click Privacy Policy. Here you can get started on creating your privacy policy. Next you can either paste in existing content, or, if you do not have an existing Privacy Policy, you can use our tool to generate a new Privacy Policy: https://privacy.prenly.co/ In the top-right corner, select the language selector to switch to your preferred language. This is important to remember: You are always the Data Controller who has the responsibility to ensure that the policy is correct for your company. Please note that the page currently doesn't store things, so reloading the web page will empty the form.
-

Apple | Renew membership
24 Oct 2025
An active membership grants you access to all resources. An expired Apple Developer Program membership will have the published apps automatically deactivated from App Store by Apple, so your readers can no longer find and download the app. Apple will remind you 30 days prior to your annual membership to Apple Developer Program expiring on the e-mail address associated with the account holder. To renew the membership you will need access to the account holder's AppleID (an e-mail address, password, and two-factor authentication) and your payment information. The most common payment method is by credit card. Step 1. Sign in to your Apple Developer account as the account holder by visiting https://developer.apple.com/account/. You may also visit https://developer.apple.com/ and select Account in the menu. Sign in to Apple Developer. Step 2. At the top of the Apple Developer overview, you will see a message regarding your membership status if it has expired. See the section Your Apple Developer Program membership has expired. In it, you will be guided by Apple as the account holder on how to renew your membership. Follow the instructions provided by Apple in this section. Find current membership expiration date You will find your current membership expiration date in the section Membership details. You can "jump" to the section by selecting the section shortcut "Membership details" at the top of the overview page. Select "Membership details" to jump to the section "Membership details". In the section Membership details, you will find details about your membership such as the Team ID, type of membership, who the current account holder is, and the membership expiration date by the label Renewal date. Your membership will expire past this date unless you renew your membership before the date, or opt-in for automatic membership renewal. Your membership expiration date is on the row labelled by "Renewal date". Automatic membership renewal You (the account holder) may opt-in for automatic membership renewal by toggling the Auto-renew option in the Membership details section. If you have opt-int for the automatic membership renewal then Apple will charge your default payment method on your membership expiration date.
-

Apple | Activate Speech synthesis
24 Oct 2025
Prenly supports speech synthesis of articles in the simplified article reading mode. This can be used to have the iOS app read the article content out loud. You can at any time in the article reading mode choose to activate or deactivate the speech synthesis functionality. 1. Select an article in the article reading mode. If your publication opens to a replica, select an article from the replica to open in the simplified article reading mode. Open the article mode. 2. Activate the speech synthesis functionality by selecting "Aa" in the top-right corner. The article reading mode's settings will appear. Select the panel "Theme & Speech" and then toggle the switch for Speech synthesis. The toggle will change to colour to indicate that the speech synthesis function shall activate. Activate the speech synthesis functionality within the Aa-menu and the panel "Theme & Speech". Article reading mode with deactivated speech synthesis functionality. 3. Deactivate the speech synthesis functionality by selecting "Aa" in the top-right corner. Select the panel "Theme & Speech" and then toggle the switch for Speech synthesis. The toggle will become colourless to indicate that the speech synthesis functionality shall deactivate. Deactivate the speech synthesis functionality within the Aa-menu and the panel "Theme & Speech". You will find three icons at the bottom of the article when the speech synthesis functionality is activated. Select the play icon, located in the middle of the three, to have the article read out loud via the speech synthesis. While the reading is active the same icon will transform into a pause icon, enabling you to pause the reading. Switch article by either swiping or selecting the previous- and next icons. If the speech synthesis is currently reading it will instead read the new selected article. Article reading mode with activated speech synthesis functionality. Select the video below to see how to activate or deactivate the speech synthesis functionality.
-

Apple | Request Access to AppStore Connect API
24 Oct 2025
To provide your customers with the best possible reading experience, we want to continuously improve and update your mobile apps. In order for us to do so, please follow the instructions below. Step 1. Log in to your Apple developer account as an account holder by visiting https://developer.apple.com/account/ Select "Users and Access " in the "Program Resources" section. Log in to Developer account and select "Users and Access". Log in to your Developer account and select "Users and Access". Step 2. Select "Integrations" and then click "Request Access " to activate the App Store Connect API. Select "Request Access" to get access to the App Store Connect API." Select "Request Access" to get access to the App Store Connect API. Step 3. Read through the request, check the confirmation box, and then select "Submit". "Submit" Read through the request, check the confirmation box, and then select "Submit" You have now activated the App Store Connect API and we will now take care of the rest. We thank you very much!
-
Apple | Updated agreements
24 Oct 2025
Apple regularly updates their agreements to use its App Store platform. Apple usually updates the agreements several times a year. Each time Apple updates the agreements it will be up to the account holder to review the updated agreement and eventually approve it, as the agreement updates will block Prenly to administrate your iOS app. Reviewing and approving the updated agreement(s) is quick and easy. All you will need is a computer and access to the account holder's AppleID (an e-mail address, password, and two-factor authentication), i.e. the information you use to log in to your Apple Developer account. Step 1. Sign in to your Apple Developer account as the account holder by visiting https://developer.apple.com/account/. You may also visit https://developer.apple.com/ and select Account in the menu. Sign in to Apple Developer. Step 2. At the top of the Apple Developer overview you will see active statuses regarding your membership: • Updated agreements• Apple Developer Program membership active expired/renewal See the section The program license agreement has been updated.In it, you will be able as the account holder to find a link to your agreement page. Click the link to be taken to the agreement page at the Business section. Follow the instructions provided by Apple in this section. Alternatively, you can swipe down to the section Program resources and select the link labeled Business. Step 3. It is time to review and eventually approve the updated agreement. Depending on your app's requirements you might see two agreements, one for the mandatory Free Apps but also one for Paid Apps. Both agreements need to be up-to-date. See the agreement's status in the tabular column Status. If it's Active without further information on new agreements, you are done – else review the new agreement. To view the agreement select View, review the agreement and approve it. Tabular view of an updated "Free Apps" agreement ready to be reviewed and approved.
-
Google | Create a Play Console Payments Profile - to manage and track your app sales
24 Oct 2025
1. Sign in to Play Console. 2. Go to the Payments settings page (Setup > Payments profile). 3. Click Create payments profile. Make sure to have your business information available. 4. Under "Payments profile," click the down arrow and select Create payments profile. 5. Name and address: - Enter the legal name of your business as you want it to appear on your payments profile. This information will be shown to your customers and also on your receipts. - Provide your legal business address as it appears on official documents. It’s important that Google has a valid physical address on file for your business. PO box address is not allowed. 6. Primary contact: Enter the name of an authorized representative for your company who Google can contact if they have questions about your payments profile. Provide an email address and a phone number (optional). 7. Enter the following public business information, or choose to match your public merchant profile and payments profile information:- Enter your business website.- Select the category of products that you sell.- Your customer support email.- The business/product name that'll appear on your customers' credit card statements. Note: To help customers remember what they purchased and keep chargebacks to a minimum for you, use an appropriate credit card statement name. 8. When you're finished, click Submit.Note: You cannot change your business location country but you can change your public merchant and payments profiles later. After you create a payments profile it is automatically linked to your Play Console. Note: If you have set up a payments profile or merchant center account previously, it is already linked to your Play Console. Reference: https://support.google.com/googleplay/android-developer/answer/7161426?hl=en Add your bank account https://support.google.com/paymentscenter/answer/7161440?hl=en
-

Google | Validate Account
24 Oct 2025
In Google Play Console you will see this banner: Picture showing banner in Google Developer account. Click on “View details” and you will see the following view: Picture showing instructions to very the organization's website. Click on “Go to Search Console”.In Google Search Console under Domain fill in your company domain (e.g. prenly.com). Picture showing the Google Search Console. You will see something like this: Picture showing instructions for domain ownership via DNS record. ... Google wants you to prove that you own the mentioned domain by adding a special code to your domain’s settings (this is called a DNS TXT record). Here’s how to do it: Log in to Your Domain Registrar • Go to the website where you purchased or manage your domain (e.g., GoDaddy, Namecheap, Cloudflare, or a similar service).• Log in using your account credentials. Go to Your DNS Settings • Once logged in, find the DNS settings or Zone Editor for your domain.• It’s often located in a section called Manage Domains or DNS Management.• Look for something like “Edit DNS Records” or “Zone File Settings”. Add the TXT Record • Record Type: Select TXT (as shown in the screenshot, this is the record type Google is asking for).• Host/Name: Some registrars require you to enter @ (this represents the root domain). Others might ask you to leave it blank or enter your full domain name.• Value/Text: Copy the exact TXT value from the screenshot: google-site-verification=xyz and paste this into the Value or Text field. Save the Record • Once you’ve entered the details, click Save or Update.• The TXT record is now added to your domain’s DNS settings. ... Verify in Google Search Console • Go back to Google Search Console.• Click the Verify button at the bottom of the screen.• Tip: If on Google Search Console you see graphs and data, that indicates that the txt record has been successful. Verify in Google Play Console • In Google Play in the banner showing “Finish setting up your developer account” click on “view details” • Click on “verify website”• If this leads you to your account details, scroll down to your organisation's website and click on the button “...” • Check if the banner on the Google Play Console startpage disappeared ... Important Notes• DNS changes may take some time (up to 48 hours) to update across the internet. If verification doesn’t work immediately, wait a few hours and try again.• If you don’t know where your domain is registered or managed, contact the person or team responsible for setting up your website.•
-
Apple | Create Developer Account
24 Oct 2025
In order to publish an iOS app on the App Store, you need a company developer account, which requires a DUNS number and an Apple Account. If you do not have this already, it is created via Apple. If you need more detailed instructions than the guide below, click here and scroll down to Enrolling in the Apple Developer Program as an organization. Start here: Step 1 - Apple Account (Previously referred to as Apple ID) Apple Account is created here: Apple Account Tip! Enter a general email address that several people in your company have access to. In case of illness, vacation, change of position. Step 2 - D-U-N-S number If you have already received the D-U-N-S number, go directly to step 3. In order to create a developer account with Apple, you need a D-U-N-S number. The D-U-N-S can be described as an international organization number. Go to this link to check/create one. You can also use this page, to have your D-U-N-S number sent to you. Step 3 - Developer account Click on the link and follow the instructions to create an account. Be sure to enter Company/Organization as the entity type later in the flow. After the application has been submitted, Apple will send further instructions via email within a few days. Step 4 - Invite Prenly to the developer account, after Apple has approved the application made in Step 3. ▪ Log in Under "Program resources" and "App Store Connect" select "Users and Access". A table view with users appears here. In the menu, click on the plus sign to add a new user. Add Prenly's developer account as "Admin". The name can be set to whatever you want but the email address must be ios-app-manager@textalkmedia.se Make sure the options under Developer/Additional Resources are checked. Save by clicking on Invite. Under "Users and Access" click on "Integration" and select "Request Access". ▪ Read through the request, check the confirmation box and click "Send". Step 5 - Verify Trader details As of April 2024, all accounts must verify their trader information in order to publish apps. Read more and follow the instructions here.
-
Google | Create an Android Developer Account
24 Oct 2025
To publish an Android app on Google Play, you need a Google Play Console developer account. Before creating the account, you will need a Google Account and a D-U-N-S number. Step 1 - Google Account The Play Console developer account is permanently linked to the Google Account used during registration. Choose carefully, as the account owner cannot be changed later. If you do not yet have a Google Account, follow this guide before continuing. Step 2 - DUNS number If you have already received the D-U-N-S number, go directly to step 3. In order to create a developer account with Google, you need a D-U-N-S number. The D-U-N-S can be described as an international organization number. If you do not know your organisation's DUNS number, visit dunsnumberlookup.dnb.com to have it sent to you. Step 3 - Play Console developer account Make sure you are on the correct account, or select Switch accounts to select the correct account owner. Start the process of creating your new developer account here. Sign in with the correct Google Account. If necessary, select Switch accounts. Accept Google's distribution agreement. Google will charge a one-time fee of $25. Google will accept multiple payment options, select the one most suitable for you and pay the registration fee. Be aware: Select Organisation as the account type. This setting cannot be changed after the account has been created. Tip: The developer name you choose will be displayed publicly on Google Play. We recommend using your organization’s official name. Step 4 - Invite Prenly Log in to your Play Console account Click on "Users and permissions" in the left-hand menu Select "Invite new users" Enter dev@prenly.com as the user email and leave the Expiry date empty. In the Permissions section, select Account permissions, select Admin Select Invite user to invite Prenly Tip: If the "Invite user" button is grey, it means you have missed a step. Step 5 - Complete the account verification Important: Before your Play Console developer account can be used, Google requires several verification steps. Make sure all of the following have been completed: Verify your organization by providing your D-U-N-S number. Verify the identity of the account owner using a valid government-issued ID. Verify your organization’s website. Your developer account will not be fully activated until all required verification steps have been completed. Recommendation Once you have created your Play Console developer account, we recommend saving or printing the payment confirmation email from Google. The email contains important information that may be required if you ever need to transfer your app to another Play Console account, including: The transaction ID The payment method used The purchase date The account owner’s email address
-

Apple/Google | Get started reading in the app!
24 Oct 2025
Getting started reading the e-newspaper is easy! Start by downloading the app from the App Store or Google Play Store. The first thing you'll see are some simple instructions on how to read the app. 1. Navigate the page view - Scroll through the newspaper by dragging the pages to the right or left. Single-tap the overview icon in the bottom left corner to access the overview. 2. Page view overview - Get a quick overview of all the pages of the newspaper by scrolling up and down the overview. Single tap on any page to open it. 3. Read in customized reading mode - Open an article in reading mode by tapping on the article in the newspaper. 4. Text settings - Adjust the size, shape and background color of the text and turn the speech synthesis on and off by clicking on the text icon in the top right corner. 5. Article list - Get an overview of all the articles in the magazine via the article list, which can be accessed via the list icon in the top left corner. 6. Available offline - Press the magazine download button to save offline. Saved material can be found under My Content. 7. Search the archive - Search the archive to find what you are looking for and use the download button to save offline. Saved material can be found under My Content. 8. log in to the app - Now it's time to start reading! Click on settings in the bottom right corner and then "Log in". 9. Log in with your Digital Account - Here you log in with your digital account, username and password. Then it is ready!
-

Apple | Digital Services Act
24 Oct 2025
Apple has decided to act on the European Union (EU) Digital Services Act (DSA) legislation. All Apple developer account holders must specify their trader status according to the Digital Services Act. If the account holder does not provide nor verify information regarding their developer account then a) the iOS app cannot be updated; b) in-app payments may be delayed; c) Apple might decide to remove the iOS app from being available in certain countries or regions. Am I a trader? The account holder will be asked by Apple if they have a "trader provider account" or a "non-trader provider account", or, more simply: Are you a trader? The definition of a "trader" is loosely defined, but in short it is any business acting for purpose relating to the trade or profession. In short, anyone who can gain financial gain by the iOS app or the content within. For a Prenly app, the term "trader" is summarised as anyone whose content is not fully publicly available is considered a trader. If all your publications (regardless of which Prenly title they belong to) are freely available then you may not be a trader. If at least one publication requires login/subscription then you are a trader. If you are not a trader, the account holder may select the option to inform Apple that the account is a non-trader provider account. However, since the term for a trader is loosely defined and Apple might have their own interpretation, it is recommended for any iOS account holder to specify the account as a trader-provider account to reduce complications moving forward. This manual will assume that the account holder wants to specify the developer account as a trader-provider account. Comply with Apple's requirement regarding the Digital Services Act You will be asked to provide a phone number and e-mail address to comply with the requirements according to this manual and to provide and verify information regarding your developer account for Apple and the Digital Services Act. Apple will publish this information publicly on the App Store in certain countries or regions. Step 1 - Login to your Apple Developer Account as the account holderLink that leads directly to the correct page https://appstoreconnect.apple.com/business/ Step 2 - Click Complete Compliance Requirements for *your account name* Select the link starting with "Complete Compliance Requirements". Step 3 - Click Complete Compliance Requirements (new page) Select the link "Complete Compliance Requirements". Step 4 - Select "This is a trader provider account" and then click Next Select the option "This is a trader provider account". Step 5 - Enter your phone number and email address Enter your organisation's public contact information. Step 6 - You will now be asked to verify your phone number and email address Check your e-mail inbox for the e-mail from Apple and SMS from Apple. Step 7 - Read through the information, and then click Confirm Verify the information and select "Confirm" to complete.
-

Apple | Create deployment key
24 Oct 2025
This guide will guide you through easy-to-follow instructions to create a deployment key for the iOS-application within Prenly. You need to sign in as the account holder to follow these steps. Step 1. Sign in to your Apple developer account as the account holder by visiting https://developer.apple.com/account/ Select Users and Access in the section Program resources. Log in to Developer account and select "Users and Access". Step 2. Select Integrations. Select "Integrations". Step 3. Select Request Access to enable the App Store Connect API. Select "Request Access". Step 4. Read through the request, check the confirmation box and then select Submit. Accept the agreement and request API access. Step 5. Notify Prenly that you are done by sending an e-mail to hello@prenly.com.
-

Google | Activate Speech synthesis
24 Oct 2025
Prenly supports speech synthesis of articles in the simplified article reading mode. This can be used to have the Android app read the article content out loud. You can at any time in the article reading mode choose to activate or deactivate the speech synthesis functionality. 1. Select an article in the article reading mode. If your publication opens to a replica, select an article from the replica to open in the simplified article reading mode. Open the article mode. 2. Activate the speech synthesis functionality by selecting "Aa" in the top-right corner. The article reading mode's settings will appear. Select the panel "Theme & Speech" and then toggle the switch for Speech synthesis. The toggle will change to colour to indicate that the speech synthesis function shall activate. Activate the speech synthesis functionality within the Aa-menu and the panel "Theme & Speech". Article reading mode with deactivated speech synthesis functionality. 3. Deactivate the speech synthesis functionality by selecting "Aa" in the top-right corner. Select the panel "Theme & Speech" and then toggle the switch for Speech synthesis. The toggle will become colourless to indicate that the speech synthesis functionality shall deactivate. Deactivate the speech synthesis functionality within the Aa-menu and the panel "Theme & Speech". You will find three icons at the bottom of the article when the speech synthesis functionality is activated. Select the play icon, located in the middle of the three, to have the article read out loud via the speech synthesis. While the reading is active the same icon will transform into a pause icon, enabling you to pause the reading. Switch article by either swiping or selecting the previous- and next icons. If the speech synthesis is currently reading it will instead read the new selected article. Article reading mode with activated speech synthesis functionality. Select the video below to see how to activate or deactivate the speech synthesis functionality.
-
Apple | Change account holder
24 Oct 2025
Here's a simple step-by-step guide on how to change "Account Holder" on Apple's Developer Account. As the current account holder 1. Sign in to https://developer.apple.com/account as the current account holder. 2. Select the icon Membership details or swipe down manually to the section for Membership details. 3. Select Update your information. 4. Select the Transfer Account Holder role and select Choose a candidate. 5. From the drop-down select the new account holder. Note. If you cannot find the new account holder in the list you must first invite the new account holder as an admin user on your developer account. 6. Read through the Account Holder Transferor Agreement and select Agree to agree to Apple's terms. As the new account holder You must have two-factor authentication activated on your AppleID to complete these steps. If you are asked to verify your identity, please see https://developer.apple.com/support/app-account#verify to start the process to let Apple verify your AppleID. Note that this might take some time for Apple to complete. 1. Wait for the current account holder to complete the steps above. 2. Sign in to https://developer.apple.com/account with your AppleID. 3. Above the section Program resources you should see a notification bar regarding pending agreements. 4. Review the agreement Account Holder Transferee Agreement and agree to the agreement by toggling the checkbox at the bottom and selecting Agree.
-
Google | Change Account Owner
24 Oct 2025
Currently, Google does not permit changing the account owner for the Play developer account. The developer account will always be associated with the Google account used when the Play developer account was created. In some circumstances, you can change the e-mail address associated with the Google account. For details, see Google's manual Change the email address for your account. Alternatively, you can create a new Play developer account with a different Google account and then make an app transfer of the selected app. Transfer app to a different developer account If you have apps that you want to transfer to a different Google Play developer account, you can submit a transfer request. For details, see Google's manual Transfer apps to a different developer account.
-
Privacy Policy
24 Oct 2025
According to Swedish data protection legislation and the GDPR (General Data Protection Regulation), you, as the data controller, are required to provide a valid privacy policy. If you also have an Android or iOS app, you are required to provide a valid privacy policy in accordance with Google's and Apple's guidelines. If you do not have your privacy policy, you can refer to Generate a Privacy Policy. It's important to keep in mind that your privacy policy must clearly outline how you, as the data controller, collect, use, and potentially share user data. You are not allowed to process user data that is not specified in your privacy policy. User Data Personal and sensitive user data includes any information that can be directly or indirectly linked to a specific (natural) person. Personal identity number Contact information, such as email address and phone number Payment information or other financial details Authentication details (i.e. login credentials) Authorization details (i.e. subscription information) Health-related information, including sexual orientation In other words, any information that can identify a specific user from among all available users when using the service/product. Google's requirements Your privacy policy must... ...describe what data the app can access or collect about the user. ...explain how the data [1] is used and/or shared. ...not be combined with other disclosures that are unrelated to the collection of personal and/or sensitive user data. ...the term "Privacy Policy" must appear somewhere in the text. Google will translate the information into English, and if their translation tool cannot find the phrase "Privacy Policy," the policy will be rejected. ...be directly accessible via a URL (web address) without a paywall, and the page must not be editable. A linked PDF is not allowed. ...cannot be partial. The full policy must be accessible via the URL and cannot link to external resources such as "read more". Sources https://support.google.com/googleplay/android-developer/answer/10144311?hl=en&sjid=13395122270323995155-EU Frequently Asked Questions Do I need a privacy policy? Yes, if you have an e-paper, you are required to have a privacy policy. Can I place my privacy policy behind a login? No. The privacy policy must be publicly accessible in full via a website. It may not be provided as a downloadable document, such as a PDF or MS Word file. Can I include my privacy policy in my e-magazine? Yes, that's possible. You can include it as an article in an open digital publication via Prenly Workspace, and the article can serve as a webpage for your privacy policy.
-

Schedule a component
24 Oct 2025
Did you know you can schedule a component on the home page? Perfect when you need to prepare a banner, carousel or similar to be displayed on a specific date. Or maybe you just want to publish a greeting to your readers on a specific holiday when fewer people work? How to do this 1. Open an existing component or create a new one.2. Scroll down to the Time Limitation section3. Select Time limit4. Select only start time, only end time or both.5. Click on update6. Don't forget to save and publish with the green button.
-

Application Settings
24 Oct 2025
This guide walks you through the Application Settings you can set for each of your titles in Prenly. These settings let you control how a title behaves in your app — for example whether readers can download it as a PDF in the web reader, share articles or spreads, see it in the archive, or access it only with a subscription. Keep in mind that these options are set per title and per application. That means the same title can have different settings in different apps. Go to Applications -> Application settings -> Select title to edit by clicking on the "pen" in the right corner. 1. Should the title be in the archive? This setting controls whether the title appears in the app’s archive: Yes, preselected shows it automatically, Yes, non-preselected keeps it available in the filters but not shown until activated, and No hides it from the archive. 2. Allow automatic download for the title The Allow automatic download for the title setting decides if readers can automatically download this title for offline use, and whether it’s selected by default. You can set it to Yes, preselected so it’s automatically chosen when users enable Automatic Download, Yes, but not preselected so users must select it themselves, or No to prevent this title from being available for automatic downloading at all. 3. Allow PDF download? Allowing PDF downloading means that the user can download the title to their device. Valid only via Prenly Web reader. 4. Allow article sharing? Choose whether you want to allow your users (readers) to share articles unlimited, limited or not at all. 5. Allow sharing of spreads? Choose whether you want to allow your users (readers) to share posts unlimited, limited or not at all. 6. Should the title require a subscription or be available to everyone?Here you can set whether the e-magazine is subscription locked or open to everyone. You can also choose to let older issues become publicly available automatically after a set number of days. Select Available after XX days and set the preferred amount of days. 7. Should the title be searchable in the archive? Enable this option if readers should be able to find search results for this title when entering keywords in the archive. Don't forget to click the save button so that the changes are saved and take effect on the apps!
-

Change width of startpage
24 Oct 2025
Now you can change the width of the homepage content for Prenly Web Reader. 1. Log in at https://content.textalk.se/ 2. Select the application for which you want to change the width. 3. Click on the tab "Start page" 4. Scroll down to the "Background and Top bar" section. 5. Choose width between 900-1400px and save.
-

App icons
24 Oct 2025
What do we need to get started? To update your app icons, we need new image files in 1024 × 1024 px (SVG). The app icon must not contain an alpha channel/transparency, while the splash icon may have transparency. For Android, we also need a separate, simplified notification icon with an alpha channel.
-

Menu settings for the web application
24 Oct 2025
It is now possible to create your own menu in the Web app, you can e.g. add external links, cookie and privacy policies and choose from a number of different icons for your menu items. This will change: “Login” will appear below the main menu and “Search” to the left of the main menu. You can shift “Search” to be under the main menu if you wish, where any remaining menu items will be visible. You can edit your menu at any time. To manage your menu in Prenly workspace here is a quick guide: 1. Log in to your Prenly Workspace account2. Go to "Applications"3. Select the application you want to manage the menu for4. Click on "Menu" on the right5. Select "Web Menu Settings"6. Manage your menu by drag and drop, add menu items or edit existing content. A maximum of two (2) icons in addition to the menu icon can be displayed in the top row of the home page. Other links end up under the menu icon. By default, the search icon appears in the top row, but it can be moved into the menu if desired and replaced by up to two other items. Add menu choices Click on "Add menu selection" and choose from - External link- Favorites- Podcast (add-on)- Title page- User selected title Note that grayed out options are not active for your license. Contact customer service or your personal sales representative for more information about these features. FavoritesFavorites is an easy way for users to select and find their most popular titles on the title page. PodcastShowcase your podcasts directly on the home page and on a special collection page.If you want to activate the podcast add-on, contact sales@textalkgroup.com and we will connect you with one of our sales representatives. Title pageBy activating the Title page, the application is given a new tab where the reader can get an overview of which titles are in the application and the option to open each title to access a descriptive text and all editions.Descriptions for each title are added under Edit Title.Here you can also activate favorites so the user can mark their titles as favourites. User selected titleA grouping of titles that the user can choose from. For example, if you have several editions or local variants in the same app and want to be able to offer the reader to choose their title. Add an external link 1. Enter a name for the link (this name will appear in the menu).2. Select icon. If you do not select an icon, a default link icon will appear (highlighted in green).3. Enter the URL you want to link to. Remember to test it in the browser first so it works.4. Select visibility.Whether the link should be visible regardless of whether you are logged in or not. Or if it should only be visible when you are logged in or logged out.5. Click the "Add" button. Sort the menu To sort the menu drag the bars (click the icon to the left of the icon, hold the mouse button and drag up or down). You can switch places on two menu items. For example, drag one menu item over another and they change places. It is of course also possible to drag to an empty place in the menu. Note that the text for "Log in" cannot be moved. It will always be directly below the main menu. Edit items in the menu If you want to change the name, icon, etc. of the menu items, click on the three horizontal dots and select "Edit". Delete items in the menu To remove items in the menu, click on the three horizontal dots and select "Remove". Note that some default objects cannot be deleted (marked with a padlock). When you are done with all the changes, don't forget to save your settings. We hope you will like this new feature as much as we do, if you have any questions please contact our support and they will help you.
-
Display articles on front page
24 Oct 2025
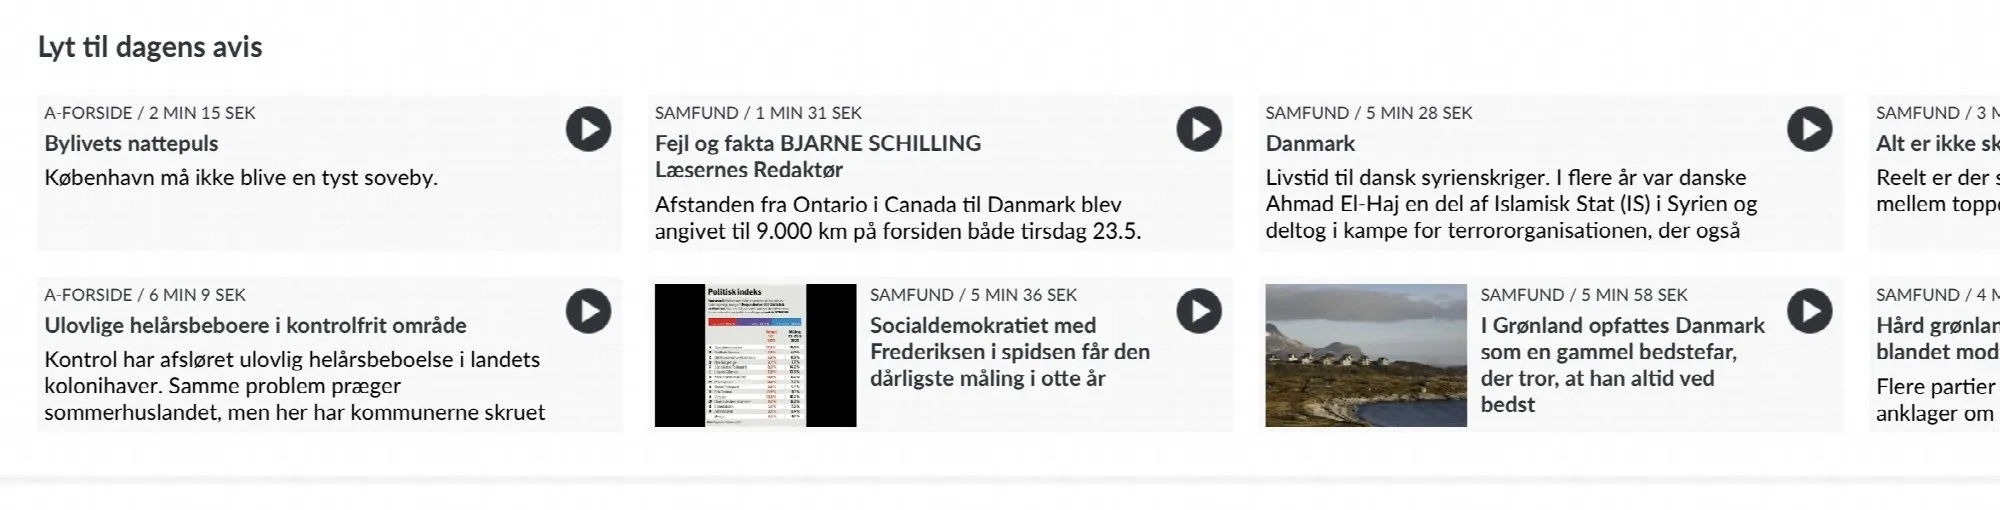
The article component allows you to show the visitor more content from the newspaper, giving your visitors the opportunity to discover articles in more ways than by browsing the e-paper.If there are audio files linked to the articles, visitors can have the article read out directly from the home page. The audio can continue to be read while you navigate around the e-magazine.A live example of what the article component looks like can be found on the Danish newspaper Politiken.How to create an article componentGo to Prenly Workspace .Select application.Select "Start page".Scroll to the bottom and select "Add component".Select "Articles".Enter a name (only displayed internally in Prenly Workspace).Select Source. First the title from which you want to display articles.Then Publication. If you select "Latest publication", the articles from your latest edition will always be displayed. But you can also select a specific issue.In the filter menu, you can filter which types of articles you want the component to display. You can choose from the following options: 1) Article audio – You can choose to display either articles that have an attached audio file or articles that do not have an audio file. 2) Articles with more words than – You select how many words an article must contain to appear in the article component. All text in the article, including the vignette, will be counted as words. (Note that the word count is automatically applied only to publications imported to Prenly after 2025-02-26. If you need help with older publications, the Prenly support team can assist you). 3) Article images – You can choose to display either articles that contain images or only articles without images.At Content you can give the component a Title and Description.Further down in the component setting, you can select labels and choose settings for article audio.Then comes the Appearance settings, where you can adjust the colours of the different parts of the component.And at the very bottom you can choose if you want to show the component only in certain platforms and only during certain times.Once you have finalised your settings and saved, you can drag the component to any position on the homepage. Activate the component and publish the page.The article component will be displayed on the home page.At the time of writing (May 24, 2023), the component is displayed in the web browser and the iOS app, but not yet in the Android app.Article audio in the form of mp3 files has higher quality than the built-in speech synthesiser and in May 2023 it is only available in the Politiken e-journal. An integration with a speech server that can receive texts and create mp3 files is required.We will work to create a solution that is integrated with Prenly but more on that later.
-

Change color theme in the web app
24 Oct 2025
Easily adjust the color theme to match your brand on both web and mobile (iOS & Android), for both light and dark mode. You configure your colors in Prenly Workspace in two places: Color Theme and Start page. Settings made on Start page apply only to the start page, while settings made under Color Theme apply to the entire app. We’ll start with Color Theme. Log in to Prenly Workspace and select Applications, then choose the application you want to modify. Click Color Theme to display the color settings. Here you will find five categories: Top Bar - Change the color for both web and mobile apps Menu - Web only Control Bar - Web only Navigation Bar - Mobile app only Podcast - Change colour of premium labels for both web and mobile apps Buttons and Links – Both web and mobile apps In the color settings, you will find a color picker where you can choose which color to use in light mode and dark mode. Choose color theme per area. If choosing Custom theme you can experiment with the color selector. Next, go to Start page. Here you will find all your home page components. Each component includes color options such as background, text, and heading colors. Click on any component and scroll down to Appearance. There you will find a color picker where you can choose which color to use in light mode and dark mode. For components where you can upload image files, such as the Banner component, you can also choose whether to use the same image in both light mode and dark mode, or upload a separate image specifically for dark mode. Below the components, you will find Background and Top Bar. There you can configure colors using a color picker for both light mode and dark mode. You can also upload a Logotype that will appear in the top bar on the Home page. If you upload a logo, it will be used in both light mode and dark mode, or you can choose to upload a separate one for dark mode. Remember to click Save when you are done. Don't miss our Color Contrast Checker tool which helps ensure your color choices provide enough contrast so text and elements remain clear and easy to read.
-

Platform-specific components
24 Oct 2025
You can decide on which platforms a component should be displayed. For example, if you want to create a special component that only appears in the web version of the e-magazine, and another that appears only in the iOS app or the Android app. This feature makes it possible to create banners and editions that are specially adapted to a specific target group. Here we show you how to do it. Select "Applications", the desired application and then "Add component". Select a component of your choice. In this example we chose "Carousel." The platform setting is located at the bottom of each component. Scroll to the bottom of the settings window. Uncheck the platforms in which you do not want to display the component and select "Update".
-

Change URL - CNAME
24 Oct 2025
In this guide, we'll walk you through how to create a CNAME record for your domain, so that your Prenly e-magazine can be accessed through its own URL, such as epaper.example.com. By setting up a CNAME, you point a subdomain (like epaper) to your Prenly homepage. This allows your visitors to use a clear and branded URL instead of a standard address. The guide shows you step-by-step how to ask your web host to do it for you, and how to set it up in your DNS yourself. CNAME with help from your hosting provider To make a CNAME pointing of your chosen subdomain to Prenly, you first contact your web host. Then you tell the web host that you want to make a CNAME pointing from your chosen subdomain (e.g. epaper.example.com) to Prenly, e.g. name.prenly.com (you replace name with your subdomain) Once a CNAME pointing has been made by the web host, contact Prenly's customer service:Email: hello@prenly.comChat: in Prenly AdminPhone: +46-31-388 47 40with information about which subdomain you have chosen and which your main domain is. Based on the above example, it is enough to tell us that you have made a CNAME on "epaper.example.com" and want to get this into your web app. Prenly will notify you when your web app has been moved to your new web address. Activating a CNAME pointing usually takes up to 24 hours and there are usually no costs involved. Please note that it must be a CNAME pointing. A regular REDIRECT will not work. What is a subdomain? A subdomain, also called a subdomain, is an extension to the main domain. The most frequent subdomain today is "www". In the web address (URL) "www.example.com", the "www" part is the subdomain; "example.com" is the main domain. For many web hosts, it is a main domain that customers need to buy. A subdomain usually doesn't cost anything extra, depending on which web host you have as a customer. Many of Prenly's customers have chosen to use the subdomain "epaper" for Prenly. Create a CNAME record yourself If you want to do this yourself through your web host, you usually follow these steps - but it may vary a bit depending on which web host you use. Step-by-step: Create CNAME record Log in to your web host's control panel (often called cPanel, DNS Editor, or similar). Navigate to DNS settings or DNS zone editor for your domain. Locate a function to add a new record.Fill in the details like this- Type: CNAME- Name/Host/Subdomain: ex etidning (if you use etidning.example.com)(sometimes you write etidning.example.com, sometimes just etidning depending on the platform) - Value / Target / Pointing to: name.prenly.com. (this value is the first URL you get from us, you can always ask for it from support if you don't remember)Note that the dot at the end is not always necessary, but some DNS systems require it - TTL: Leave it at default (e.g. 3600) Click on Save / Add record / Update. It can take up to 24 hours for the change to take effect globally (due to DNS caching), but it is often much faster. You can test that it works via e.g.: - https://dnschecker.org- Or through the terminal with: nslookup etidning.example.com
-

Menu settings for the app (custom tabs)
24 Oct 2025
You can create your own menu in your app. It is possible, for example, to add external links, cookie and privacy policies. For each menu item, you can choose from a number of different icons.Required app version:Android: 11.6.0iOS: 10.9.0Note that some of the icons require newer versions. Menu settings for iOS & Android You can go in at any time and edit how you want your menu to look.To manage your menu in Prenly workspace here is a quick guide:1. Log in to your Prenly Workspace account2. Go to "Applications"3. Select the application you want to manage the menu for4. Click on "Menu" on the right5. Select "Menu Settings for iOS and Android"6. Manage your menu by drag and drop, add menu items or edit existing content Note: If the setting "Title page" is activated in Prenly Workspace, it may take one of the available places depending on how the settings look before. Add / change menu items 1. Click on "add menu" choice2. Choose external link (or podcast if you have this feature in your agreement)3. Enter a name4. Select icon (note that some icons are only available in specified releases)5. Click "add"6. Drag the object to the desired position Change the icon or name of a menu itemClick on the bar or select edit. Enter name, select icon and "update". Change order of menu itemsClick on a beam and hold down the mouse button. Drag the object to the desired position. Remove menu itemsClick the three dots and delete to remove a menu item you have added. System links cannot be deleted. Enable browser navigationIf the external page does not provide its own back/forward navigation, enable Browser navigation to add a small navigator. What can be added in the custom tab The content of the custom tab can be as simple as an external web page or you can develop an advanced and mobile optimized set up.Read more → Guidelines to avoid problems with future app updates • Never create links to a page where you can subscribe, or include further links, buttons, or content that could lead to a purchase or subscription page.• The page cannot mention Google, Android, or related services on an Apple device - and vice versa, pages viewed on Android devices should not reference Apple or iOS. JS Bridge When adding a custom tab with external content, it cannot communicate with Prenly by default. To enable this, you can use our JS Bridge, which lets the custom tab access app information (e.g. user consent).Read more → Technical details IsolationExternal pages in a custom tab are isolated from the app. Menus, tracking, and cookies are not shared. If needed, you must provide your own menu on the external page Link behaviourLink behaviour follows standard HTML:• Default or non-"_blank" → opens in the same view.• "_blank"→ opens in a new browser tab/WebView.• SPAs usually keep users in the same view without _blank targets. HTTP HeadersHTTP headers are additional information exchanged between your browser (or app) and a website to guide how requests and responses are handled. They are part of the HTTP protocol and are managed automatically by browsers, servers, or frameworks. Every webpage interaction includes request and response headers. There are three Prenly custom HTTP headers a customer can use to help identify the device and user status, allowing tailored content for each user, where each custom HTTP header needs to be enabled:• "X-Prenly-Client-Type" → "android" or "iOS"• "X-Prenly-Is-Logged-In" → 1 (yes) / 0 (no)• "X-Prenly-Logged-In-User-Id" → user ID (special approval required, GDPR)
-
Add and play podcasts in your apps
24 Oct 2025
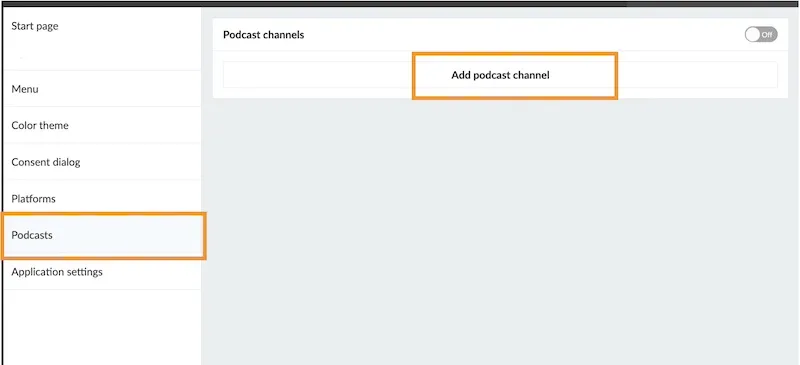
Display and play podcast episodes directly in your apps, so users can browse and listen without leaving the app. This keeps users in one place and gives them another reason to come back, even when there is no new publication yet. It’s a simple way to increase engagement and make your app more valuable. Live example See how podcasts look on the web application or mobile apps.thisis.prenly.com → How to activate it? If you are interested in the podcast feature, send us a message at hello@prenly.com.We’ll share pricing details and enable the feature for you. How does it work? Once the feature is enabled, you can add and manage podcasts in Prenly Workspace. Add a podcast channel Go to Applications Select your application Choose the menu option Podcasts Click on Add podcast channel Add your RSS feed and click Add Note: A podcast is always connected to an RSS feed, which contains all episode information and links to the audio files. Since Prenly does not host audio files, your podcast must be hosted externally (for example via Podbean, Libsyn, Buzzsprout, or your own server). Configure access (optional) You will be able to control access if you want to restrict access to subscribers only. Publish the podcast Turn the switch at the top to “On”. This activates the feature. Next, let's make sure the podcast is visible in your apps. Display podcasts in your apps On the startpage click “Add new component” choose “Podcast” configure how it should look You can decide whether to show episodes from all podcasts or only selected ones.Adding this component is important — it helps users discover your content faster and increases the chances that they actually press play. In your web application Add a podcast item in the menu of your web application Decide if you would like to place it in the expandable menu or as a visible icon next to it. On your native app Add a podcast section as a tab in your mobile apps Updates New episodes are automatically synced from your RSS feed. Note: Updates are not instant and may take a few minutes due to caching. Tip You are not limited to your own content either, as you can also include podcasts from partners to expand your offer and give your readers more to explore.
-

Create a CMP module
24 Oct 2025
According to new digital laws all web pages and Android / iOS apps must have a consent dialog for the collection of cookies and other personal data. This is easily done using a CMP (Consent Management Platform) module that you create in Prenly Workspace. Here we show you how! You can also use external CMP platforms where we currently support Didomi, Cookiebot, Usercentrics and Sourcepoint. Read more To configure external CMP platforms in Prenly Workspace you will need them to be activated for your application. Please contact our Help desk and ask them to activate the CMP platform you want to use. Please note that you have to be a workspace owner with full rights in order to create these modules and modify the consent dialogs. Create a new CMP module in Settings -> Consent dialogs. Start by logging into Prenly Workspace and going to Settings -> Consent dialogs -> click New. Name and choose the type and language of the new module. A window appears in which the module is to be created. Start by filling out its desired name. Then choose which type of module you want to use. (Prenly CMP is the standard preset, but you can also choose Didomi, Cookiebot or Usercentrics if these are used by your company and have been enabled) Finally you have to choose if you want to generate a new standard dialog text (and also in what language) or if you want to copy the dialog from an already created module. Then click Create to create the module. Configuring the module is as easy as counting to three! When the module is created it ends up in the list of available modules. If we click on a module in this list we can see which clients it's connected to and add new connections.Here we can also edit the module's name and title - and to a large extent configure its contents by scrolling further down on the page. Next to each segment are helpful explanations that we can read by clicking the question mark buttons or the three dot menus further down. Using the three dot menus we also have the option to reset each segment to its default text. If we want to save changes made we click the green Save button in the upper right corner. If we want to delete a module we can find this option when we click the three dot menu next to the Save button.Should the module already be connected to a client when we want to save our changes, the next step will be affected depending on how extensive our changes are. If we try to save major changes, a new consent from the users will be required. If, on the other hand, only a misspelling or similar is corrected, the changes are simply saved in the module without new consent being required. Go to your application -> Consent dialog to connect the app with the new module. To connect the newly created module with an application, we go to Applications -> select an application -> Consent dialog. There we easily connect any client (Android / iOS / Web) with a consent dialog by selecting the module in the respective client's list. Finally, save the new connection using the green Save button in the upper right corner. All done! Please note that the consent dialog will not appear on the mobile applications until they are updated to version 11.0.4 (Android) and 10.0.0 (iOS). For the web app, however, the dialog is displayed immediately. For those who use Google Tag Manager If your e-magazine uses its own Google Tag Manager container to send statistics for the e-magazine, you need to ensure that the user's consent in Prenly CMP is respected. This instruction assumes you are familiar with Google Tag Manager. Step 1. Create a new variable Press “Variables” in the left menu.Go to “User-defined variables” and press “New” Select variable type "Data Layer Variable" Select variable type "Data Layer Variable" Enter “consent.analytical” in the “Data Layer Variable Name” fieldAlso enter “consent.analytical” as the name at the top. Tap the box so it expands and you can select “Format value” Set "Format Value" so that the value “null” is set to “false” and the value “undefined” is set to “true”. Press "Save". You have now created your data store variable. It appears in the list of "user-defined variables". Step 2. Set your “triggers” Now set your triggers to include the variable as a condition. Tap on “Triggers” in the left menu. Open each trigger and add a condition that “consent.analytics” should be set to “true”. This means that the visitor's choice to reject statistics is respected. Add this condition to all your triggers. Save them. Check that all triggers have this condition. Step 3. Preview and publish your container If you have not yet added the Prenly CMP module to Workspace, the statistics will work as usual. Once you have added the Prenly CMP module, statistics will not be sent from the users who chose to reject statistics in their privacy settings. If you use other types of tags, there are also data layer variables for “consent.marketing” and “consent.functional”. The instruction above only applies if you use your own GTM container that you administer yourself. In that case you must configure GTM before activating the CMP module in Prenly Workspace. If you are using Prenly's Google Tag Manager container GTM-5B22TM then this configuration is done by us at Textalk Media. The same applies if your statistics are sent via Firebase for web. In these cases, you only need to activate the CMP module in Workspace.
-
Custom tabs and JS Bridge
24 Oct 2025
A common problem when adding a custom tab—an embedded webpage with a single designated URL available in the Android or iOS app—with externally sourced content is that this content is hosted on a separate webpage and cannot communicate directly with the Android or iOS app, as the app would see the custom tab as a “black box” whose boundary cannot be crossed. To address this, you can use the JavaScript SDK called JS Bridge, which lets you programmatically communicate on the client-side with the native app and the embedded webpage via JavaScript calls.
-
Using time zones in Prenly
24 Oct 2025
You can set your current time zone to make scheduling jobs in Prenly easier. The setting is made per account and applies everywhere where time is specified in Prenly Workspace. Unless you change the setting in your account, times are always based on Stockholm, Europe (+01:00) UTC. How to activate this 1. Log in to https://content.textalk.se/2. Select "My Profile" in the menu in the upper right corner3. Under the Time Zone section, set the current time zone you want your account to use. Questions and Answers Q: What happens when Sweden switches between summer and winter time?A: Your setting is then adjusted automatically.Q: Where does this setting apply?A: The time setting applies everywhere in Prenly, such as for push notifications and insert ads.Q: How are my colleagues affected by the time settings I make?A: The time settings are automatically converted and displayed according to the time zone that is set on each user's account.For example, if you select the time zone Helsinki, Europe (+02:00) and schedule a setting for 21:00, a Swedish colleague with the default setting Stockholm, Europe (+01:00) will see the time as 20:00 in their Prenly instance, adjusted to Swedish time.
-

Add a banner component to your application today
24 Oct 2025
Have you discovered our banner component? It can be used for a number of different purposes: - Advertising banner- Promote a special issue- Link to an information page/FAQ Here's how to insert a banner component 1. Open the startpage of your application and click Add Component. 2. Select Banner. 3. Name the component so you know what it contains. 4. Choose the URL for the banner: External URLFor example a link to a news page or FAQ.PublicationAn existing published publication.Modal loginThe same as the feature Log in with the option of using an image and text.ApplicationLink to an iOS or Android application.No linkIf you only want to insert an image.5. Upload a suitable image for different screen sizes: - Mobile devices, portrait (rec. width 1024 px).- Mobile devices, landscape (rec. width 2048 px).- All devices where nothing else is specified (max 5 MB, rec. width 2048 px). 6. You can choose whether the component should be displayed for a limited time. For example, start showing on Monday and end on Wednesday. 7. Select Update. 8. Select Save and publish.
-

Digital Accessibility Guidelines in Prenly Workspace
24 Oct 2025
Digital accessibility is important from several perspectives, and many people benefit from applications being as accessible as possible.This can include situations when you use tools such as screen readers or a keyboard, but also, for example, when you're standing in sunlight with your phone and can't see the screen properly, or when you're carrying something and only have one hand free to operate your device.There are general guidelines for digital accessibility: the Web Content Accessibility Guidelines (WCAG).To comply with these, there are certain things you need to ensure in Prenly Workspace.With the help of Prenly Workspace, you have the opportunity to adjust your settings to meet these guidelines.Headline on the start pageYour start page needs a headline that clearly describes the content of the page.The first heading must be a Heading 1, representing the top heading level. This benefits both sighted users and those who use assistive technologies such as screen readers.Add a text component at the top of the start page in your application, set a headline, and make sure it is a Heading 1.You choose the heading level by selecting the heading text and then choosing the desired heading level. Screenshot from Prenly Workspace showing how to set the heading level.Alternative image text for banner componentsAll banner components on the start page need alternative text (alt text) to enable visual description of the image.In the banner component, there is a field labeled “Image alternate text” that you should fill in. Screenshot from Prenly Workspace showing where the 'Image alternate text' field is located.Colors and contrastThere are many colors you can adjust to visualise the applications in line with your brand.Make sure that the color contrasts are sufficiently high — for example, between background color and button color, or background color and text.There are different accessibility requirements for elements such as headings and body text, to ensure that as many people as possible can distinguish the information. You can adjust the colors in Prenly Workspace.• For each start page componentYou can find the setting by selecting Applications in the left-hand side menu, then selecting your application and the middle menu option Start page.Choose to edit the desired component—either by clicking the component name in bold text or by using the three-dot menu and selecting Edit.Scroll down to the Appearance section.• Under ‘Color Theme’You can find the setting by selecting Applications in the left-hand side menu, choosing your application, and then selecting Color Theme in the middle menu.Then choose Custom Theme for each color theme category to set your own color.For each color selection you make, a so-called HEX code is generated, which you can see when you click on a color box. Screenshot from Prenly Workspace showing an example of where the HEX code is displayed.There are different ways to test contrast. We have a dedicated tool for Prenly: Color Contrast – Accessibility Check.There is also a general tool available from webaim.org: WebAIM: Contrast Checker.Link copyIt's possible to adjust the link copy on some start page components. The copy should be descriptive, to ensure the user understands what will happen if they click the link. As an example 'Read more' is not recommended, but 'Open archive' is a better option.This is especially important for users with screen readers.If you have any questions, feel free to contact us.
-
Create a startpage for your application
24 Oct 2025
The start page is where everything in your app comes together. From here, you can guide them to your latest publication, older issues, articles, the latest podcast episode, or the content of your custom tabs in the mobile apps. All this is done by adding the right components, such as banners, flashbacks, podcasts, text, etc. To be able to manage the start page, you need to have the Application Manager role or higher. Below we go through how to create a start page and how the different components work. How to set up a start page 1. log in Log in via https://content.textalk.se with the user information you received from Textalk support. If you have forgotten your password, you can reset it via the Forgotten Password service. If you have forgotten your username, contact support via hello@prenly.com. 2. Select applications In the menu you should now see the option Applications (if you have the right authorization). Select the application you want to build/manage a start page for. A tip is to first look under Application settings so that your title is entered in the application. Read more here. Under the Home tab, build your page with optional components: All optional components Carousel Present the latest issue together with all parts and annexes, show the last 7 issues, highlight interesting annexes. Available in four different sizes. Editors Choice Highlight one or more publications of your choice from the archive in a carousel. Available in four different sizes. Banner Make your own design and upload as an image. Can link to external URL, publication, login, application or be completely without link. Flashback Take your readers back in history and rediscover old issues and articles. What really happened 1, 5 and 10 years ago? Articles Highlight articles directly on the start page to encourage reading. There is also the option to enable article audio playback directly on the start page. Podcast Highlight the latest podcast episodes. News item Display the latest issue of a newspaper, supplement or magazine, select a special issue to highlight to your readers. Hero Highlight an issue of a newspaper or magazine that is particularly important, such as the latest issue or that special publication everyone should see. Text Welcome your readers, tell them about your app, your vision or just take the opportunity to wish your readers a great day. Rights container If you have many titles in your application, you can choose to show only what a reader subscribes to. Fill the container with, for example, carousels to present the reader's newspapers. Web content Make content in your custom tab more visible by showcasing it directly on the start page. This requires the use of JS Bridge and a custom tab set up. 3. add a carousel We start by adding a Carousel to display the latest publication. - Name the carousel so you can keep track of what it contains later (e.g. "Latest publication".) - Choose between four different sizes to display. Test what works best for your title. In this case we choose an Extra large. - Under Source, select the titles to be included in the component. - Under Content component, put a Heading that your readers will see (e.g."Latest edition"). You can also write a descriptive text if you want. - Under Publication content, you define how your title will be presented in the carousel and the publication date. For the title, click on the tag icon and select, for example, Publication date. It is also possible to have a subheading that could, for example, be the name of the title if you have several different titles displayed in the same carousel. - Under Publication days , first select the number of days of the title to be displayed in the carousel. Keep in mind that the number of titles displayed in full depends on the size you selected (see above) and the unit in which the start page is displayed. In our case, we set 1 publication day to show only the latest publication. - Under Start on day, you can choose to skip, for example, the latest publication and start on day 2, which will be useful in our next carousel. We leave this on 1 in this case. If you have several titles displayed in the carousel, there is also a setting to show the number of publication days per title. We recommend that you select the Publication days option for all titles if your titles have a similar publication frequency. If the publication frequency differs a lot, it is recommended per title to show all titles in the carousel. - Under Text on archive link you can change the text Archive which is set as default. For example, if you want to write "See the whole archive" instead. - Under Download you can set whether the publications in the component should be able to be downloaded offline from the start page, then a download icon will appear. - The Appearance section allows you to change background colors, text colors, etc. in the component. We will leave them as default for now. - The last selection is Time limit. Here you can control whether the component is displayed for a specific period of time. You can choose either start time, end time or both. If a component has no required content, such as Title, the checkbox will be grayed out and cannot be activated until it is filled in, to prevent empty components from appearing on your start page. Use the drag-and-drop menu to put the components in the order you want them to appear on your start page. 4. Save component When you are done with the configuration, select Update in the top right corner. The component is now prepared for publication but is not yet visible to the reader. The checkboxes allow you to activate or deactivate components. Only active components will be visible. 5. Create another carousel to show more issues We add a new carousel to show the last 2-15 issues. Follow the steps above for more detailed instructions: - Select size Medium. - Add the title. - Set the title to e.g. "Read our older publications". - Set the number of publication days to 15 and start on day 2 (i.e. skip the latest publication which is already above). - Update. 6. other settings Make sure to also add your logo and brand colors so that your app feels familiar and clearly connected to your brand. Select the Background and top bar section. Here you can set the color of the top bar, the text color, and whether you want a different background color on the start page. More color settings can be found in the menu on the left under "color theme". You can upload a logo by clicking on Browse and selecting a suitable image. Here we can also choose to hide the top bar for the mobile version of the app (Android and iOS) but we leave it visible in this case. 7. Publish your start page. Now we have a basic configuration of the start page ready and we are ready to publish it. After each component there is a checkbox to activate the component. We drag it to the right so that it turns green and then click the Save and Publish button in the top right corner to finalize the setup. Congratulations, you have now created your start page! 8. Delete or modify a component If you want to remove a component from the start page, you can either deactivate it (if it will be used again later) by changing the checkbox to gray or click on the three dots next to the component to select Delete. If you want to change something, just click on the component to open its settings. Remember to save and publish each change! Note: If a checkbox is gray, it means that the component lacks the required content and it cannot be activated until it is complete. A black checkbox means that the component is inactive, but can be activated. A green checkbox means that it is activated but not published until you click Save and publish - you do this when everything is ready. 9. add more components Now you can start exploring our other components that, along with the carousels, will enhance the reader experience. For example, you can use a banner for ad slots, podcast feed and highlight articles from the latest issue. Try it out!
-

Rename components
24 Oct 2025
You can easily give your components individual names in Prenly Workspace. Under the Applications menu, select which application to edit. Then in the Home menu, click on the three-dot menu on the right of the component you want to rename. Click Rename and then enter the new name for the component and click Update and finally click the save button at the top right. The video below shows how to rename the components.
-

Create deep links to open the app
24 Oct 2025
To drive traffic to your iOS and Android apps, you can send out links that automatically open the app when the user clicks on them on a mobile device.These types of links are often colloquially referred to as deep links, but technically they are called "Universal links" in iOS and "App Links" in Android.Most Prenly apps automatically support deep linking, but if your app doesn't support it, it may need to be updated.You can check if deep linking works by copying some urls from the web reader, pasting into an email, sending the email to yourself, and opening the email on an iOS or Android device. Long press on a link to show that it can be opened in either the app or Safari.The links that work are of the type:- Link to home page: Example https://etidning.dn.se/ - Link to a page in an issue: Example https://esvd.svd.se/p/svenska-dagbladet/2023-06-09/r/4/6-7/1001/1016121- Link to article page: Example https://eavis.lokalavisen.dk/p/folkebladet/07-06-2023/a/auning-aktivitetspark-vokser-spaden-gar-snart-i-jorden-til-naeste-etape/2645/1012971/40483101- Link to title page and title summary (only available in some applications): Example https://emagasin.arcy.se/titleshttps://emagasin.arcy.se/title/amelia/3051- Link to the archive: Example https://eavis.lokalavisen.dk/search- Dynamic link to the latest issue in a title: Example https://eavis.lokalavisen.dk/p/adresseavisen/latest/2637Please note that this link must be created using the title-slug and title-id - which you will find in the regular url that the dynamic link opens, when typed, it points tohttps://eavis.lokalavisen.dk/p/adresseavisen/07-06-2023/r/1/1/2637/1012975where title-slug is "addresseavisen" and title-id is "2637".If the deep linking works properly, you can also in iOS - if you long press on a link in Mail - open a menu where you can choose whether you want to open the link in the Prenly application or in Safari. The iOS smart banner appears at the top of the mobile web page in Safari.Please note that not all Prenly applications are yet configured to support deep links. Please contact our helpdesk (hello@prenly.com) if your app does not work with deep links.Also note that deep links only open the app when you open a link from another application or webpage outside your own domain. If you manually enter a link in Safari or use a bookmark in Safari, the link will open in Safari. In Chrome for Android, the smart banner appears at the bottom of the webpage.If the app is not installed on your device, or the app cannot be opened for some reason, a "smart banner" should appear at the top of mobile Safari.There you can easily open the app or go to the AppStore to download it.The Android smart banner appears at the bottom of the webpage in mobile Chrome.If you click to close a smart banner, you can get it back by clearing your browser's cache.