


Other articles by Sofie
-

Making news accessible for everyone – together with MTM
2 Apr 2026
Accessibility has been part of Textalk’s DNA since the very beginning. In 1979, our founder Henryk Rubinstein developed the world’s first digital newspaper for visually impaired readers, laying the foundation for what would later become Prenly. We have continued running our so-called talking newspaper service ever since. What is our talking newspaper service? Instead of reading a printed page, the newspaper content is transformed into a structured, accessible format. The content is then delivered through dedicated apps, tailored to different user needs, where it can be listened to or used with assistive tools like screen readers or braille displays – making it possible to access the news in a way that truly works for each individual. The talking newspaper service provides various alternatives for consuming newspapers, one of them being the Akila app powered by Prenly. The Akila app is intended for visually impaired readers as well as readers with dyslexia. Today’s challenge The way newspapers are produced and consumed has changed dramatically. Originally, newspapers were designed for print. Today, publishers create a much richer digital experience: Additional articles are published only online Digital-only editions and supplements are created Visually driven content such as images, layouts, or design-heavy articles are added While this shift has created more value for most readers, it has also introduced a gap. Visually impaired users cannot always access this expanded content in the same way, which can lead to an uneven experience compared to other readers. Another challenge is how content is consumed. A full newspaper can take several hours to listen through – often up to six hours. While sighted readers can quickly scan headlines and choose what interests them, this level of flexibility is harder to achieve in audio-based experiences. Our plan forward Our goal is simple: to give people with different abilities the same opportunity to access and explore news as everyone else. To better understand which changes will truly help users, MTM and Prenly recently completed a pre-study exploring how people interact with accessible content. This gave us valuable insights into what works well today versus where improvements are needed. One encouraging takeaway was that we don’t need to start from scratch. Much of the technology needed to improve the experience exists today. Based on these findings, the next step is to test improvements with users and gradually make the experience easier to use. A key focus is personalization based on user interests, combined with improving how content is structured and presented. This makes it easier to find relevant content without removing depth or choice. We also want to explore introducing voice navigation in the Akila app, making it even easier for users to move through content in a way that suits their needs. What this means for our users Making the service more personal and easier to use means people can find the news they care about faster and be engaged from the first minute. It becomes simpler to explore and use the service more often, and stay interested over time. This creates a better overall experience that encourages users to keep, extend, or start a subscription. Learn more about MTM and their work here →
-
Third-party CMP modules
30 Mar 2026
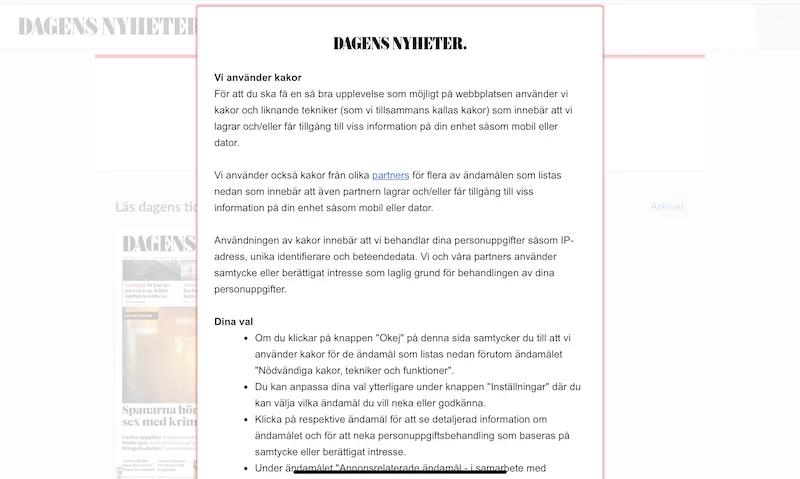
Prenly CMP can be used as a consent module in the e-paper at no extra cost. It meets the legal requirements but is limited in functionality and form.If you want to use a more advanced CMP module, we currently (2024) offer integrations with four third-party tools: Didomi, Cookiebot, Usercentrics and Sourcepoint.With any of these, you have greater possibilities to customize the shape and color and also integrate with other services so that the consent applies across multiple subdomains.The visitor is presented with the CMP dialog when they first visit the e-journal. The visitor can then choose to "Accept all" or make their own personal settings regarding consent for different purposes. The visitor's choice is saved, but the visitor can change their choice on a subsequent visit by re-opening the CMP dialog. If you want to use a third-party CMP, you will need to enter into an agreement with the CMP company yourself and make sure to set up consent dialogs and the features that need to be displayed and managed. An SDK (software development kit) needs to be built into the native apps and configuration needs to be done in Workspace to link the external CMP dialog with the app's functions so that the user's choices are both saved and respected. Contact our support to enable external CMP modules for your application in Prenly Workspace.There will be an additional ongoing cost for the integration we do with the third-party tool. Do you want to use any other CMP module than the ones we support today? Contact our sales team to get a cost estimate. Below is a review of the different tools that Prenly supports: Didomi https://www.didomi.io/Used on Bonnier News e-newspapers, for example Dagens Nyheter, works both on web, ios and Android.To use Didomi in the ios and Android apps, Didomi SDK needs to be built into the apps, which requires an app update.You need to create consent dialogs (consent notices) for web and native apps in Didomi admin and download api key and notice ID.Next, modules need to be created in Prenly Workspace where a number of values must be entered: - API key (Didomi's organization id for your account)- Notice id (if app id or domain is not specified in Didomi's admin)- Purpose ids for functional, analytical and marketing.- Vendor ids to control Prenly's functions.These values you need to get in Didomi's admin. Cookiebot https://www.cookiebot.com/ - has been bought by Usercentrics.Used in the web reader, currently on JP/Politikens e-newspapers, e.g. Politiken e-avis. A module needs to be created in Workspace and connected to the e-newspaper web client, where you enter the "Domain group ID" as defined in Cookiebot.Cookiebot scans the web reader's cookies and you must map each cookie to the correct purpose in Cookiebot's admin. Usercentrics https://usercentrics.com/ Currently used in apps for IOS and Android in JP/Politikens e-newspaper apps, for example Jyllands-Posten e-avis.To use Usercentrics, an SDK needs to be built into the IOS and Android apps, which requires an app update.Once the SDK is in place, the configuration can be completed in Prenly Workspace. There, a new consent module needs to be created and values entered for "settings-id" and also the mapping needs to be done between "service-id" in Usercentrics and features in Prenly. Sourcepoint sourcepoint.comCurrently used by Schibsted, for example in Aftonbladet and Svenska Dagbladet's e-newspapers, both web, ios and Android.To use Sourcepoint, you need to contact Prenly support, as a special SDK needs to be built into the app and a number of configurations need to be made in Prenly Workspace.
-

Prenly at Future of German Media 2026 in Hanover
27 Feb 2026
On March 11–12, we’re heading to Hannover for The Future of German Media (TFGM) 2026 – a key meeting place for German quality journalism and digital media innovation.The summit brings together leading voices from editorial teams, publishing houses, product, sales and the wider digital economy to discuss the future of media business models, brand strategies, and the opportunities and challenges of AI. About the Future of German Media (TFGM) TFGM is an initiative by MADSACK Mediengruppe and serves as an open forum for exchange, innovation and collaboration across the media industry. After a strong premiere in 2025, the summit returns to Hannover for its second edition – hosted at the historic Alte Druckerei. Four focus areas for 2026 This year’s program is built around four themes that are crucial for the future of media and sustainable, digital-first journalism: Content: Quality through relevance – new journalistic products, creative platform strategies, and storytelling formats designed to create real impact. Business: Sustainable success in a disruptive environment – from subscriptions and advertising to innovative community and newsletter approaches. Leadership: Responsibility in times of transformation – building trust, clarity and decision-making strength in changing organizations. New Audiences: Winning new target groups – reaching younger generations and building long-term trust and relevance. Deep dives & networking on March 11 A highlight of TFGM 26 is the new Deep Dives: compact masterclasses that share hands-on insights and practical knowledge within the summit’s core topics. The day ends with the TFGM Party – designed for relaxed conversations, new connections and meaningful exchange. Hope to see you there as well! Why this matters to us At Prenly, we work with publishers and media houses who want to build sustainable, digital-first businesses by strengthening four key areas: Publishing workflows – making everyday publishing easier and more efficient across teams Subscription growth – improving conversion, onboarding, and retention Advertising monetization – supporting scalable revenue strategies Operational efficiency – reducing complexity and creating a more unified setup In short: these are the same practical priorities being explored across the summit – and the reason we’re excited to join the conversation in Hannover. Let’s meet in Hannover If you’re attending TFGM 2026 and looking for a smarter, more unified way to manage digital publishing and subscriptions, we’d love to connect. Please reach out to us and book a meeting in Hannover.Looking forward meeting you in Hannover! Ravi Sen GuptaSenior Account Executiveravi@textalkgroup.com LinkedIn -> Esther Dietzsch Account Executiveesther@textalkgroup.comLinkedIn ->
-
Generate a Privacy Policy
27 Nov 2025
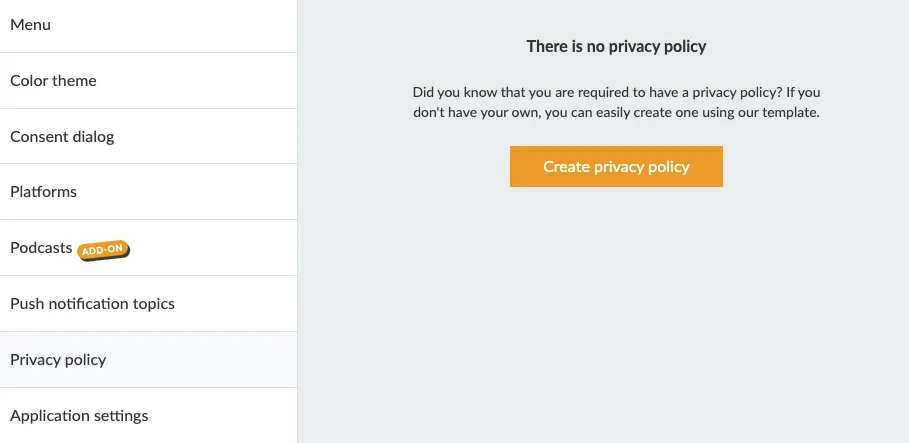
If you do not have an existing Privacy Policy, you can create and host your Privacy Policy page directly in Prenly. In Prenly Workspace in the left-hand menu, click Applications and select your application where you want to add the Privacy Policy. In the application menu, click Privacy Policy. Here you can get started on creating your privacy policy. Next you can either paste in existing content, or, if you do not have an existing Privacy Policy, you can use our tool to generate a new Privacy Policy: https://privacy.prenly.co/ In the top-right corner, select the language selector to switch to your preferred language. This is important to remember: You are always the Data Controller who has the responsibility to ensure that the policy is correct for your company. Please note that the page currently doesn't store things, so reloading the web page will empty the form.
-

Google | Validate Account
24 Oct 2025
In Google Play Console you will see this banner: Picture showing banner in Google Developer account. Click on “View details” and you will see the following view: Picture showing instructions to very the organization's website. Click on “Go to Search Console”.In Google Search Console under Domain fill in your company domain (e.g. prenly.com). Picture showing the Google Search Console. You will see something like this: Picture showing instructions for domain ownership via DNS record. ... Google wants you to prove that you own the mentioned domain by adding a special code to your domain’s settings (this is called a DNS TXT record). Here’s how to do it: Log in to Your Domain Registrar • Go to the website where you purchased or manage your domain (e.g., GoDaddy, Namecheap, Cloudflare, or a similar service).• Log in using your account credentials. Go to Your DNS Settings • Once logged in, find the DNS settings or Zone Editor for your domain.• It’s often located in a section called Manage Domains or DNS Management.• Look for something like “Edit DNS Records” or “Zone File Settings”. Add the TXT Record • Record Type: Select TXT (as shown in the screenshot, this is the record type Google is asking for).• Host/Name: Some registrars require you to enter @ (this represents the root domain). Others might ask you to leave it blank or enter your full domain name.• Value/Text: Copy the exact TXT value from the screenshot: google-site-verification=xyz and paste this into the Value or Text field. Save the Record • Once you’ve entered the details, click Save or Update.• The TXT record is now added to your domain’s DNS settings. ... Verify in Google Search Console • Go back to Google Search Console.• Click the Verify button at the bottom of the screen.• Tip: If on Google Search Console you see graphs and data, that indicates that the txt record has been successful. Verify in Google Play Console • In Google Play in the banner showing “Finish setting up your developer account” click on “view details” • Click on “verify website”• If this leads you to your account details, scroll down to your organisation's website and click on the button “...” • Check if the banner on the Google Play Console startpage disappeared ... Important Notes• DNS changes may take some time (up to 48 hours) to update across the internet. If verification doesn’t work immediately, wait a few hours and try again.• If you don’t know where your domain is registered or managed, contact the person or team responsible for setting up your website.•
-

Upload paper in Webarch
24 Oct 2025
Webarch is used for the material to be processed so that the article reading mode becomes available. Start by visiting the page: https://prenly.webarch.se Log in with your login details, and then start uploading material according to the instructions below. 1. The first page after logging in shows your newspaper/newspapers. Select the newspaper you want to work with. 2. To create a new edition, click on "Create new issue" and fill in the publication date in the box that appears and select the PDF's to be uploaded. NOTE: You can only upload one issue per publication date in Webarch. If you upload multiple issues on the same date, only the most recently exported issue will be available in Prenly. In the "External ID" box, you do not need to write anything if you do not want to. It may be that for internal use you wish to write, for example, No. 10, for the edition. In the "PDF actions" menu, you only need to click on "Cut pages at crop marks" IF the edition contains crop marks, otherwise leave it blank.Likewise, "Split spreads into pages", if the edition is structured as spreads instead of pages, click in this box, otherwise leave it blank as well. 3. Once done, click the "Create issue" button and the new issue will be uploaded. Everything is uploaded correctly if the issue looks like a stop light; "red" "yellow" & "green". Now everything is ready and our operators will take over and manage the issue.
-
Handle date ranges
24 Oct 2025
The date range selector is at the top right of every report except the Real-Time reports. Click the arrow next to the existing date range to open the controls. Select one of the following from the Date Range menu: Custom: Data for your custom date range. (See instructions, below.) Today: Data available for the current calendar date up until the time of your selection Yesterday: Data for the previous calendar date Last Week: Data for Sunday through Saturday of the previous calendar week Last Month: Data for the first to last day of the previous calendar month Last 7 days Last 30 days Click Apply. Custom date range To set your own dates, select Custom from the Date Range menu, then follow the instructions below.To select a single date:Click twice on any date on the calendar OR Enter a single date in both Date Range fields.To select a specific week:Click the first and last days of the week on the calendar OREnter the beginning and end dates in the Date Range fields.To select a range of dates:In the calendar, click the desired start date, then click the end date. The selected days are highlighted. OR Enter start and end dates in the Date Range fields.To compare two different date ranges:Select the Compare to checkbox, then select Custom, Previous Period, or Previous Year. Use the controls to set the second date range.Click Apply.
-
How the link structure works in a Prenly
24 Oct 2025
Understanding how a URL is structured can help editors, developers and analysts alike to quickly identify the type, origin and structure of content. In this article, we break down two typical URLs from Prenly: - One pointing to a page in a publication- One pointing to an article.We anonymize parts of the links to focus on the structure rather than the content. Example 1: Page in a publication https://[domännamn]/p/[slug]/2025-01-01/r/3/4-5/1234/123456 What each part means: https://[domain name] The server where the content resides /p/ Stands for publication, and is used as the entry point to the entire system for issues and articles [slug] A specific name for the title, e.g. My magazine becomes my-magazine. This slug is configured in the system administration interface per title. 2025-01-01 Name of the publication. By default this is a date, but it is also possible to change this in Prenly admin to a text. /r/ Stands for replica, i.e. reading in standard/PDF mode 3/ An internal sorting parameter for spreads, where each number represents a pair of pages. For example:1 = pages 12 = pages 2-33 = pages 4-5 4-5/ The actual page range of the spread. 1234 Title ID in Prenly 123456 Issue ID, i.e. the specific numbering of that particular publication. Example 2: Article https://[domännamn]/p/[slug]/2025-01-01/a/[artikel-slugg]/1234/123456/555666777 What each part means: https://[domain name] Same as above: domain of the publishing platform. /p/ Publication [slug] Name of the publication (title) 2025-01-01 Same as above, name of the publication. /a/ Stands for article [article-slug] A search engine friendly variant of the article title, e.g. this-is-the-title-name 1234 Title ID (same as above) 123456 Issue ID (same as above) 555666777 Article ID - a unique ID for the specific article. Summary These links are systematically designed to combine readability with functionality. They make it easy to: - Identify which publication the content belongs to- See the publication date- Know whether it is a whole page/page break or a single articleFor systems that use this approach - such as editorial platforms like Prenly - it provides an efficient and predictable way to link content, automate processes and create metadata for sharing, analysis and indexing.
-
Remote API
24 Oct 2025
The purpose of this document is to explain: 1. ...how the Prenly ecosystem allows user authentication and authorization to be handled by a technical infrastructure owned by the publisher or a third party. 2. ...how a technical implementation can be done by building a modest REST API that follows the “Prenly Remote authority API” specification. Contact Please contact us by e-mail at hello@prenly.com or by phone at +46-31-3884740 for questions or issues regarding this API. Definitions Authentication is the process of verifying someone’s, or something’s, identity, as in whether they are who they say they are, before granting access to protected data. Normally, this is done by providing some credentials such as a username and a password. Given that the credentials match a stored record, the user is “verified” (authenticated) by applying the principle that the user knew something only the “real” user would know. Authorization is the process of deciding what resources a user has access to, i.e. what data the user has permission to access as in what the user may or may not do. For Prenly, this is determining what publications the user can see and open to read. An API (Application Program Interface) is a set of routines, protocols and tools to handle the interaction between different systems or parts of systems, dictating system-to-system communication. In Prenly, an authority is a technical implementation deciding how authentication and authorization are handled by a Prenly application within Prenly’s backend. Introduction The Prenly Remote authority API introduces the ability to replace Prenly’s authorization and/or authentication handling by implementing API endpoints that follow an API specification, which enables a Prenly customer to authenticate and authorize according to their system, requirements and needs. At the core, this enables the Prenly application’s authority to authorize and/or authenticate users as they engage with the Prenly application, i.e. when they read publications within an app, by proxy of the Prenly Remote authority API. The Prenly authority will mediate authentication and authorization requests between users and Prenly where no direct communication is allowed between users and the API implementation. Instead, the API implementation informs the Prenly authority how to act upon the users’ authentication and authorization requests. Implement your API Understand how the user consumes the Prenly application Prenly applications Prenly serves the end user with applications mainly used for reading publications and articles. The application is either a native mobile app on the Android or iOS platform, or our responsive web-based e-reader. These two application types offer a similar user experience. The application may contain published publications that are public for everyone, as well as protected content that needs some kind of permission to be consumed. For native apps, it is also possible to allow any non-logged-in user to consume some publications for free before login is required. Navigating the application By using the application, a user can normally see the start page containing components displaying published publications. Public publications can be opened and read by selecting the publication. But when the user tries to open a protected publication, the application will require the user to log in (authentication). After logging in, Prenly will decide whether the requested publication is readable for that user (authorization). If so, the publication will be opened, ready to be consumed. If the user does not have read access, the user will be notified within the app. The protected content will not be shown, but the user will still be logged in. In some cases, an application will require the user to log in to display certain publications, especially when not all published publications can be seen by just anyone. For example, publications accessible via a subscription where other non-subscribed published publications should be hidden. Setup an API environment Trusting Prenly requests Prenly sends a pre-defined secret key in all authentication and authorization requests. The key is known only by Prenly and your system. You should check that the provided key matches the expected key for all API requests. You may also open up your API endpoints for certain IP addresses only for extra security. Please contact us for an up-to-date list of IPs Prenly will use in requests if you would like this extra security. Encrypt the traffic We strongly recommend disallowing any unencrypted HTTP traffic to your API. Use HTTPS! Allow for a RESTish behaviour < p> Currently, requests are made with HTTP POST, but the API should not be limited to using any HTTP methods for future endpoint expansion. Please see the current API specification for more details, as the API specification has the final say in any discrepancies with this documentation. In API responses, HTTP status codes are used to inform Prenly about the result. You must be able to respond with different HTTP status codes, for successful requests as well as for data errors, runtime errors and unexpected server errors. Request parameters are currently passed as JSON in the request body. All endpoints are currently responding with JSON in the response body. Get acquainted with OpenAPI 3.0 The API specification is documented in a yaml file according to the OpenAPI 3.0 standard (formerly Swagger), stating the technical aspects and requirements of the API and each endpoint, including all request and response data objects. Auto-generated documentation is provided at https://apidoc.prenly.com/remote-api/ and the specification file is available at https://apidoc.prenly.com/remote-api/spec/v1.3-specification.yaml. Feel free to make a copy of the specification file and modify it to your API endpoints (URLs) as the auto-generated specification contains generic named endpoints as a reference. With this file, you can easily build a testing environment with ready-made tools provided at https://openapi.tools/ (see the section “Testing). Read more about OpenAPI, including the specification, at https://www.openapis.org/. Build the authentication endpoint See the API specification at https://apidoc.prenly.com/remote-api/ for the authentication endpoint(s). You can choose the endpoint URL exactly as you wish; however, the endpoint must follow the API specification. Request parameters Request parameters are part of the request body as JSON and are sent by Prenly for each request. Response on success A successful login must respond with HTTP status code 200 and a JSON response with the unique identifier of the user that was authenticated. Response on failure Known errors that depend on the given request parameters must respond with one of the HTTP status codes 401, 403 or 412 as specified in the API documentation. These errors must include a JSON response following the Error data model, which you can find specified at the bottom of https://apidoc.prenly.com/remote-api/. You can choose to either provide an Error or an empty JSON object. Currently, only the "message" property is required if providing an Error. It is, however, recommended to also provide a "code" property. We highly recommend that you provide a “message” property value in English that represents the error in some way. If your software has some kind of internal codes, it is suitable to use them here if future mutual troubleshooting will be needed. Do not include personal data that is not needed, such as personal names! Unique IDs are good enough to troubleshoot. This information is never shown to the end user but can be logged in Prenly to simplify troubleshooting. Build the authorization endpoint See the API specification at https://apidoc.prenly.com/remote-api/ for the authorization endpoint(s). You can choose the endpoint URL exactly as you wish; however, the endpoint must follow the API specification. Request parameters Request parameters are part of the request body as JSON and are sent by Prenly for each request. Response on success A successful fetch of the user information must respond with HTTP status code 200 and a JSON response according to the UserSummary data model as described in the specification. Fields in this data object are explained at the bottom of https://apidoc.prenly.com/remote-api/. What properties are used to The only property that currently cannot be left blank is “uid”. The other properties can be omitted; however, we recommend that you specify a “productCodes” property to better control if Prenly should or should not grant read permission to publications. Currently, Prenly will treat a missing “productCodes” property as an empty list. Response on failure Known errors that depend on the given request parameters must respond with one of the HTTP status codes 403, 404 or 412 as specified in the API documentation. These errors must include a JSON response following the Error data model as described above. Testing It is important to test your implementation for the authentication and authorization endpoints. Refer to https://docs.google.com/document/d/1UxmvDs7_Z0GwGbwCHXr4Ojpb9HaZif1nJ8YRMmztzeo/ for more information regarding testing your endpoints. What happens in Prenly? When the user logs in (authentication + authorization) When the user requests to log in and submits the login form, the credentials are sent to Prenly’s authority (encrypted with SSL). From there, the authority handles how to use these credentials to authenticate the user. For the Remote authority API, this means that the credentials are sent to the remote endpoint according to the specification. Prenly will process the API response and handle both successful and failed authentication requests, where the user will see an error depending on the failure response HTTP status code. See below for more details. If authentication succeeded... A successful login will trigger a separate authorization request to the authorization remote API endpoint to fetch the user’s information, which is cached in Prenly for a limited set of time. The application will also reflect that someone is logged in, with the name or email based on what user data was returned within the user information. Note. If the immediate authorization request responds with HTTP 401 directly after the successful authentication request, Prenly will treat it as an implementation error, log out the user, and inform the user that their login credentials were wrong. To prevent this, it is recommended to use the token concept found within the UserIdentification schema in case you want to support logging out the user remotely. If credentials were wrong… If the request was technically successful, but the credentials were wrong, the Prenly authority will notify the application, and a message about wrong credentials will be presented to the user. If something failed... Other client- or server-based errors, or network errors, are caught and logged by Prenly. The application will be served with a suitable error message to present to the user. When the user keeps reading Caching for repeating requests Caching a successful authorization response data (the user’s information) eliminates the need for repeated requests to the remote API to fetch user data that seldom changes. Each Prenly customer can choose the cache expiration time; we recommend setting 30 minutes, where the minimum allowed cache expiration time is 20 minutes. Re-authorization Prenly will use the cached result for each authorization request as long as the cache has not expired. If the cache has expired, then Prenly will trigger a new authorization request to the authorization endpoint in the remote API. This will update the user’s data, such as product availability, as well as the cached data. Failure handling If a server error (5xx HTTP code) occurs when re-authorization is triggered, the cache expiration time is extended by five minutes. Prenly does this to avoid users being logged out for temporary network or server errors; the user will continue reading as if nothing happens, and after five minutes, a new re-authorization attempt is made. This behaviour lasts as long as the server problem persists. Prenly will log such technical problems and try to reach the customer if this happens. Going live When you think that the API is ready to go live (you are done developing and testing your implementation), contact us to take the last steps. Prenly will require information from you to set up your implementation in Prenly. The information will be evaluated, and if everything is up to par, your implementation can be used in Prenly for your chosen e-paper Prenly applications. Setting up Prenly Before your implementation of the remote API can be used in Prenly, you must provide: • Your chosen secret key for the authentication and authorization endpoints • Your chosen API endpoints • A list of products that should grant read permissions and for which Prenly title (only Prenly-known products within the product codes list from the authorization endpoint can grant read permission) • Your desired cache expiration time • A URL where a new user can create an account • A URL where a user can delete their account • A URL where a user can reset their password (in case they forgot their password) • We recommend that you also provide a URL where an authorized user without any Prenly-known product codes may activate a product (i.e. purchase a subscription) • User credentials (username and password) for the test user, where the user is shared by Textalk, Apple, and Google (if you have native apps), and at least one product code must remain active as long as the remote API is used by your e-paper’s Prenly authority
-

Menu settings for the app (custom tabs)
24 Oct 2025
You can create your own menu in your app. It is possible, for example, to add external links, cookie and privacy policies. For each menu item, you can choose from a number of different icons.Required app version:Android: 11.6.0iOS: 10.9.0Note that some of the icons require newer versions. Menu settings for iOS & Android You can go in at any time and edit how you want your menu to look.To manage your menu in Prenly workspace here is a quick guide:1. Log in to your Prenly Workspace account2. Go to "Applications"3. Select the application you want to manage the menu for4. Click on "Menu" on the right5. Select "Menu Settings for iOS and Android"6. Manage your menu by drag and drop, add menu items or edit existing content Note: If the setting "Title page" is activated in Prenly Workspace, it may take one of the available places depending on how the settings look before. Add / change menu items 1. Click on "add menu" choice2. Choose external link (or podcast if you have this feature in your agreement)3. Enter a name4. Select icon (note that some icons are only available in specified releases)5. Click "add"6. Drag the object to the desired position Change the icon or name of a menu itemClick on the bar or select edit. Enter name, select icon and "update". Change order of menu itemsClick on a beam and hold down the mouse button. Drag the object to the desired position. Remove menu itemsClick the three dots and delete to remove a menu item you have added. System links cannot be deleted. Enable browser navigationIf the external page does not provide its own back/forward navigation, enable Browser navigation to add a small navigator. What can be added in the custom tab The content of the custom tab can be as simple as an external web page or you can develop an advanced and mobile optimized set up.Read more → Guidelines to avoid problems with future app updates • Never create links to a page where you can subscribe, or include further links, buttons, or content that could lead to a purchase or subscription page.• The page cannot mention Google, Android, or related services on an Apple device - and vice versa, pages viewed on Android devices should not reference Apple or iOS. JS Bridge When adding a custom tab with external content, it cannot communicate with Prenly by default. To enable this, you can use our JS Bridge, which lets the custom tab access app information (e.g. user consent).Read more → Technical details IsolationExternal pages in a custom tab are isolated from the app. Menus, tracking, and cookies are not shared. If needed, you must provide your own menu on the external page Link behaviourLink behaviour follows standard HTML:• Default or non-"_blank" → opens in the same view.• "_blank"→ opens in a new browser tab/WebView.• SPAs usually keep users in the same view without _blank targets. HTTP HeadersHTTP headers are additional information exchanged between your browser (or app) and a website to guide how requests and responses are handled. They are part of the HTTP protocol and are managed automatically by browsers, servers, or frameworks. Every webpage interaction includes request and response headers. There are three Prenly custom HTTP headers a customer can use to help identify the device and user status, allowing tailored content for each user, where each custom HTTP header needs to be enabled:• "X-Prenly-Client-Type" → "android" or "iOS"• "X-Prenly-Is-Logged-In" → 1 (yes) / 0 (no)• "X-Prenly-Logged-In-User-Id" → user ID (special approval required, GDPR)
-

Add a banner component to your application today
24 Oct 2025
Have you discovered our banner component? It can be used for a number of different purposes: - Advertising banner- Promote a special issue- Link to an information page/FAQ Here's how to insert a banner component 1. Open the startpage of your application and click Add Component. 2. Select Banner. 3. Name the component so you know what it contains. 4. Choose the URL for the banner: External URLFor example a link to a news page or FAQ.PublicationAn existing published publication.Modal loginThe same as the feature Log in with the option of using an image and text.ApplicationLink to an iOS or Android application.No linkIf you only want to insert an image.5. Upload a suitable image for different screen sizes: - Mobile devices, portrait (rec. width 1024 px).- Mobile devices, landscape (rec. width 2048 px).- All devices where nothing else is specified (max 5 MB, rec. width 2048 px). 6. You can choose whether the component should be displayed for a limited time. For example, start showing on Monday and end on Wednesday. 7. Select Update. 8. Select Save and publish.
-

Mark favourite
24 Oct 2025
Bookmarking publications and/or applications in Prenly is easy. In Prenly Workspace, there is now a "drag-and-drop" menu on the left side. Go to Publications and Applications and you will see it.To change the order, select the three dashes to the left of the publication name and then drag the title in the order you want.To select a favourite (mark a title with a ⭐), just click on the transparent star to the right of the title name. Remember that all settings are individual, and will not affect other team members' Prenly Workspace. You can also see how to bookmark a publication and/or application in the video guide below.
-

Write in Prenly
24 Oct 2025
Regardless of what you want to say, it is easy to say it with Prenly! To write in Prenly is as simple as creating a new article and starting writing in a selected publication.Select publicationRegardless of what you want to write, you need to select a publication to host your article. Select the publication of the Prenly title of your choice by clicking the publication card either on the cover image or name field.If the publication does not exist, select the button "Create publication" to create a new publication on the selected Prenly title. Enter a delivery date and name. Select whether the publication should be public or "Same as title" to use the title's general read permissions settings. Once you are happy with the configuration, select "Create" to create your new publication. Prenly will, by default, use your chosen delivery date as the publication name when Prenly automatically creates a new publication; but you are free to select whatever name you would like. Select "Create publication" to create a new publication. Configure your new publication by entering a delivery date and a name prior to creating it by selecting the button "Create".You will enter Prenly Editor once you have selected a publication.Prenly EditorSelect the panel "Articles" if it is not already selected.Create your first article by selecting the button "Create new article". Prenly will create a new blank article and you can immediately start to fill it with your content.Select the button labelled "+ New content" and then select "New article" from the drop-down menu to create a new article if you have articles from before. Select "+ New content" and then "New article" to create a new article.Content fragmentsAll content disregarding type in Prenly exists as content fragments. There are two top-level fragment types; media, and text. Select the top-level fragment of your choice:* Select video to add a media container for a video;* Select image to add a new media container for an image;* Select text by writing a text of your choice;You can re-arrange the order of your content fragment once it has been created. You re-arrange it by selecting the three-line anchor on the right-hand side of the context fragment and then dragging it to the new position. View over a newly created unnamed article.New content fragmentCreate a new content fragment by selecting the previous content fragment, and create a new content fragment by selecting the ENTER key on your keyboard.You can delete a content fragment by selecting it and then BACKSPACE till the content fragment is empty. Prenly will automatically delete the content fragment on the final BACKSPACE on the active content fragment.Media containerEach media container, whether if you add video or image, will let you add more media content, re-arrange the order if more than one media is added, set media description, and remove media content.You can adjust the size of the media container by setting the width. Select the container and then select an inline or full-width size. Prenly will, by default, select the full-width size on media container creation.Prenly will automatically display a media carousel of your media container if it contains more than one media. Your readers can then select the next or previous media content by the pagination arrows.VideoOnce in the media container, create a new video fragment by entering a URL to an embedded video player, e.g. YouTube. Prenly will detect what type of video host you have selected and do some setup in the background. Once it has been completed, select the button "Add" to add your new embedded video as a new video container fragment or select "Cancel" to abort.Prenly will extract a description text from your video but, if you want, you can edit the text by selecting the description under the video. Select "Add Video" to add a new video media container. Enter a video URL, e.g. a YouTube-URL. View over completed background setup. Select "Add" to add the video. View over a new video media container added to the article.ImageOnce in the media container, to upload new images select "Browse" to open a file-handler on your local device or select images on your local file-handler and drag-and-drop them to the designated area. After you have selected your new image Prenly will close the media modal and add your new image to the image container.To add an image description, select the description area under the image by touching the area immediately underneath and start entering your image description.You may also re-add previously added images to the article or publication by selecting "Article images" or "Issue images" in the mini-menu in the image media modal. Prenly will assume you want to add new images and automatically select the mini-menu option to "Upload images". Select "Add image" to add a new image media container. Drag-and-drop an image to add it, or select "Browse" to open a local file-handler on your device. View over a new image media container added to the article. View over added image description to the current image within the added image media container.TextEnter text to create a new text fragment. Once a text fragment has been created you can change its type by selecting a new type in the left-hand drop-down menu. By default, Prenly will assume that your text fragment is an article body.Prenly supports the following text fragments:* Vignette;* Heading 1; * Heading 2;* Heading 3;* Heading 4;* Heading 5;* Heading 6;* Lead;* Body;* Quote;* Byline;"Heading 1" is the largest headline often usable as the article primary headline. Heading 2 to Heading 6 is sub-headings.SectionWhen you write an article Prenly will place it in a section. By default, Prenly will use the default section – which is named as the current selected Prenly title.Change the section the article belongs to by selecting the section in the article status bar and selecting the new section.You can create a new section by selecting the section in the status bar and create a new section by selecting "+ New section". You will be asked to set a name for your new section. You can also set section colours, which is an optional attribute. The section colours will be displayed in the article reading mode in the Prenly Android, iOS, and Web Reader. The article will automatically be transferred to the new section. If the GUI does not reflect the change immediately, please reload.Article categoryBy default, your new article will be created as an Article category. If you have more types available to select from, you can select a new type from the article status bar.To add a new article category you have to be an owner of your Prenly Workspace and add new article types to the Prenly title.Common article content types are Article, Teaser, and Article part (e.g. sidebars or notes). Any article part can be further added as linked article content.Linked contentYou can add linked content to your article by selecting Linked in the status bar. A new modal will appear where you can select the content to add as linked content.Select the content you want to link. Your content will be sorted into article category type and thereafter article section; unfold the drop-down menu of the desired article category and select the content from the desired section by touching the content's name or the "+" symbol.When a linked content is added it will be removed from the article list and added as linked content to the parent article. The status bar will update to reflect that you have added new linked content to the active article. To edit the linked content, select the Linked in the status bar and from the drop-down menu select the linked article you want to edit.To remove a linked content select the Linked status bar and from the drop-down menu select "X" adjacent to the linked article content. If the removed linked content is no longer linked content to any articles within the publication it will return to the article list.Approve article to be available to publishTo be able to publish your article you will have to approve it to be publishable.By standard, when an article is first created, its status is set to "Draft". Prenly supports three statuses; "Draft", "Approved", and "Stopped". You are free to change an article's status via the status bar by selecting the drop-down menu for it.An article set as "Draft" is editable. If you want to edit an article you must first set it in "Draft".An article set as "Stopped" is uneditable and not publishable.An article set as "Approved" is uneditable and able to be published. To publish the current version of the article, however, you need to create a new publication version by selecting to publish your currently active version.Article versionsPrenly Editor will show the currently selected version of your selected article by default. You may select an older version (or a newer version) by selecting the three-dot menu in the status bar and in the drop-down menu select "History" followed by the version you want to set as the active article version.When you select to publish a new publication version, only the approved articles' current versions will be available for publishing. If you want to change which article is published you will first have to select in the article's History which version to publish, by selecting which article version is the current version.
-
Link Boxes Directly in Prenly Workspace
24 Oct 2025
How to Do It 1. Select a title Go to the "Titles" menu and choose the title you want to work with. 2. Open the desired page Under the "Pages" tab, select the page where you want to add a link box. 3. Open the menu Click the three dots in the top-right corner of the page. 4. Add a link box Select "Add URL box to page X" (where X is the page number). 5. Position the box Drag the edges of the box to adjust its size and placement. Use the small handles on the corners. 6. Confirm position Click "Done" once you’re happy with the placement. 7. Enter the link Fill in the URL where the user should be directed upon clicking the box. 8. Choose border style Decide if the box should: a) have a border b) have no border c) have a fading border 9. Set border color (optional) If you chose a border, you can specify its color. 10. Add a CTA button (optional) Enable a Call to Action (CTA) button if needed. You can customize: a) text b) icon c) size d) color e) position 11. Save Click "Save" to complete the process. Tip! You can also add link boxes by editing the PDF before importing the page into your issue.
-

How Svenska Dagbladet Goes Digital with Prenly’s E-Paper Platform
6 Jun 2025
How Prenly helps Svenska Dagbladet (SvD) access content wherever they are - without compromising on journalistic quality, depth or editorial values.Svenska Dagbladet is an institution in the Swedish media landscape - with deep roots in print journalism and a strong trust among its readers. When the newspaper wanted to strengthen its digital presence without compromising on content quality or identity, Prenly became the natural choice. Working closely together, we have found a way forward where tradition and innovation meet. Challenge: Svenska Dagbladet, one of Sweden's most respected daily newspapers, faced a key challenge: How to maintain the strength of its print heritage while meeting readers' growing digital expectations? Readers wanted access to content wherever they were - without compromising the quality, depth or editorial values of journalism. The solution SvD chose Prenly as its platform for the digital edition - a tool that enables content to be published, distributed and consumed with both precision and flair. Prenly's user-friendly interface allowed the editorial team to maintain its unique tone and layout in the digital format. The platform also supports a rich set of features such as video, audio and interactive graphics, opening up new ways to engage readers. The results Stronger digital footprint - without losing the editorial DNA that readers trust. App version appreciated for its accessibility, structure and interactivity. Readers can now access content on their own terms - when they want, where they want. For us at Prenly (Textalk Group), we are now taking a step in our relentless quest to make digital publishing both easier and more meaningful. "Textalk's robust and user-friendly Prenly platform allows us to maintain our editorial values while taking advantage of the opportunities of digital publishing," said a spokesperson from Svenska Dagbladet. Read SVD hereImage: SVD in Prenly Workspace