


Marketing
-

Activate vouchers for easy access to your apps
7 May 2026
The voucher function allows you to give readers temporary access to your content through redeemable voucher codes. These vouchers can be used for promotions, partnerships, giveaways, or temporary free access to your application. You can either: Create one shared code for all users (Generic Voucher) Generate individual codes for specific users (Unique Vouchers) How to Activate the Voucher Function Click Applications in the left-hand menu. Select the application you would like to add vouchers for. Go to Application settings. Scroll down until you see the Vouchers section. Toggle the function on. In the left-hand menu, go to Settings → Vouchers. Click New. You will now see two different voucher types: Generic VoucherEvery user redeems access using the same voucher code. Unique VoucherIndividual voucher codes are generated for each user. General Setup Steps The following settings are available for both voucher types: Name and DescriptionAdd an internal name and description for the voucher. PackageChoose which package the voucher should give access to. Find out here how to create packages → ApplicationSelect the application where the voucher will be valid. Valid for Days After RedemptionChoose how many days of access the reader should receive after redeeming the voucher. Max Number of RedemptionThis determines how many times in total the voucher can be redeemed. Redemption PeriodChoose the period during which the voucher can be redeemed. If a reader redeems the voucher on the last valid day, they will still receive access for the full number of days configured in Valid for days after redemption. After activation, the voucher can no longer be edited. However, it can still be terminated whenever needed. Setting Up a Generic Voucher CodeChoose the voucher code readers should use, for example: SUMMER26 Once everything is configured: Click Activate. Setting Up Unique Vouchers PrefixOptionally choose a custom prefix for the generated codes.If left empty, the prefix will be generated automatically. CodesChoose how many unique voucher codes should be generated. Once everything is configured: Click Activate and Generate.A download button will then appear.Click the button to download a CSV file containing all generated voucher codes. If you download the CSV file again later, you will also be able to see which codes have already been redeemed and which are still unused. Make Voucher Redemption Visible for Readers Web Application Go to applications and select menu, then choose web. Click add menu section and select Redeem voucher. You can change the menu name if wanted and select an icon. This adds the voucher redemption option to the menu of your web application. Native Apps (iOS & Android) In native apps, readers can redeem vouchers under Settings.
-

Startpage ads
13 Apr 2026
What is it? Home page ads allow you to display ads directly in your home page layout. These ads can be placed between your existing components as a natural part of the page. The content of the ad is defined via a script that controls what is shown to the user. How is it implemented? To create a homepage ad, go to Marketing in the left menu of Prenly Workspace and select Ads. Click on New and select New landing page ad. Name your ad Start by giving the ad a name. This is an internal name used only to help you identify and manage your ads. Where on the home page should the ad appear? Next, choose where to place the ad on the homepage. You can place it at the top, at the bottom or between existing components. If several ads are assigned to the same position, you can control their order by setting a priority. When should the ad be active? Specify when the ad should be displayed by selecting a start date and, if necessary, an end date. The ad will be automatically activated and deactivated based on this time range. Make sure to select the correct time zone. Ad content Next, specify how the ad will be displayed by pasting a script. This script determines the content of the ad. You can find a sample script at the bottom of the page. What are the sizes of your ad? You also need to specify the ratio between the height and width of the ad by entering one or more sizes. If only one size is specified, that ratio will be used on all devices and in all orientations. If multiple sizes are specified, the width will act as a breakpoint to customize the layout accordingly. (Recommended sizes are listed below.) In which applications should the ad be displayed? Finally, select the application where the ad will be displayed.When everything is ready, don't forget to switch the ad from inactive to active to make it visible. Example: Example script < script>(function () {var TAG = '[ta-ad]';console.log(TAG, 'script running');// Capture insertion anchor immediately - document.currentScript is the// reliable way to find "where this script tag lives" in most ad contexts.var anchor = document.currentScript;if (!anchor) {var all = document.getElementsByTagName('script');anchor = all[all.length - 1];}console.log(TAG, 'anchor:', anchor, 'parent:', anchor && anchor.parentNode);// Fontsvar preconnect1 = document.createElement('link');preconnect1.rel = 'preconnect';preconnect1.href = 'https://fonts.googleapis.com';document.head.appendChild(preconnect1);var preconnect2 = document.createElement('link');preconnect2.rel = 'preconnect';preconnect2.href = 'https://fonts.gstatic.com';preconnect2.crossOrigin = '';document.head.appendChild(preconnect2);var fontLink = document.createElement('link');fontLink.rel = 'stylesheet';fontLink.href = 'https://fonts.googleapis.com/css2?family=Merriweather:ital,opsz,wght@0,18..144,300..900;1,18..144,300..900&family=Playfair+Display:ital,wght@0,400..900;1,400..900&display=swap';document.head.appendChild(fontLink);// Styles (scoped under .ta-ad to avoid clobbering the host page)var style = document.createElement('style');style.textContent = ['.ta-ad{position:relative;width:100%;height:100%;min-height:200px;overflow:hidden;cursor:pointer;background:#333;}','.ta-ad .ta-ad-bg{position:absolute;inset:0;width:100%;height:100%;object-fit:cover;opacity:0;transition:opacity 1.5s ease-in-out;z-index:1;}','.ta-ad .ta-ad-bg.active{opacity:1;}','.ta-ad .ta-ad-text{position:absolute;left:10px;bottom:10px;right:auto;top:auto;z-index:2;display:flex;flex-direction:column;align-items:flex-start;gap:5px;margin:0;padding:0;font-family:"Merriweather",serif;font-optical-sizing:auto;font-style:normal;font-variation-settings:"wdth" 100;color:#fff;}','.ta-ad .ta-ad-text h1,.ta-ad .ta-ad-text h2{background:#000000b8;padding:9px 16px;display:inline-flex;margin:0;line-height:1.2;}','.ta-ad .ta-ad-text h1{font-size:4vw;}','.ta-ad .ta-ad-text h2{font-size:2vw;min-width:8.4vw;}'].join('');document.head.appendChild(style);// Markupvar container = document.createElement('div');container.className = 'ta-ad';container.addEventListener('click', function () {window.open('https://www.textalk.se', '_blank');});var img1 = document.createElement('img');img1.className = 'ta-ad-bg active';var img2 = document.createElement('img');img2.className = 'ta-ad-bg';var textWrap = document.createElement('div');textWrap.className = 'ta-ad-text';var h1 = document.createElement('h1');h1.textContent = 'This is a sample ad!var h2 = document.createElement('h2');textWrap.appendChild(h1);textWrap.appendChild(h2);container.appendChild(img1);container.appendChild(img2);container.appendChild(textWrap);// Insert where the script tag lives - unless the script is in // (some ad platforms inject creatives into, where nothing renders). // In that case, or if the anchor is missing, fall back to.function mount() {var parent = anchor && anchor.parentNode;var inHead = parent && parent.nodeName === 'HEAD';if (parent && !inHead) {parent.insertBefore(container, anchor);} else if (document.body) {document.body.appendChild(container);} else {//doesn't exist yet - wait for it.document.addEventListener('DOMContentLoaded', mount);return;}console.log(TAG, 'container inserted into', container.parentNode && container.parentNode.nodeName, 'size:', container.offsetWidth, 'x', container.offsetHeight);}mount();// rotationvar images = [img1, img2];var current = 0;function loadInto(idx) {var url = 'https://picsum.photos/1400/400?random=' + Date.now();console.log(TAG, 'loading image', idx, url);images[idx].onerror = function (e) {console.warn(TAG, 'image failed to load', idx, url, e);};images[idx].src = url;}function nextImage() {var next = (current + 1) % images.length;images[next].onload = function () {console.log(TAG, 'image loaded', next);images[next].classList.add('active');images[current].classList.remove('active');current = next;};loadInto(next);}images[0].onload = function () { console.log(TAG, 'image loaded 0'); };loadInto(0);setInterval(nextImage, 5000);// ClocksetInterval(function () {h2.textContent = new Date().toLocaleTimeString();}, 500);})();< /script>
-
Social sharing
24 Oct 2025
Under "application settings" you can enable "social sharing" and decide whether readers should be able to share unhindered or restricted. See the guide for how to set it up here. In this guide, we will show how your readers share articles or article spreads in the e-magazine. First, log in to the e-magazine either via the web or via the app. Then choose which edition you want to share the article/spread from. Once inside the edition, there is a menu in the middle -> click on the "three-dot menu" -> and then select "share spread" from the PDF mode. Here you get all the different ways and platforms you can share spreads or articles too. To share a specific article, click on the article you want to share so that you end up in "article reading mode". Then click on the "three-dot menu" again --> and then select "share article". Here are two examples of what it might look like. Select "share link" creates a URL that you can easily copy and send. Or, choose to share to "Facebook", and a pop-up box will appear where you can adjust the sharing text and to whom you want to share the article spread/article too. And that's how easy it is to share articles or spreadsheets ?
-
Automatic link and image to latest issue
24 Oct 2025
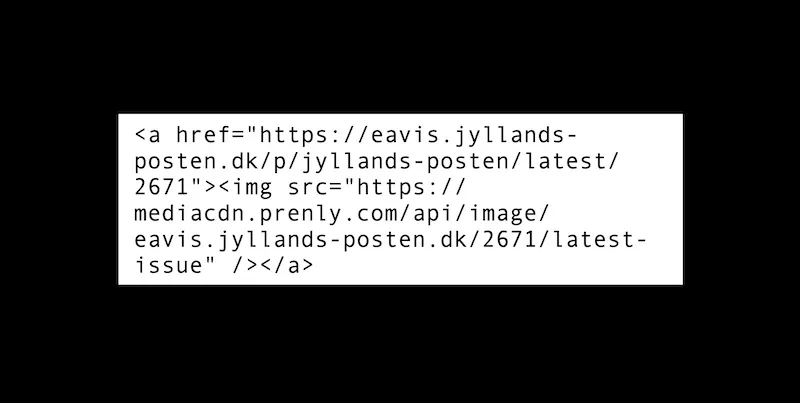
If you want to promote the latest issue of your e-magazine on your own website or in a newsletter, you can use our features to automatically link to the latest issue and display the cover of the latest issue.You can do this by inserting an HTML code on your website or in an email. You can easily customise the code by adding your own information.This is the html code to create an image of the latest issue with a clickable link that takes the visitor directly to it.*Be aware: Removed the space after "<" for the code to work. *< a href="https://{domain}/p/{title-slug}/latest/{title-id}">< mg src="https://mediacdn.prenly.com/api/image/{domain}/{title-id}/latest-issue" />< /a>You need to replace the variables in the code - title-id, title-slug and domain - with the ones that apply to your e-magazine.Example: If you want to use the code to display and link to the latest edition of Jyllands-Posten, use the following variables.{domain} =. "eavis.jyllands-posten.dk"{title-slug} = "jyllands-posten"{title-id} =. "2671"Which means that the full code is written like this:< a href="https://eavis.jyllands-posten.dk/p/jyllands-posten/latest/2671">< img src="https://mediacdn.prenly.com/api/image/eavis.jyllands-posten.dk/2671/latest-issue" /></a>The link and image will always point to the last published issue in a title. This means that you never have to change the link, but when a new edition is published, the block will automatically be updated.The domain, title-id and tile-slug can be found in the usual URL of any replica page in your e-paper. You can now easily generate your links using our GPT which takes one or more links to an opened edition and creates the links you need. Try it here!
-
Interstitial ads
24 Oct 2025
Interstitial ads are full-page ads that appear between the pages of the e-newspaper. You can create a new ad or manage an existing one at any time in Prenly Workspace. They are dynamically added to the e-newspaper without appearing in the PDF or in the print version of the newspaper. They are created and managed in Prenly Workspace. We also offer a premium service to make managing Interstitial ads easier. In this case, they are created and managed within our service and inserted into Prenly Workspace as HTML ads—one version for portrait orientation and one for landscape. Learn more about this service and sign up at ctabtn.comRequirements HTML. The minimum requirement for Prenly to display your ad is to include an image tag in HTML within the ad content configuration. HTTPS. For security reasons, your ad image source must use HTTPS for the ad to be displayed in your e-newspaper. ClickableAd. If you want your ad image to be clickable for readers, you need to wrap the image tag in a link tag. You can use scripts from external ad servers such as Google Ad Manager to dynamically display in-article ads, but keep in mind that this type of advanced integration requires thorough testing. For this purpose, we have developed a number of features described further down on this page. Here’s how to do it In the left-hand sidebar of Prenly Workspace, select “Marketing” and then “Ads.” 1. Create a new in-feed ad by selecting “New.” 2. Name your ad. Readers won’t see this name; it’s only used so you can find your ad among the others in the ad list in the future. 3. Specify on which page(s) your ad should appear. If you want to select multiple pages, separate them with commas. The ad will appear after the specified page and before the next spread is displayed. 4. Select the date range during which the ad will be displayed. You can choose to specify a start date and keep the ad active indefinitely, or select a specific date range by entering a start and end date. If you choose the latter, the ad will become inactive after the specified end date. Otherwise, you’ll need to visit the ad again to deactivate it. 5. Enter valid HTML in the form of an image tag. Material Specifications Portrait format: 1100 × 1700 pxLandscape format: 1700 × 1100 pxImage format: JPG, PNG, or GIF, max 500 kBVideo format: MP4 (H.264)Delivery: All media must be hosted on HTTPS Upload the material directly to ctabtn ( if you have an account) or provide an external link to the image or video. Both images and videos are supported. If landscape material is not available, the portrait version will be used even in landscape orientation, but we recommend submitting both formats. Choose whether you want a different image for portrait and landscape orientations. You must specify one of these, but only one is required. For example, if you choose to provide content for portrait mode but omit landscape mode, Prenly will use the samecontent to display your ad regardless of whether the reader is viewing in portrait or landscape mode. To create a clickable ad image—meaning readers can click on the image and be taken to the desired ad destination—you also need to include a link tag () that wraps around your image tag. The link destination (the href attribute)mustuse HTTPS for security reasons. What is HTTPS? HTTPS is encrypted communication with web addresses, and the protocol is specified as "https://". Comparehttp://example.com/ andhttps://example.com/. Many web browsers display a padlock icon in the address bar to indicate that it is an HTTPS connection. Why is HTTPS required? For security reasons, Android can only open secure links; therefore, all links that leave the e-newspaper must use HTTPS, even if you only have a web app. This also provides a more secure experience for your readers. To display a dynamic ad—one that, for example, changes its content—you need to use JavaScript. JavaScript is accepted,butthe script must return an `img` tag and, if applicable, a surrounding `link` tag when executed. Prenly willnotvalidate your HTML code. We recommend that you test your code on an HTML page. Sample code for an image: Portrait: < img src="{INSERT-IMAGE-SRC}" alt="Advertisement" width="1100" height="1700" style="display: block; width: 100%; max-width: 100vw; max-height: 100vh; object-fit: contain; margin: 0 auto;" > Landscape: < img src="{INSERT-IMAGE-SRC}" alt="Advertisement" width="1700" height="1100" style="display: block; width: 100%; max-width: 100vw; max-height: 100vh; object-fit: contain; margin: 0 auto;" > You can experiment with different ad sizes to find what works best. We recommend that they match your format. Sample code for video (mp4): H.264-encoded videos are required to work in Safari. Specify image-related content for the ad. Use ctabtn.com to create ads One-time campaign: Create a campaign in ctabtn, copy the code, and insert it as an interstitial ad in Prenly Workspace. This is suitable when a campaign is to run for a limited period. Recurring campaign space (recommended): You create a campaign space in ctabtn and insert its code once in Prenly Workspace. After that, you manage everything in ctabtn: which campaigns will appear in the space, when they start and end, and how they should be distributed when multiple campaigns are active at the same time. You do not need to go back into Prenly Workspace. Here’s how to do it in Prenly Workspace: Create the campaign or campaign space in ctabtn.com and copy the code for portrait and landscape orientations, respectively. Follow steps 1–4 above. Paste the code for portrait orientation into the portrait field and the code for landscape orientation into the landscape field. Activate the ad and save. Always check the result in the app or browser after publishing. If you change the creative, target URL, or display orientation for a single campaign in ctabtn, you must copy the new code and replace it in Prenly Workspace. If you’re using a recurring ad slot, the code never needs to be replaced. When no campaign is active in the ad space, the ad codeautomaticallycallswindow.PrenlyAd.collapseAd(). The Prenly app then hides the entire ad space so that the reader never sees an empty space. Therefore, keep the recurring ad active in Prenly at all times. Title ControlA campaign can be limited to one or more titles. If the field is left blank, the campaign will appear in all titles where the ad space is present. Statistics are also reported by title, so you can see where the campaign performs best. Consent and PrivacyThe ad code reads the reader’s consent via window.PrenlyUserConsent(CMP). The ad is displayed regardless of consent—even if the reader has not consented to ad tracking, the ad will still be displayed, but the statistics are collected anonymously and in aggregate. No TC strings, cookies, or identifiers are stored for individual readers. Statistics and ReportsFor each campaign, the number of impressions, number of clicks, and click-through rate are measured—both in total, by month, and by title. Each campaign is reported separately, even when multiple campaigns share the same ad space. You can also send reports directly from ctabtn to any email addresses—either on a one-time basis or automatically every week or month. The report shows the campaign name, where it was displayed, the number of impressions, and the number of clicks. Common Mistakes That Can Occur on ctabtn.com The material has been updated in ctabtn, but the old code remains in Prenly Workspace. Only portrait-oriented content has been added, which results in a poor display in landscape mode. The image is larger than 500 kB, which causes the ad to load slowly. Content hosted on HTTP instead of HTTPS is not displayed in the app. Using JavaScript from an ad server If you use JavaScript from an ad server, you can take advantage of some additional features that were developed for the web browser in May 2025 and are included in the iOS app starting with version 14.1.1 and in the Android app starting with version 12.10.0. As of May 2025, these new features are being used by a publisher who uses Google Ad Manager, and it is up to you to ensure that your integration works properly. The new extensions allow the ad script to capture the user’s consent settings in the PrenlyUserConsent object. And with the PrenlyAd object, you can instruct the app to hide an unbooked ad and capture data about the base URL and ad title. See the technical description at the bottom of this page. 6. Select the application(s) that will display the ad. 7. Select which titles within each selected application should display the ad. 8. Select "Save" to save your settings. If you cannot save after the last setting, you have missed a setting. Look for a red dot on the right-hand side and continue configuring the settings from that section. 9. Activate your ad using the toggle at the top. If the ad is inactive, you will activate it; if the ad isactive, you will deactivate it. An active ad will be sent to your e-newspaper and, based on your settings, will be displayed to your readers in newspaper reading mode. An inactive ad will not be displayed to readers when they swipe past the selected newspaper page. Example of an active ad. 10. Remove ad. To delete a selected ad, tap the three-dot menu in the top-right corner and then select “Delete Ad.” The ad will be deleted from Prenly Workspace and deactivated in your e-newspaper if the ad wasactive prior todeletion. Integration with external ad systems It’s possible to dynamically load in-article ads from external ad systems via JavaScript. This requires a good understanding of your ad system and its capabilities, as well as knowledge of JavaScript, and may not work for everyone. PrenlyAd The PrenlyAd object contains the "collapseAd" function, which you can use in your script to instruct the app to hide an ad slot when the ad system cannot deliver an ad. Instead of displaying an empty ad slot, the entire ad area is hidden. You can retrieve the "baseUrl" and "titleSlug" from the ad’s position in the e-newspaper to create a virtual URL in your script that you can use to target your ad from the ad system so that it appears under a specified title in the app. Example of how to create a virtual URL that can be used for targeting. url = window.PrenlyAd.baseUrl + "/p/" + window.PrenlyAd.titleSlug; window.PrenlyAd= { collapseAd: function // function that should be called to notify the native app that the ad is collapsed titleSlug: string // title slug that identifies the title associated with the interstitial ad baseUrl: string // base URL of the app} PrenlyUserConsent You can use the PrenlyUserContent object to retrieve the user’s consent settings and, based on those, determine whether to load dynamic ads from a third party (if the user has consented to ads) or internal static ads (when consent is not given). The object contains parameters to pass along the user’s selections from the CMP dialog and the TC string, if available. In cases where the iOS app has an ATT (App Tracking Transparency) prompt—which is sometimes required by Apple—the "att_granted" parameter is included. window.PrenlyUserConsent= { cmp: string, // CMP module name cmp_vendor_grants: dictionary, // dictionary containing vendor grants info if available cmp_purpose_grants: dictionary, // dictionary containing purpose grants if the CMP provider supports it prenly_purpose_grants: dictionary, // only available if the app uses Prenly CMP as the provider tc_string: string, // TC string if the CMP provider supports it att_granted: boolean // only if the app has ATT configured } Support Questions about in-app ads and ctabtn:hello@prenly.com
-

Create/send push notification
24 Oct 2025
From Prenly Editor, you can send an unlimited number of push notifications to your reader's iOS- and Android devices. This article will help you get started. When a user clicks on a push notification, the app opens and displays the page you set up when you created the push notification in Prenly Work Space. How to send a push notification Click on the drop-down menu "Marketing" and select "Notifications" Here, you can choose between a one-time push notification or a recurring push notification. Recurring notifications are useful for content such as “New issue available,” weekly highlights, or ongoing campaigns. Select "New" 1. Name your push notification Name your push notification to make it easier to search for it later. This name will not be visible to the user. Tip! With the tab key on your keyboard, you can easily jump to the next field, for example from "Name your push notification" to "Which applications should the push notification be sent to". 2. Select which application(s) the push notification should be sent to Since your notification can be sent to multiple applications, you need to choose which application(s) will deliver your push notification. If you choose to send the push notification to more than one application, in the next step you will only be able to choose to open the application itself, not for example a specific issue or article. 3. Select what the push notification should open Select what the push notification should open when the user clicks on it. There are five possible choices: App, Tab, Publication, Article, Page. If the user has not updated their app (iOS app version 12.3.0 or later and Android app version 11.14.0 or later), the user will receive your push notification as if it was sent as open as App. If you are unsure what app version you have for your app, visit the App Store and Google Play and search for the app, where you will find the latest published app version number. App If you choose App, simply the application itself will open. Tab If you choose Tab, a new menu will appear where you can select which tab in the application should be opened. If you choose a tab that displays content from a web domain, you also have the option to enter a specific address, for example to an article. Note that the article needs to be on the same web domain as the tab is set to display. That is, the article you want to show must be available on the same domain as the one pre-filled in the field. If you just want the tab to open, you can simply leave the specific URL field blank. Publication If you choose Publication, you first need to select which Title you want to send the push notification to, and then which publication should be opened. Article If you choose Article, you first need to select Title, then Publication, and then which article should be opened. Page If you choose Page, you first select Title and Publication, and then which page should be opened. 4. Adjust your audience If you have set up topics, you can target push messages to readers with specific interests. Your readers can subscribe to any of these topics in their mobile apps. You can create and manage topics by going to Applications, selecting your application, and navigating to Push Notification Topics. 5. Write your message Write your message. Keep the message under 160 characters to ensure readability on older devices. Feel free to use emojis as these can help you achieve a higher open rate. getemoji.com 6. Set the time for sending the push notification The final step is to set the time for when the push notification is to be sent. You can choose a specific date and time, or click on 'Send Now' if you want it to be sent immediately after approval. 7. Set an end date for your message [only for recurring notification] For recurring push notifications, you can choose to continue the delivery indefinitely or set a specific end date. Change the "Draft" toggle button to "Approved for delivery" Good work! You have now scheduled your first push notification! See previous push notifications To find a started or completed push notification, you can use the search mode and enter either the name of your push notification, the date or time you've chosen to have the push notification sent, or the current status - for example "Approved for delivery" or "Sent ". Delete a push notification By clicking on the "three dot menu" in the upper right corner and then on "Delete", you can delete your notification.
-

Marketing link
24 Oct 2025
Create a sharing link for a specific publication. This is perfect for newsletters, social media campaigns, or “try it out” promotions. Please note that the marketing links can only be openend in the web app. How to do it: Go to Titles and find the publication you want to share. Click the three dots next to it and select Share. Market the publication by selecting "..." and thereafter "Share". You’ll see two options: The first option Market publication can be used to copy the web address (URL) to the publication, even if it has not yet been published. This option can be for instance used to prepare a newsletter, or create a QR code for an upcoming event. Note: This link does not give free access to users without a subscription. Select "Copy" to copy the publication's public URL. To give free access, use the second option Give access to publication and click Create link.It is possible to rename links so they are easy to distinguish —e.g. Christmas gift campaign 2025. Simply select copy and share the link with your readers (newsletter, social media, direct messages, etc.). You can deactivate the link anytime, for example when the campaign ends. See what status the link is in (be it active or inactive) in the column "Status" in the tabular view. Select the link to deactivate and then "Deactivate" to deactivate the link. Below you can see a deactivated link. Readers who used to be able to access the publication without subscription via the link will now require a subscription to read the publication again. A deactivated link can not be further used to bypass the subscription requirement of the publication.